Pumpkin Bread (Chocolate Chips optional)

October has been unseasonably warm (and smoky) here in the Pacific Northwest but that hasn’t stopped our minds from moving toward cozy fall foods like pumpkin bread and hot apple cider. Anne loves this recipe for pumpkin bread and makes it every fall. It has a delicately crisp crust when fresh from the oven and is deliciously soft the following days.

Anne likes to make the pumpkin puree from scratch, but mostly just to make roasted pumpkin seeds and fill the house with pumpkin scented steam. If you don’t want to make the pumpkin puree from scratch you can use canned pumpkin. We recommend you make sure you are getting canned pumpkin or canned squash and not pumpkin pie filling. The cans can look similar, but pumpkin pie filling usually has spices and sugar in the can which would change the taste of the end product.

Anne always makes this in a bundt pan. If you don’t have this, feel free to use a different pan but know the timing will likely be slightly different. If you try it in another pan and it goes well feel free to share in the comments what timing you used and any tips for your pan.

We are planning to take November and December off from posting to get in a little recharge. We are excited to get back to sharing recipes with you again January 3rd.

Pans required: bundt pan

Serves: 8-12

Time: 1 1/2 hours (1/2 hour active)

Ingredients

1 cup oat flour

2 cups white flour

2 tsp baking soda

2 tsp cinnamon

1/2 tsp salt

4 eggs

1 cup neutral oil, like sunflower, safflower, or vegetable

1 cup coconut sugar

2 cups winter squash puree

1 cup plus a sprinkle chocolate chips (optional)


Preheat oven to 325 F.

Mix the oat flour, white flour, baking soda, cinnamon, and salt in a medium bowl. Mix the remaining ingredients other than the (optional) chocolate chips in a large bowl. Stir the dry ingredients into the wet ingredients until mostly combined. Add the chocolate chips and stir until the white powder of the flour just disappears. Don’t overmix or your gluten can get very chewy. Pour into an oiled Bundt pan and bake 1 hour.

Allow to cool for about 10 minutes before carefully inverting the cake onto a serving plate. Delicious hot or cooled completely.

Chocolate Cake with Strawberry Icing

Happy Spring and Happy Birth to Virginia Jean Giopponi, we’re so excited to meet you <3<3<3 We love this chocolate cake with strawberry icing so much. If you love it, you might also really enjoy our chocolate cake with hazelnut frosting.

We have not yet tried a gluten free version of this although we love this gluten-free cake mix, and it would be great with our strawberry icing. While the box mix says cupcakes, it also works great in a cake pan. To make this recipe you would likely want to have two boxes so you could have the two tier cake with frosting in-between.

Pans needed: 2 6-inch round cake pans (if you only have one you can make this in batches it will just take twice as long).

Serves: 4-6 servings

Time: 1 hr

Ingredients

For the cake:

3/4 cup + 2 tbsp all purpose flour

3/4 cup coconut sugar

1/4 cup + 2 tbsp cocoa powder, plus extra for powering the pans

1 tsp baking soda

1/2 tsp baking powder

2 tsp vanilla powder (option to replace with vanilla extract)

1/2 tsp salt

1 room temperature egg

1/2 cup almond milk

1/2 tsp apple cider vinegar

1/4 cup neutral oil

1/2 cup hot coffee

For the icing:

3/4 cup soaked cashews

2 dates

squeeze of lime juice

Lime zest

1 tsp vanilla powder (option to replace with vanilla extract)

3/4 cup pureed strawberries (about 8 large strawberries), plus extra strawberries for topping the cake

1/4 tsp - 1 tsp agave (depending on your sweetness preference)

1/4 tsp salt

up to 1/2 water depending on how thick you want the icing to be. Less water is more fudgy, more water is fluffier. The puree is pretty wet so you may not need any water at all

This cake can be made by hand or with a mixer. We use a mixer because we have one.

Pre-heat the oven to 350 F and make hot coffee. Brush oil into your cake pans and add 1 tbsp of cocoa powder and shake until bottom and sides are coated. Mix the dry ingredients (flour, sugar, cocoa powder, baking soda, baking powder, vanilla powder, salt). In a separate bowl or in a 2 cup liquid measuring cup combine the almond milk, apple cider vinegar, neutral oil, and the egg. Break the yolk up, but no need to whisk the egg. Add this to the dry ingredients and mix until just combined, careful not to over mix. While you are stirring, add the hot coffee and watch it transform into liquid, smooth, velvety cake batter.

Divide the batter between the two cake pans as equally as possible. Bake in a pre-heated oven for about 30 minutes or until you can touch the center of the cake and it bounces back, however it should not be firm and should still have a slight wobble to it. Remove from the oven and let the cakes cool for about 5 minutes.

Wearing hot mitts, pick up the cake and tilt to about 45 degrees. Using the palm of your hand (in the hot mitt) pat the side of the cake pan and then turn the cake pan. Repeat this until you’ve tapped all the way around the pan. Next turn the pan upside-down, turning the cake onto a wire rack, clean counter top, or plate. Then lift the pan off of the cake. Flip your cake over so that the cake is right side up and let it cool completely before frosting.

Drain your cashews and add them, with the rest of the icing ingredients, to the bowl of a food processor. Blend, scraping down regularly until you have a smooth creamy icing. If you find you need to add water, add it 1 tbsp at a time until you have the consistency that you like. The less water you use the more dense it will be, the more water you add the more fluffy the icing will be.

Once your cakes have cooled, place the first cake onto a plate. Using a serrated knife, cut the rounded top of the cake off, just enough to create a flat surface. Generously spread icing onto the top of the first layer. Put the second layer on top, cutting off the top for a cleaner look or leaving it on for a rounded top. Spread icing over the top and sides. To get a smooth finish on your icing, use an icing spatula or knife to spread the icing onto the cake. In between strokes, wipe the icing off the spatula or knife and rinse in hot water. The hot knife will smooth the icing more effectively and stop the knife from creating a peak when you lift it off the icing.

Optionally top the cake with fresh cut strawberries. Cut into slices and enjoy!

Spring Rolls

Spring rolls are one of our go to meals because we can use up any veggies we have in the fridge! It does take a while to roll these, especially when you are new to it. However we have now become faster at this and deeply enjoy it.

In this recipe we chose not to list specific amounts of vegetables as we will often cut up a lot of veggies and then wrap up as many as we feel like eating. We often wrap more the next day when we want to eat more. Additionally, because we use this to clean out the veggies we have in our fridge, we use this as a template and then adjust how much of each vegetable we use. For example, we have cabbage heavy spring rolls if we have lots of cabbage and not a lot of carrots, etc.

processed_20210628_181122.jpg

Prep time: 20 minutes, total time depends on how fast you are at wrapping and how many you make.

Serves: we didn’t write this recipe with a specific portion size in mind, feel free to make as many as please you. If you are new to this, start small and then size up from there.

Ingredients

Spring roll wrappers

lettuce

grated carrot

sliced cabbage

mint leaves

basil leaves

bean sprouts

for the scrambled egg:

4 large eggs

1/4 cup almond milk

1 tsp garlic powder

1 tsp salt

1 tbsp nutritional yeast

for the sauce:

1/4 cup avocado oil

1 inch ginger

2 cloves garlic

1/2 cup almond butter

2 tbsp tamari

2 tbsp coconut aminos

1 tsp sriracha


Whisk all the “for the scrambled eggs” ingredients in a small bowl. Preheat a large frying pan with some olive oil to medium or medium high heat. Pour in the egg and scramble to your liking.

Rinse the lettuce, pat dry, and tear into 3 inch long rough ovals. Grate carrots. Thinly slice cabbage. Rinse mint and basil and remove leaves from stems. Rinse bean sprouts.

To make the sauce, start by mincing garlic and ginger. Heat a pan to medium high with oil and add the garlic and ginger. Cook, stirring constantly, until they are fragrant. Either turn off the heat (if using electric stove) or turn the heat very low (if using gas stove). Then add the almond butter and stir until it melts into the oil and becomes soft and liquid-y. Add the tamari, coconut aminos, and sriracha. Stir, put in a bowl, and set aside.

Next, make a spring roll station. Fill a wide shallow pan with 1/2 inch water. Using cold water the spring roll wrappers will take longer to soften, hot water makes the softening process faster. Make this choice based on how much time you want to roll the spring rolls. For example, if you want to move at a slower pace, cold water could be a good option. If you want to and are able to fill and wrap quickly, hot water is a good choice.

Next to the water, clear a surface to roll on. We like to do this on a large wooden cutting board. Then next to the cutting board place a large plate to put the finished spring rolls. Along the top and sides of this set up, place all of the fillings you prepared above (except the sauce) for easy reaching!

To roll, soften a rice wrapper by fully submerging in the water. Most spring roll wrappers have a subtle raised texture on one side. Once the wrapper has mostly lost its surface texture it is soft enough to work with. It should be soft enough to work with but not so soft that it sticks to everything a ton/breaks easily. Experiment until you find something that feels easy(ish) to work with. At first this task might feel challenging however it gets easier with practice. Once it is soft enough, spread this in front of you on the cutting board. If you’ve spread it on the cutting board and realize it isn’t soft enough you can wait 30 seconds or a minute as it will continue to soften — running your finger along it will help. Also note if it is very soft it will continue to soften as you assemble the ingredients so if you are slow to put all the ingredients on the wrapper you will want to pull it out less soft to account for that time. As you get fast at layering the ingredients you can work with a softer wrapper since it won’t sit there as long.

At the bottom, we have a video of how to roll these, and we will also describe it here: place a piece of lettuce in the center of the wrapper. Then make a log shaped pile of cabbage on top of the lettuce. Add pieces of scrambled of egg on top of the cabbage. Then add a couple of bean sprouts and then the grated carrot. Add mint and basil leaves across the top. Lift the part of the wrapper closest to you and fold up over your pile of vegetables. Fold in each side. Then roll away from you until completely rolled. Then place on plate and start another one!

Serve with sauce and enjoy!

Pierogies

This recipe makes a whole mess of pierogis.  After boiling them, if you want to freeze them, you can do this on a greased cookie sheet or a piece of parchment paper. Then once frozen, transfer to a plastic freezer bag. Do not freeze them all together in one bag without first freezing on a cookie sheet or they will clump together and be impossible to separate.

Our favorite way to cook them from frozen is to fry in a pan on medium heat and they get a bit crispy on each side.

In these photos, we served the pierogis with roasted broccoli, caramelized onions, and some vegan butter. That’s not included in this base pierogi recipe, but it is delicious! Would love to hear what you serve these with in the comments.

Serves: about 10

Time: 2 hours

Ingredients

For the Pasta Dough:

3 cups all purpose flour plus more for dusting

1 cup water

1 egg

2 tsp olive oil

1 tsp salt

For the Potato Filling:

1 3/4 lb Idaho potatoes

1 head of roasted garlic

salt


If you haven’t roasted the head of garlic, do so now. Pre-heat the oven to 350 F. There are many ways to roast garlic. Anne cuts the top of the head and pours some olive oil over the garlic and then puts this in a garlic roaster in the oven (if you don’t have a garlic roaster you wrap the head in tin foil). Camille peels the garlic cloves and puts them in a cast iron pan with olive oil and puts the pan in the oven to roast. Roast the garlic until golden brown (about 20 minutes if the garlic is bare in a cast iron pan and about 40 minutes in a garlic roaster).

Peel the potatoes (we don’t often peel potatoes, but for this recipe it makes the texture more delightful for us) and cut into large chunks. Boil the potatoes in a pot of very salty water until tender. Once tender, strain and mash in a bowl with the roasted garlic and season with salt.

While the potatoes are boiling, put the flour and salt from the dough ingredients in a large shallow bowl.  Make a well in the center and put water, egg, and oil in well.  Mix the liquid into the flour slowly until a ragged ball forms.  Knead the dough on a flour dusted surface for about 8 minutes, until smooth, elastic, and supple, dusting with flour as needed to prevent sticking.  Overturn a bowl on the dough and let sit for 20 minutes.


To shape the Pierogis:

Fill a large pot with water and put it on the stove on high to boil.

Roll out the dough until thin on a cutting board dusted with flour (if you are lucky enough to own a pasta roller this is when to use it). Cut rounds about 3" in diameter (I use a cookie cutter, but a wine glass would work as well).  Put between one half and one tsp of potato filling in the center of each round. Wet the edge of the dough with a wet finger. Fold the dough over the potato, forming a pocket and tuck the corners in. Seal closed with your fingers and then crimp the edges with a fork. Once all the pierogis are shaped, drop them one at a time into the boiling water, about ten pierogis can cook at once.  Stir the pot with a slotted spoon once at the beginning of cooking to prevent sticking, and allow to cook about 3 minutes.  The pierogis should be floating when you remove them from the water.  Drain them.

Note: if it feels good to you, you can also start cooking some of the pierogis before you’ve finished shaping so that you are shaping and cooking pierogis at the same time. If this feels hard, feel free to ignore.

Now you can freeze these for later, or cook up whatever you want to serve with them and enjoy!

Orange Chocolate Cupcakes

If you are gluten free, you can substitute the Simple Mills chocolate cupcake mix and add 1 tsp of orange extract, in addition to the ingredients it already calls for, into the batter. Note: we prefer to make this mix with just two eggs not the three that it calls for. Then frost as usual and enjoy a gluten free version of these delights!

Makes: 12 cupcakes

Time: 1 hr

Ingredients

For the cupcakes:

3/4 cup + 2 tbsp all purpose flour

3/4 cup coconut sugar

1/4 cup + 2 tbsp cocoa powder

1 tsp baking soda

1/2 tsp baking powder

1 tsp vanilla powder (option to replace with vanilla extract)

1 tsp orange extract

1/2 tsp salt

1 room temperature egg

1/2 cup almond milk

1/2 tsp apple cider vinegar

1/4 cup neutral oil

1/2 cup hot coffee

For the icing:

3/4 cup soaked cashews

4 dates

1 tsp orange extract

1 tsp orange zest

1/4 tsp - 1 tsp maple syrup (depending on your sweetness preference)

1/4 tsp salt

1/4 cup orange juice depending on how thick you want the icing to be. Less liquid is more fudgy, more liquid is fluffier.


These cupcakes can be made by hand or with a mixer, however we use a mixer because we have one.

Pre-heat the oven to 350 F and make hot coffee. Either grease the cupcake pans with some neutral oil or line with silicone or paper cups. We like to use silicone cupcake cups in our cupcake pan because they make cleanup easier and you don’t have to throw them away every time. Paper cupcake cups work to line the cupcake pan as well.

Mix the dry ingredients (flour, sugar, cocoa powder, baking soda, baking powder, vanilla powder, salt). In a separate bowl or using a liquid 2 cup measuring device combine the almond milk, apple cider vinegar, neutral oil, orange extract, and the egg. Break the yolk up, but no need to whisk the egg. Add this to the dry ingredients and mix until just combined, careful not to over mix. While you are stirring add the hot coffee and watch it transform into liquid smooth velvety cake batter.

Divide the batter between the cupcake cups as equally as possible. Bake in pre-heated oven for about 22 minutes or until you can touch the center of the cupcakes and it bounces back, however it should not be firm and should still have a slight wobble to it. Remove from the oven and let the cupcakes cool for about 5 minutes. Then transfer them out of the pan onto a cooling rack, if you have one, otherwise the counter or a plate works just fine.

Drain your cashews and add them, with the rest of the icing ingredients, to the bowl of a food processor. Blend, scraping down regularly until you have a smooth creamy icing. For the orange juice, start with 1/4 cup and then add the orange juice 1 tbsp at a time until you have the consistency that you like. The less liquid you use the more dense it will be, the more liquid you add the more fluffy the icing will be.

Spread the icing on the cupcakes,

Enjoy!

Spinach Waffles and Eggs

We love these waffles for breakfast, lunch, and dinner! Although the recipe is written for spinach, feel free to use kale, collards, chard, or beet greens and if you have less than the recipe calls for that’s fine — we love it with 2 cups and it’s equally delicious with 1 cup.

processed_20210530_184823.jpg
processed_20210530_184845.jpg

Serves: 4

Time: 1 hr

Ingredients

1/2 lb cremini mushrooms

black pepper

olive oil

For the waffles:

1 cup all purpose flour (optional Gluten Free: We recommend Minimalist Baker’s Flour Mix with Xanthan Gum)

1/2 cup oats blended to a rough flour (gf option, option to use oat flour)

1 tbsp baking powder

1 tbsp coconut sugar

1/2 tsp salt

3 eggs

1/2 cup olive oil

1 1/2 cup almond milk (or non-dairy milk of your choice)

2 cups chopped spinach

For the scrambled eggs (substitute tofu if you like):

4 large eggs

1/4 cup almond milk

1 tsp garlic powder

1 tsp salt

1 tbsp nutritional yeast

Serve with:

Sriracha (optional)

Almond ricotta (We like Kite Hill)

Vegan butter (We like Miyoko’s) (optional)

Maple syrup (optional)


Preheat waffle iron.

Mix the dry ingredients for the waffles in a large bowl. Mix the eggs, olive oil, and non-dairy milk in a smaller bowl. Make a well in the center of the dry ingredients. Pour the wet ingredients into the dry ingredients. Stir to just combine. Add the spinach to the batter and fold in. Leave to rest while the waffle iron preheats. When it is hot start making waffles. Anne’s waffle maker makes two large waffles with four quarters with this amount of batter. Their waffle iron does not need be greased, but feel free to add oil if yours needs it. These waffles may take longer to cook than a standard waffle because the spinach releases a lot of liquid. We like to check on our waffles once the steam dissipates, but we often cook them longer because we like a crisp waffle.

While the waffles are cooking, cut the mushrooms into thin strips and sauté with some olive oil for about 15 minutes until soft and slightly browned. In the last five minutes of cooking, pepper the mushrooms generously.

Scramble as much egg as you need for the current meal, we like an egg per serving. Whisk all the “for the scrambled eggs” ingredients in a small bowl. Preheat a large frying pan with some olive oil to medium or medium high heat. Pour in the egg and scramble to your liking.

Anne and Camille assemble this in different ways. Feel free to try one of ours, or make your own!

Anne skips the butter and layers the waffles with first mushrooms, then the scrambled eggs, and then sprinkles the ricotta cheese and tops with hot sauce. This gives a spicy/creamy effect as the hot sauce and the cheese interact.

Camille butters the waffles, then spreads the ricotta cheese thickly on top of that and tops with mushrooms and eggs. She often skips the hot sauce and sometimes tops with maple syrup. This is a buttery, creamy, sweet, and savory experience.

We would love to hear some of your creations in the comments. Enjoy!

Harvest Salad with Creamy Dressing

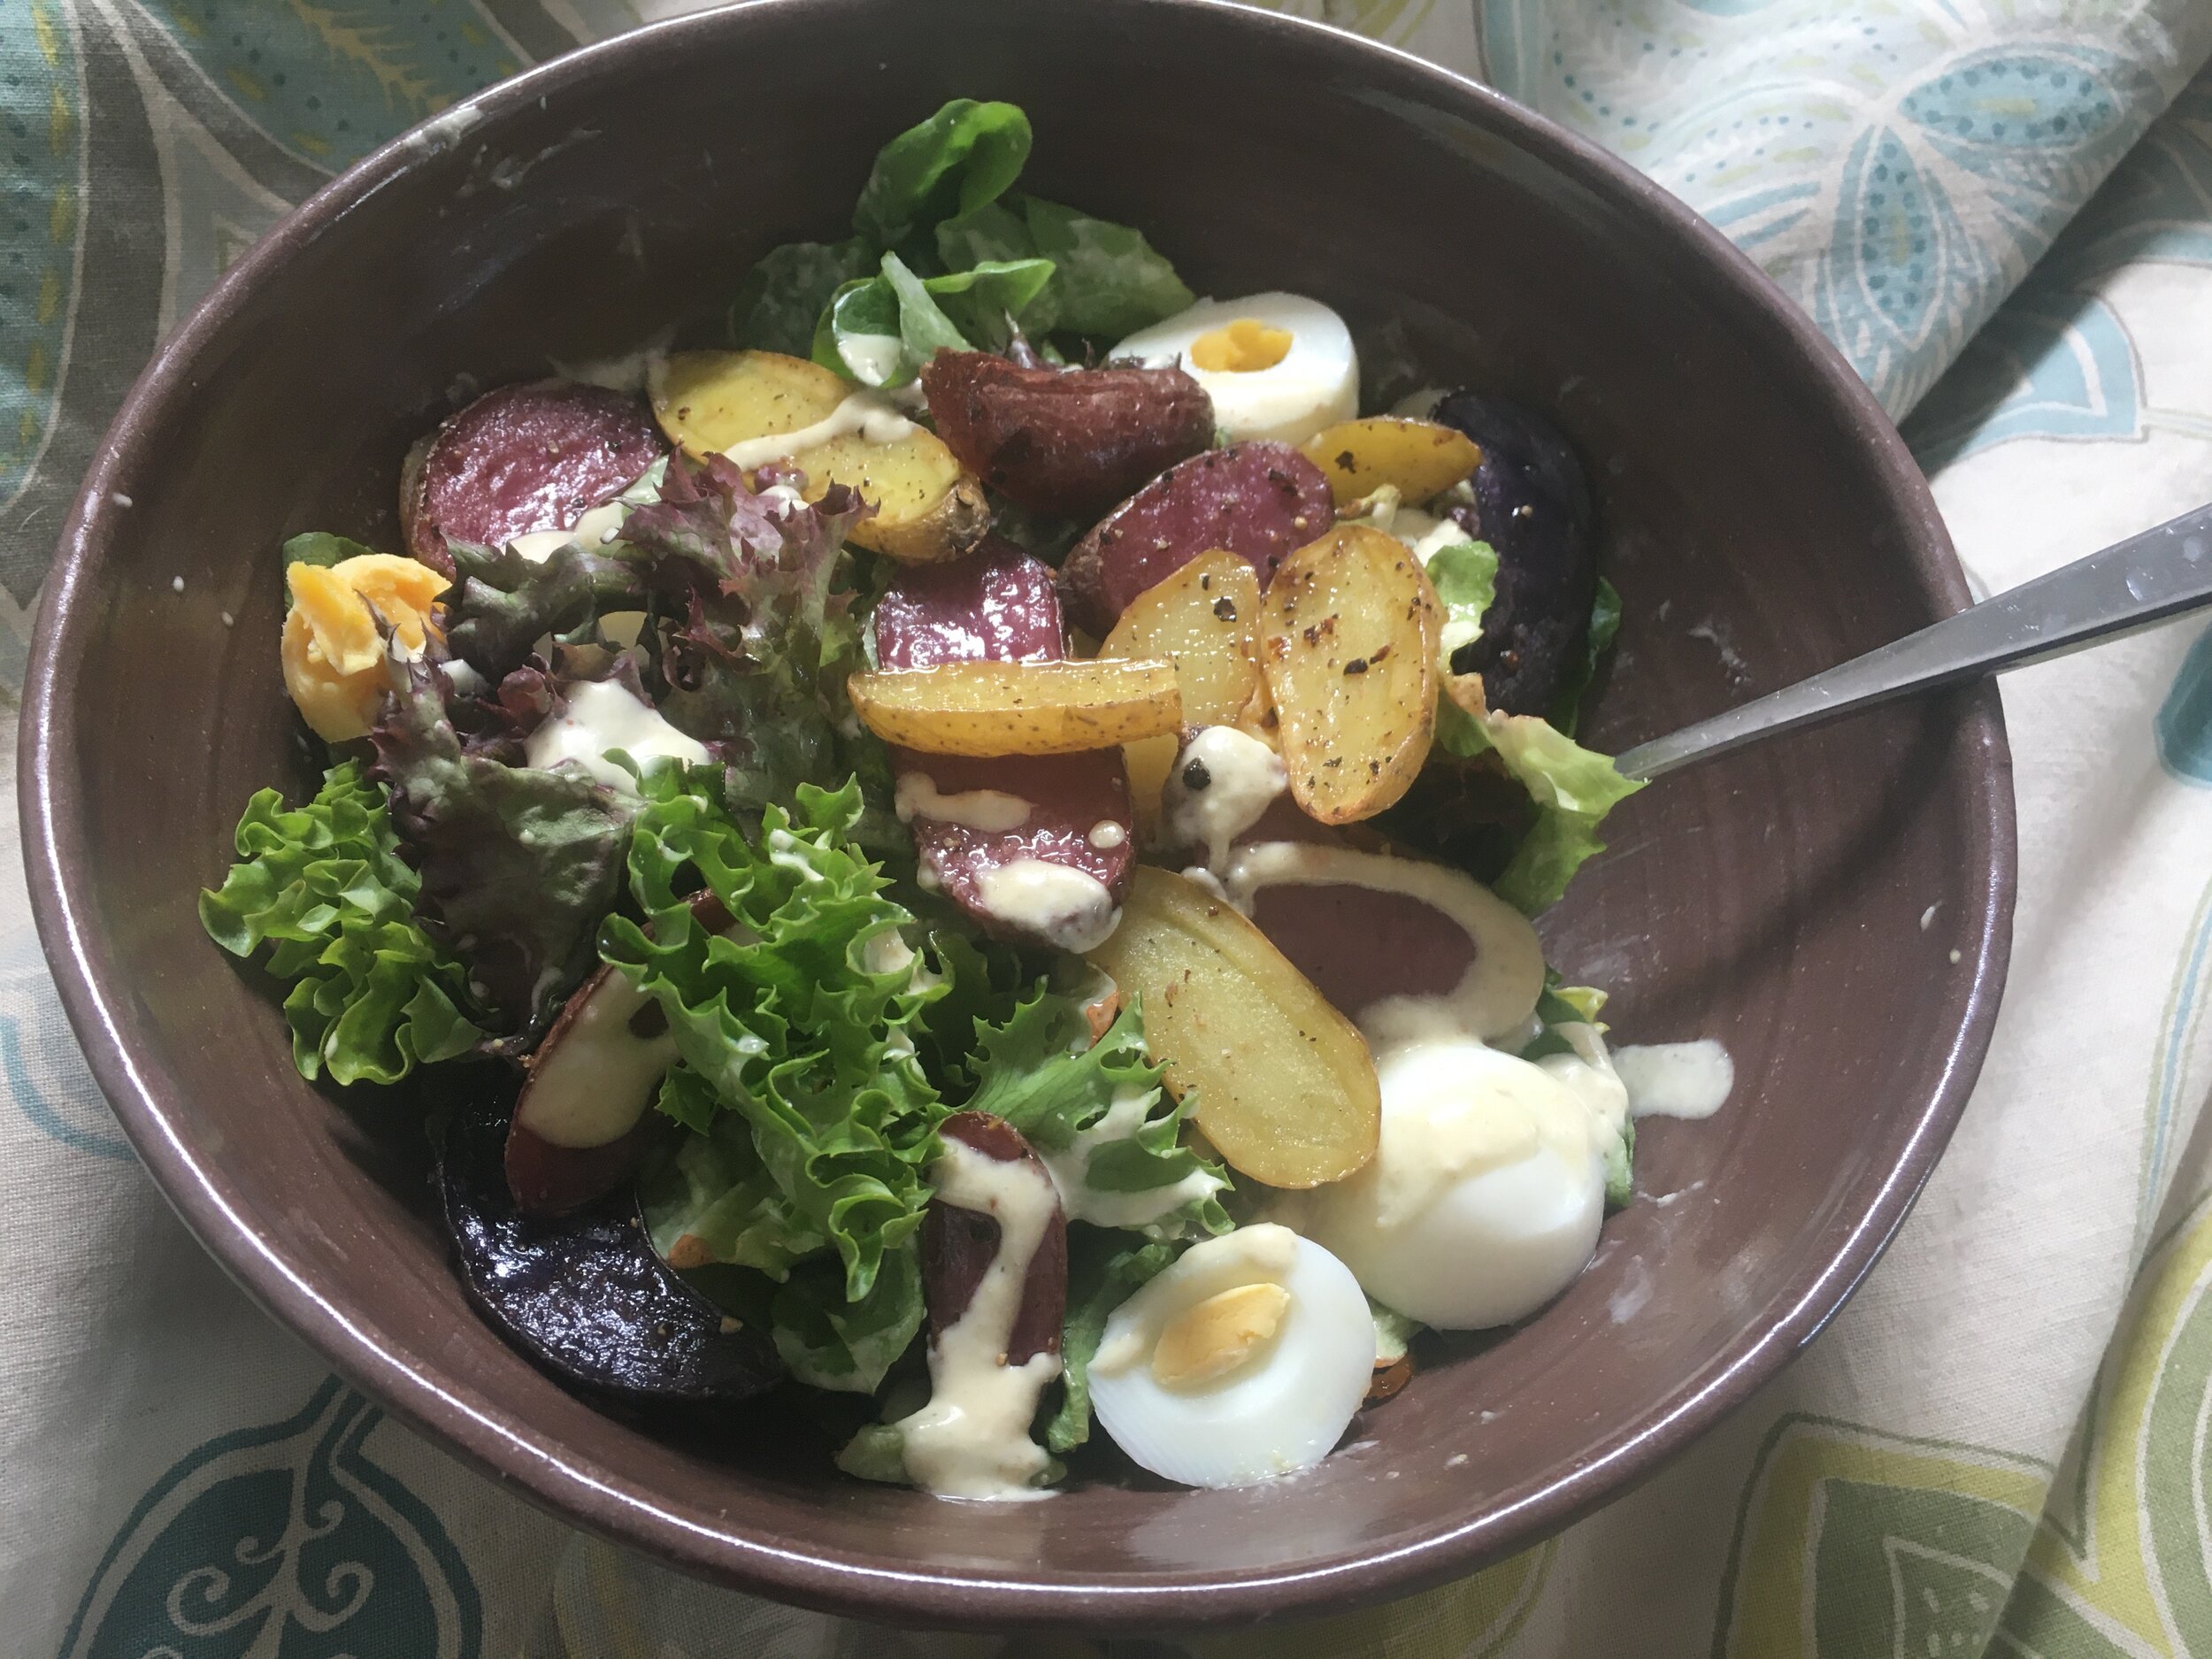
I’ve been making a version of this salad every week with my CSA. The first week we had radishes, but by the time I wrote up this post radishes were gone and cucumbers were here! I recommend making the salad with whatever veggies you have on hand. We used agave to balance the sweetness of the salad dressing because that’s what we had on hand, feel free to substitute other sweeteners like honey, sugar, or maple syrup.

Serves: 2-4

Time: 1 hr (15 minutes active time)

Ingredients

2 - 4 eggs (depending on how many you want to eat)

1/2 lb - 1lb salad greens

1 bunch radishes

1/2 cup sliced pecans (option to toast these)

5 small potatoes, we like carola’s or a waxy kind

1/2 tub Kite Hill ricotta (optional)

For the dressing:

1/3 cup mayonnaise, we like the vegan versions of this best

2 tbsp rice vinegar

2 tbsp almond milk

2 tsp mustard

1 tsp agave (or substitute sugar)

salt + pepper to taste


Note: you can always make the boiled eggs and roasted potatoes ahead of time and then the whole salad only takes about 15 minutes to assemble. Often I will make triple of the eggs and potatoes so that I can eat this for the next few days with little work or re-purpose these cooked ingredients into different meals.

Pre-heat the oven to 350 F. Clean and thinly slice the potatoes (no need to peel them). Place on baking sheet and drizzle with olive oil, salt, and pepper. Bake for about 1 hour or until golden brown flipping every 20 minutes.

Place the eggs in a lidded pot with cold water. (We tried it with salted and unsalted water and it made no difference in the texture or taste of the eggs.) Bring this water to a rolling boil and then turn off the heat and let rest for 10 minutes. Remove the eggs and cool them immediately by running them under cold water or putting in an ice bath.

Hot tip: if you aren’t sure if your eggs are still good (if you’ve had them a while) when you put them in the pot of water if they sink or are near the bottom they are good to eat, if they float to the top they are not good, do not eat them.

Create the salad dressing by whisking all the dressing ingredients together. Feel free to double or triple and use over multiple days and or for other meals.

Rinse and dry the lettuce. Break into bite sized chunks. Clean and slice the radishes. To assemble put greens, radish, sliced pecans, feta cheese, sliced boiled eggs, and roasted potatoes in a bowl and pour the dressing over. Enjoy!

IMG-0397.JPG

Potatoes Au Gratin

We love potatoes. We love to eat them every way possible and we love this recipe which makes a whole casserole full of delicious creamy potatoes. We tried cooking these with the peel on and it works but texturally we enjoy it more without the skins. We think these go great with lemon butter broiled asparagus and black bean burgers.

processed_20190713_200318.jpg
processed_20190713_200321.jpg

Serves: 6-8

Time: 2 hours (1 hour active)

Ingredients

8 waxy potatoes (2 lbs 10 oz)

1 cup cashews

1/2 cup plus 1 tablespoon olive oil

1-2 tsp minced rosemary

1 tsp mustard

1/2 tsp garlic powder

pinch cayenne

2.5 tsp salt


Soak cashews in enough water to cover them for 30 minutes or more. While the cashews are soaking, peel and cut the potatoes into thin slices. This is best done with a mandolin (1/8 in thick) but can be done with a knife.

Preheat oven to 350 F.

Strain the cashews and put them in a blender pitcher. Cover with water and blend until smooth. This is best done with a Vitamix as less high powered blenders will make grainy cashew cream. Transfer the cream to a liquid measuring cup and add rosemary, mustard, garlic powder, salt, and cayenne.

In a baking dish or casserole, layer potatoes and alternate drizzling olive oil and cream mixture. The final layer of potatoes should have both cream and oil.

Bake in the preheated oven one hour and broil for 5 additional minutes to make the top crispier. Enjoy!

Creamy Cauliflower with Breaded Eggplant Cutlets and Roasted Red Pepper Sauce

We posted a recipe for eggplant cutlets earlier this month and this is a new twist on how to serve cutlets. This recipe has many moving parts and they all come together to make a divine dining experience! The cauliflower is light and creamy and offers the perfect balance to spicy greens and delicious crispy eggplant. If you don’t want to spend a whole evening cooking this, you can easily make the cauliflower and red pepper sauce ahead of time and just heat it up when the eggplant and greens are finished cooking. This flavor combination can also be achieved with less labor by buying pre-made options. There are several frozen brands of breaded eggplant cutlets available on the market, and in many markets you can also buy roasted red pepper in a can or bottle. Either or both could be substituted in this recipe to achieve this flavor combination in a much faster way.

IMG_3749.JPG

Serves: 6-8

Time: 2 hours 45 minutes

Ingredients

for the mashed cauliflower:

1 head of cauliflower

3 cloves roasted garlic

1/4 cup olive oil

salt

for the roasted red pepper sauce:

2 red bell peppers, roasted

2 cloves roasted garlic

1 jalepeno, seeds removed

1/2 onion, chopped and sauteed

1/4 cup of almond pulp (can substitute 1/4 soaked cashew/almond blend)

1 tsp apple cider vinegar

water, until desired consistency

1 tsp salt

for the eggplant cutlet:

3 medium eggplants, cut into 1/4” coins

kosher salt

1/2 cup cornstarch

1/2 tsp salt

4 pieces of toast or two cups of bread crumbs (a gluten free bread or crumb will work here)

1/2 cup oats gluten-free option

3/4 cup sunflower seeds

2 tbsp garlic powder

1/4 cup nutritional yeast

1 tbsp salt, if your sunflower seeds are salted, you will need less salt.

3/4 tsp pepper, divided

3 or 4 eggs

olive oil

for the fried greens:

1 bunch dark leafy greens (kale, swiss chard, collards, spinach, etc)

3 T high heat oil (we like avocado)

1/4 tsp szechuan pepper (if available)

squeeze of lemon

Salt

IMG_3752.JPG

Cut eggplant into 1/4” thick coins. Layer them in a colander salting each layer generously. Leave eggplant to drain about 20 minutes. This will pull the moisture from the eggplant allowing it to cook faster and get sweeter.

There are many ways to roast a red pepper. If you have a gas stove, you can place the pepper directly on the burner, turn the burner on and cook, flipping with tongs until all the sides are charred. If you don’t have a gas stove, it can be done in the broiler. Move a shelf to the top of the oven and turn on the broiler. Place the red peppers under the coils of the broiler and allow to cook about 6 minutes before rotating the peppers. The skins should char. Remove the peppers from the oven once the skins are charred on all sides (about 24 minutes). Either way you cook the peppers, once they are charred on all sides, quickly place them in a bowl and cover with lid (this makes them easier to peel). Set the bowl aside.

Preheat the oven to 375 F. Roast garlic. You can do this a number of ways and our two favorite are to use a garlic roaster or a small cast iron pan. If you are using a garlic roaster, chop the tops off the garlic, drizzle a bit of oil into the garlic cloves, put this into the garlic roaster and roast in oven for about 45 minutes. To use a small cast iron pan, peel the garlic and place cloves in the cast iron pan with a small amount of olive oil. Roast this in the oven for about 20 minutes, stirring every 10 minutes. Either way, the garlic should look golden brown and be very soft. With the cast iron method, it is easier to burn the garlic so make sure to check on it.

Once the eggplant has been salted for 20 minutes it should have released some moisture that you will be able to see on the surface. Press the eggplant between kitchen towels to remove the moisture and some of the salt. Rip your toast into chunks before putting it into the food processor with the oats.  Blend them until they are sandy with slightly larger chunks.  Add the sunflower seeds, garlic powder, nutritional yeast, salt, and 1/2 tsp pepper.  Blend until the majority of the sunflower seeds have been cut at least once, but not so far that the mixture looks homogeneous.  Leave some sunflower seed chunks. Assemble a workstation with a shallow bowl of beaten eggs, a shallow bowl of cornstarch mixed with 1/2 tsp of salt and 1/4 tsp pepper, and a shallow bowl of the breadcrumb mixture. Dip the egg in the cornstarch, then the egg, and then breadcrumbs. Start with two eggs and add more as necessary to coat all the eggplant. Place on oiled baking sheet and bake in the oven for 1 hr flipping every 20 minutes.

While your eggplant cooks chop and saute the onion about 7 minutes until soft and starting to caramelize.

Put a pot of salty water on to boil. The water should taste about as salty as sea water so that the potatoes soak in the water and are perfectly salted when done. Don’t worry if these feels like a lot of salt; you will be draining the water.

Rough chop the cauliflower removing the core and leaves. Add the cauliflower to the heavily salted water and cook until fork tender (about 15 minutes). Drain the cauliflower and allow to sit for 10 min.

Next create the roasted red pepper sauce. Remove the roasted pepper from the covered bowl and remove the skin over the sink, rinsing off the char. Remove the seeds and stems. Add to a food processor with the remaining roasted red pepper ingredients and blend until mostly smooth. If you are using almond pulp, you will need a bit of water to make the sauce a nice texture. If you are using almond milk or cashew crema you may not need water. Put the sauce in a small jar or bowl.

Rinse your food processor and then combine all ingredients for the mashed cauliflower and blend until smooth and fluffy.

Lastly, rinse, de-stem, and thinly slice your greens. Heat a pan with 3 tbsp of high heat oil and wait until oil is very hot. Add greens and flip with tongs until greens are wilted and maybe a bit golden brown on some sides. If using szchuan pepper add to the pan right as greens are starting to wilt. Garnish with a squeeze of lemon juice and a pinch of salt.

To assemble, layer mashed cauliflower on a plate. Next place the eggplant cutlet and pour roasted red pepper sauce over the eggplant. Finally top with fried greens and enjoy!