Mushroom Stew

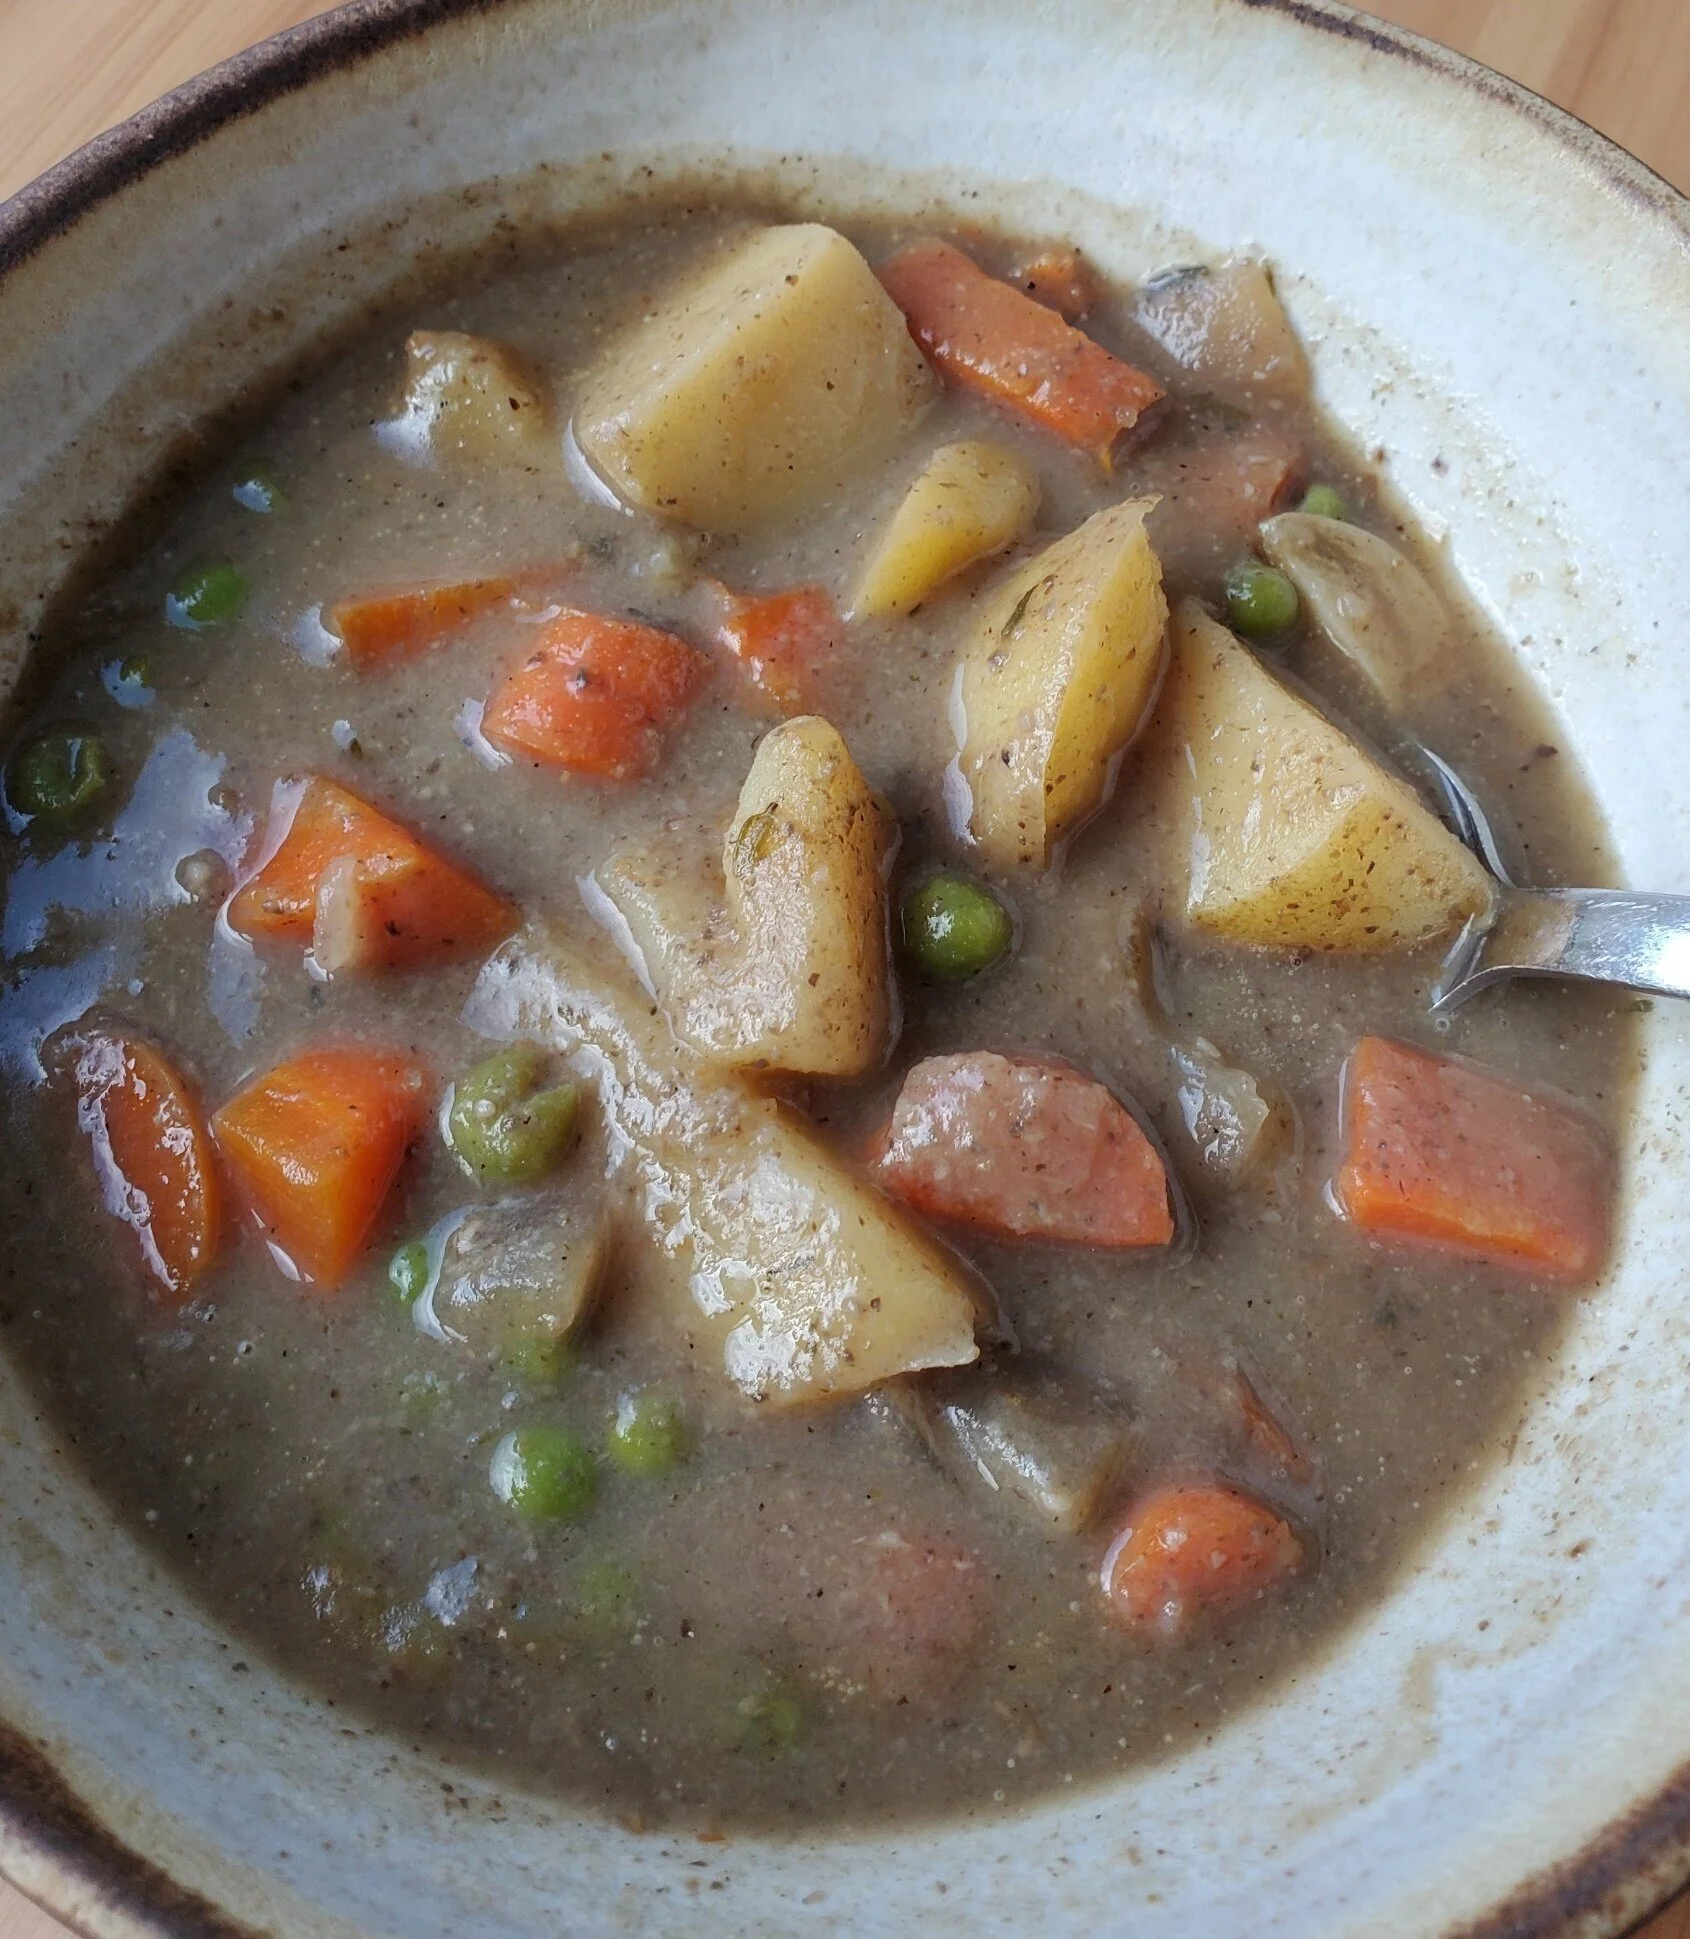
Growing up, one of my favorite meals was the beef stew that my father made. His stew took several hours of simmering to soften the beef, but this vegetarian version only takes 1 hr. This stew reminds me of all the great parts of the stew from my childhood. It is filling, has lots of veggies for different flavors and textures, and really warms me up on a cold and rainy day. The addition of halved garlic cloves not only reduces prep time, it also provides a sweet and garlicky surprise every couple of bites. If you don’t love garlic the way we do, feel free to mince it to reduce its prominence, or omit it entirely.

Like many of our recipes, this recipe is quite flexible. You could omit the onions and garlic if that is your preference. Potatoes could be replaced with parsnips if you are sensitive to nightshades. And white beans or chickpeas could easily be added (either blended into the liquid or chunky) for more protein. Let us know in the comments how you alter it, and how it turns out!

processed_20200126_124735.jpg

Serves: 6

Time: 1 hr

Ingredients

olive oil

4 cups cremini mushrooms (11 oz)

1 onion (11 oz)

6 cloves garlic, halved

3 carrots (1/2 lb)

4 potatoes (2 lb)

1 tsp dried thyme

pinch of red pepper flakes

1 1/2 tsp salt

5 cups veg stock (gluten-free option, soy-free option)

1/2 tsp pepper

1 bay leaf

1 cup peas (frozen)

1 bunch of kale, de-stemmed and thinly sliced

1 tsp apple cider vinegar


Slice and saute the mushrooms until browned, over medium heat, about 20 minutes, adding pepper after 15 minutes. In a large soup pot, saute the chopped onions and carrots in olive oil until starting to soften about 14 minutes. Add cubed potatoes, halved garlic cloves, veg stock, 1 1/2 tsp of salt, thyme, pepper flakes, and bay leaf. Bring it to a boil, turn down to a simmer and simmer for about 20 minutes or until the potatoes are tender.

Put the cooked mushrooms in a blender with 3 chunks of potato from the soup. Add hot veg stock from your soup until you cover the mushrooms and chunks of potato. Blend until smooth. Pour this back into the pot of stew and add apple cider vinegar, peas, and kale. Stir to combine new ingredients and simmer for 5 more minutes or until peas are hot and greens are wilted. Enjoy!

Romanesco Alfredo Pasta

This recipe was inspired by receiving romenesco and having no idea what to make with it. We love how it pairs with the cheesy Alfredo sauce. Combined with some shittake bacon and wilted greens it’s a perfect pasta night!

processed_20191201_122927.jpg

Serves: 4

Time: 1 1/2 hrs

Ingredients

2 heads romenesco, cut into small florets (cauliflower or broccoli is a good substitution)

6 tbsp olive oil, divided

salt

1 batch Shiitake Bacon

1 bunch Red Russian kale (or any hearty greens)

3 cloves garlic, minced

1 lb pasta (gluten-free option)

1 onion, sliced

3 tbsp white wine, optional

For the Breadcrumbs:

1 cup breadcrumbs (gluten-free option)

1/4 cup sunflower seeds

1/4 cup nutritional yeast

1 tbsp garlic powder

3 tbsp olive oil

For the sauce:

1 cup cashews soaked for at least 30 min

1 1/2 cup water

1/2 lemon, juiced

1/2 tbsp garlic granules

1 tbsp nutritional yeast

1/2 tsp salt

1 pinch of red pepper flakes


Pre-heat the oven to 375 F and soak 1 cup of cashews in water. Start making shiitake bacon since the mushrooms need time to marinate. Cut the romenesco into florets and toss with 4 tbsp of olive oil and 1 tsp of salt. Bake for 45 minutes or until tender and golden brown with a couple of crispy bits.

To make the breadcrumbs, whizz the sunflower seeds in a food processor until breadcrumb consistency. Add all the rest of the ingredients except the olive oil. Start the food processor and stream the olive oil into the mixture while it is running. This should clump some of the breadcrumbs together. Be careful not to over blend.

Drain the soaked cashews. Add them and all of the other sauce ingredients to a blender and blend until smooth. To test the consistency, put a small amount of sauce on your finger and rub your fingers together. If it is completely smooth then you are there! If it feels at all like there is some sandiness, keep blending.

Boil a pot of well salted water. If you aren’t sure how much salt to use, the water should taste similar to seawater. Once boiling, add pasta and cook to desired consistency (follow instructions on pasta package). While pasta is boiling, cook the shiitake bacon and slice the onions. Next de-stem kale, wash, and slice into ribbons. Mince the garlic.

After straining the pasta, heat the pasta pot with oil and saute the onion until it caramelizes and turns a beautiful brown color. You will need to stir less at the beginning, but as the onion starts to break down you will need to be stirring non-stop. If the onion starts to stick, de-glaze the pan with a bit of white wine (optional). Add the cashew alfredo sauce to the pan and stir until slightly thickened. At the same time, in a separate pan, cook the garlic in a little bit of oil, adding the kale in just to wilt. Set these aside.

Now, it’s time to add it all together! Add the strained pasta back into the pot with the Alfredo sauce and stir to coat. To plate serve the Alfredo pasta topped with the romenesco, wilted garlic kale, and shittake bacon. Garnish with breadcrumbs and enjoy!


White Bean Kale Stew

I seasoned this soup with rosemary and thyme this time (haha) around, but any herbs can be used to give the soup a richer and more interesting flavor. I generally grab whatever herbs I have in the kitchen from previous recipes or in the spice cabinet. Some other nice options include: oregano, sage, bay leaves, and hot pepper flakes. If you prefer it with more or less spice, feel free to add or remove some of the cayenne.

IMG_3662.jpeg

serves: 6

time: 1 hr

Ingredients

1/2 onion, (1 cup) diced

4 cloves garlic, minced

2 large carrots, (1/2 lb) diced

1 small zucchini, diced

3 cups seasoned white beans* (2 cans)

4 medium waxy potatoes, 1 1/2 lbs (yukon golds or red potatoes work well), cut into 3/4 inch cubes

1/2 bunch lacinato kale, chiffonaded, about 3 cups loosely packed

6 cups hot veggie broth

1/8 tsp cayenne

one sprig rosemary, de-stemmed and minced

1/2 tsp dried thyme

parsley

salt

1/2 tsp apple cider vinegar


Put a pot (about 6 cups) of salty water on the stove to boil. The water should taste about as salty as sea water so that the potatoes soak in the water and are perfectly salted when done. Cut your potatoes into 3/4 inch cubes and add to the water (it’s okay if it isn’t yet boiling). Cook the potatoes until they are fork tender but not falling apart, about 10 minutes. Drain and set aside.

In a large soup pot, sweat the onions and carrots on medium low heat for about 7 minutes before adding the garlic and the zucchini. Cook this mixture for about 10 minutes before adding your seasonings: rosemary, thyme, a pinch of cayenne, and a generous pinch of salt. Mix all this together and allow to cook for about 2 more minutes.

Pour the broth over the veggies and stir. Bring up to a simmer before adding the beans and potatoes. Once the potatoes and beans are hot, add the kale, cooking 5 more minutes until the kale wilts. Add the apple cider vinegar and season to taste.

Garnish with chopped parsley and enjoy on a cold rainy night.

*Cooking white beans from dry:

In the Instant Pot:

To cook the white beans in an Instant Pot, add 1 1/3 cups of dried white beans to the pot.  Cover the beans with water (in the small Instant Pot this is about 6 cups of water), season with 1 1/2 tbsp kosher salt, 2 cloves garlic, 1 tbsp cumin, a sprig of rosemary, and 1/8 tsp cayenne.  Set the Instant Pot to pressure cook for 28 minutes letting depressurize naturally. Drain and rinse before adding to the dish.

On the stove:

If you don’t have an Instant Pot, you can easily cook white beans from scratch with a little planning. First you will need to soak the beans which can be done one of two ways. 1. you can soak them overnight making sure they have enough water and space to double in size or 2. you can put them in a pot and bring to boil, then turn off the water and let soak for one hour. Again, make sure you have enough water and space that they can double in size.

Once you have soaked your beans, rinse them and then put in a pot with salty water. These will be cooking for about 2 hours so you don’t want as much salt as you would use for pasta, but you do want to add enough that you can taste the salt. The best way to get good at this is to practice. Each time you salt the water, taste it and when the beans are done taste them to see if they are well salted. A well salted bean should taste flavorful but not salty. If it tastes like you are eating salt, you added too much. If the bean lacks flavor then you didn’t have enough salt.

For this recipe, also add 1 1/2 tbsp kosher salt, 2 cloves garlic, 1 tbsp cumin, a sprig of rosemary, and 1/8 tsp cayenne to the white beans as they cook. Cook the beans until they are soft but not falling apart (this will take 1.5-2 hours).  We recommend checking the beans at about an hour and then every 20 minutes until they are soft but not disintegrating. Make sure your pot has enough water as I have definitely cooked all the water off before and burnt the beans! This may seem like a lot of work, however once you get the hang of it the work is almost all passive and the reward is high: beans cooked from scratch taste much better and are much cheaper! 

IMG_3664.jpeg

Bash's Cauli N' Cheese

We’re in love with this quick and easy cheesy recipe that our friend Bash taught us to make. It goes great with stir fried vegetables, and can also be delicious as a stand alone dish.

Bash's Cauli N' Cheese

Serves: 4

Time: 30 min

Ingredients

2 T olive oil

1 med size head of cauliflower, diced

1/2 large onion, diced

3 cups cooked chickpeas* (2 cans)

1/2 to 1 tsp salt, according to taste

1/4 tsp garlic powder

1/4 tsp turmeric

1/8 tsp red pepper flakes

2 cups of cashew cheese

green onion, sliced for garnish


Cook onions on medium low heat until they start to brown about 7 min. Add cauliflower and cook for another 10min. Add chickpeas and remaining seasoning, cook until the cauliflower is soft and starting to brown and get crispy (another 20min). Pour cashew sauce over and stir until incorporated and warm. Garnish with green onion and enjoy!

processed_20191006_124746.jpg

*Cooking chickpeas from dry:

In the Instant Pot:

To cook the chickpeas in an Instant Pot, add 1 1/3 cups of dried chickpeas to the pot. Cover the chickpeas with water (in the small Instant Pot this is about 6 cups of water), season with 2 tbsp kosher salt, 2 tbsp turmeric, 2 bay leaf, and 1/4 tsp cayenne. Set the Instant Pot to pressure cook for 35 minutes letting depressurize naturally. Drain and rinse before adding to the dish.

On the stove:

If you don’t have an Instant Pot, you can easily cook chickpeas from scratch with a little planning. First you will need to soak the chickpeas which can be done one of two ways. 1. you can soak them overnight making sure they have enough water and space to double in size or 2. you can put them in a pot and bring to boil, then turn off the water and let soak for one hour. Again, make sure you have enough water and space that they can double in size.

Once you have soaked your beans, rinse them and then put in a pot with salty water. These will be cooking for about 2 hours so you don’t want as much salt as you would use for pasta, but you do want to add enough that you can taste the salt. The best way to get good at this is to practice. Each time you salt the water, taste it and when the beans are done taste them to see if they are well salted. A well salted bean should taste flavorful but not salty. If it tastes like you are eating salt, you added too much. If the bean lacks flavor then you didn’t have enough salt.

For this recipe, also add 1 tbsp turmeric, 1 bay leaf, and 1/4 tsp cayenne to the chickpeas as they cook. Cook the chickpeas until they are soft but not falling apart (this will take 1.5-2 hours). We recommend checking the beans at about an hour and then every 20 minutes until they are soft but not disintegrating. Make sure your pot has enough water as I have definitely cooked all the water off before and burnt the beans! This may seem like a lot of work, however once you get the hang of it the work is almost all passive and the reward is high: chickpeas cooked from scratch taste much better and are much cheaper!

Winter Bounty Kale Salad

My dear friend Meredith shared this recipe with me. It is perfect in the fall or winter when what you have in abundance is root vegetables, apples, and kale. I love all the colors in this salad; it’s a treat for the eyes and on the palette! We usually don’t peel the vegetables (sweet potato and apple are left un-peeled) however we recommend peeling the carrot because peeled carrot tastes sweeter when you roast it. You can totally leave the carrot peel on, however it will add a bit of bitterness to the dish.

Photo Credit: Meredith Hickson

Photo Credit: Meredith Hickson

Serves: 2-4

Time: 1 1/2 hrs (45 minutes active time)

Ingredients

1 medium sweet potato (1 lb), 1/4“ diced

2 root vegetables (3/4 lb), peeled and 1/4” diced (we used carrots but parsnips and beets are also nice)

4 tbsp olive oil

1 1/2 tsp salt

1/2 tsp pepper

1 medium green apple, diced

1/2 cup raw un-salted pumpkin seeds or sunflower seeds

for the chickpeas:

1 15-oz can chickpeas or 1 1/2 cups cooked chickpeas*, drained

1 tbsp oil

1 tsp curry powder

1 tsp paprika

1/4 tsp turmeric

1/4 tsp garlic powder

for the kale:

1 generous bunch kale, chopped into thin ribbons

1 tsp apple cider vinegar

1 pinch of salt

for the dressing:

2 tbsp maple syrup

1/4 cup tahini

1 tsp apple cider vinegar

3 tbsp hot water

1 tsp curry powder

1 tsp tamari (gluten-free soy sauce)

1/4 tsp garlic powder

1/4 tsp paprika

1/8 tsp cayenne

1/8 tsp turmeric


Pre-heat the oven to 400 F. Dice the sweet potato and root vegetables. Toss in a bowl with 4 tbsp olive oil, 1 1/2 tsp salt, and 1/2 tsp pepper. Spread on baking sheet and bake until golden brown, stirring every 10 minutes. This should be about 45 min. Toss chickpeas in a bowl with 1 tbsp oil, 1 tsp curry powder, 1 tsp paprika, 1/4 tsp turmeric, and 1/4 tsp garlic powder. Spread on baking sheet and cook until golden brown and slightly crispy, stirring every 15 minutes. This should be about 45 min.

Wash and de-stem the kale. Cut into tiny strands (chiffanade). Pour 1 tsp apple cider vinegar and a pinch of salt over the kale and massage until the kale turns a bright green color.

Combine all ingredients for the dressing and whisk until smooth. Toast pumpkin seeds or sunflower seeds in a dry pan on medium heat until fragrant. Raw seeds can burn quickly, so remove from heat if starting to brown. Dice the green apple.

Combine kale, chickpeas, roasted vegetables, apple, and pumpkin seeds. Dress each serving of salad before eating. Enjoy!

Hot tip: If you end up with extra dressing, it makes a great sauce to use in wraps.

*Cooking chickpeas from dry:

In the Instant Pot:

To cook the chickpeas in an Instant Pot, add 3/4 cup of dried chickpeas to the pot.  Cover the chickpeas with water (in the small Instant pot this is about 6 cups of water), season with 1 tbsp kosher salt, 1 tsp turmeric, 1/4 tsp garlic powder, and a pinch of cayenne.  Set the Instant pot to pressure cook for 35 minutes letting depressurize naturally. Drain and rinse before adding to the dish.

On the stove:

If you don’t have an Instant Pot, you can easily cook chickpeas from scratch with a little planning. First you will need to soak the chickpeas which can be done one of two ways. 1. you can soak them overnight making sure they have enough water and space to double in size or 2. you can put them in a pot and bring to boil, then turn off the water and let soak for one hour. Again, make sure you have enough water and space that they can double in size.

Once you have soaked your beans, rinse them and then put in a pot with salty water. These will be cooking for about 2 hours so you don’t want as much salt as you would use for pasta, but you do want to add enough that you can taste the salt. The best way to get good at this is to practice. Each time you salt the water, taste it and when the beans are done taste them to see if they are well salted. A well salted bean should taste flavorful but not salty. If it tastes like you are eating salt, you added too much. If the bean lacks flavor then you didn’t have enough salt.

For this recipe, also add 1 tsp turmeric, 1/4 tsp garlic powder, and a pinch of cayenne to the chickpeas as they cook. Cook the chickpeas until they are soft but not falling apart (this will take 1.5-2 hours).  We recommend checking the beans at about an hour and then every 20 minutes until they are soft but not disintegrating. Make sure your pot has enough water as I have definitely cooked all the water off before and burnt the beans! This may seem like a lot of work, however once you get the hang of it the work is almost all passive and the reward is high: chickpeas cooked from scratch taste much better and are much cheaper!

Photo Credit: Meredith Hickson

Photo Credit: Meredith Hickson

Cauliflower Tikka Masala

This meal is melt in your mouth good. The flavors are balanced and dance on your tongue. My wife says her mouth (and belly) are a full “yes!” to this dinner. We really like having leftovers of this meal, so we often double the recipe!

We like this recipe so much we thought we would share it with you on Anne’s birthday! It’s warming and cozy. What’s better for a winter birthday meal?

processed_20191217_120355.jpg

Serves: 6

Time: 1 hr 45 min

Ingredients

1/2 cups cashews, soaked

olive oil

salt

2.5 lb cauliflower (1 med size head)

1 lb potatoes (3 small)

1/2 lb onion (1 small), diced

2 cloves garlic, minced

2 tsp ginger, minced (less than an inch)

1 small red bell pepper

1 tomato

1/2 bunch cilantro

1.5 cups cooked chickpeas* (1 can)

1 1/2 cup of rice

vegetable stock (optional; soy-free option)

Spice Mix

1.5 tsp garam masala

1 tsp ground coriander

1.5 tsp turmeric

1 tsp cinnamon

1.5 tsp salt

1/4 tsp chili powder


Preheat the oven to 375 F. Mix the spices in a bowl. Cut the cauliflower into florets, drizzle with olive oil, and sprinkled with half of the spice mix. Roast for 45 minutes until soft and golden brown. Cube the potatoes in 1/2 inch cubes, toss in olive oil and 1/2 tsp of salt. Roast for 45 minutes until soft and golden brown on the edges.

Cook your rice with with salt (and vegetable stock if you like).

Dice the onion. Cook in a large pot over med. heat until soft (about 15 min). Add garlic and ginger and sautée for another 5 min. Add the remaining spice mix and sautée for another minute. Remove from heat.

In a Vitamix combine cashews, 1/2 cup water, red pepper, tomato, cilantro, and onion mix. Blend until smooth. Combine sauce with cooked potatoes, cauliflower, and chickpeas in the large pot from before. Stir to coat and then warm to desired temperature. Serve over rice.

*Cooking chickpeas from dry:

In the Instant Pot:

To cook the chickpeas in an Instant Pot, add 3/4 cup of dried chickpeas to the pot. Cover the chickpeas with water (in the small Instapot this is about 6 cups of water), season with 1 tbsp kosher salt, 2 tsp coriander, 1 tsp turmeric, and 1/4 tsp chili powder. Set the Instapot to pressure cook for 35 minutes letting depressurize naturally. Drain and rinse before adding to the dish.

On the stove:

If you don’t have an Instant Pot, you can easily cook chickpeas from scratch with a little planning. First you will need to soak the chickpeas which can be done one of two ways. 1. you can soak them overnight making sure they have enough water and space to double in size or 2. you can put them in a pot and bring to boil, then turn off the water and let soak for one hour. Again, make sure you have enough water and space that they can double in size.

Once you have soaked your beans, rinse them and then put in a pot with salty water. These will be cooking for about 2 hours so you don’t want as much salt as you would use for pasta, but you do want to add enough that you can taste the salt. The best way to get good at this is to practice. Each time you salt the water, taste it and when the beans are done taste them to see if they are well salted. A well salted bean should taste flavorful but not salty. If it tastes like you are eating salt, you added too much. If the bean lacks flavor then you didn’t have enough salt. For this recipe, also add 2 tsp coriander, 1 tsp turmeric, and 1/4 tsp chili powder to the chickpeas as they cook. Cook the chickpeas until they are soft but not falling apart (this will take 1.5-2 hours). We recommend checking the beans at about an hour and then every 20 minutes until they are soft but not disintegrating. Make sure your pot has enough water as I have definitely cooked all the water off before and burnt the beans! This may seem like a lot of work, however once you get the hang of it the work is almost all passive and the reward is high: chickpeas cooked from scratch taste much better and are much cheaper!

processed_20191217_120402.jpg

Nut Milk

We love making our own nut milks and here’s why:

  • For us, they taste better than anything you can buy in a store.

  • Milk with zero packaging (if you buy the nuts in bulk with your own jars).

  • Affordable: cost is $4.50 for 32 oz of organic almonds and $2.25 for 32 oz non-organic almonds at our store. Plus, you can use the pulp to cook with and stretch that savings!

We use almonds and cashews most often because we like the balanced taste this combination creates. Most nuts can be made into nut milk and we look forward to hearing about your favorite combinations! Let us know in the comments what you like!

almond+milk+2.jpg

Serves: 4 cups

Time: 15 min (nuts need to soak for at least 6 hours in advance)

Ingredients

1.25 cups of nuts, soaked for at least 6 hours (recommend 1 cup almond and 1/4 cup cashew)

4 cups water, plus more for soaking


Here are three options for making nut milk. Unless you are going with option #3 you will need to soak the nuts at least 6 hours and I find it easier to do this overnight. If in the morning you don’t want to make milk, just rinse and re-fill with clean water. When you finally get to making the milk, strain the nuts and use 4 cups of fresh water to blend.

Options:

  1. Peel some or all of the soaked almonds (not necessary but makes for a sweeter, more amaretto flavor). Put through a masticating juicer with water. If you don’t have a juicer, use method 2!

  2. Add all the ingredients to a high powered blender (Vitamix recommended) and blend on high. Then strain with a nut milk bag.

  3. If you have the money to spare and know you want to always have home-made nut milk and nut-butters there is a machine that does just that and it works really well: TheNutraMilk. This is a great option especially in commercial environments.

Save the pulp to use in cashew cheese or throw it in with some veggies and beans for home-made veggie burgers. The nut milk is best if used within 4 days.

almond%2Bmilk%2Band%2Bcashew%2Bcheese.jpg

Quick Stir Fry

We all have nights when we have not planned for dinner and have not shopped for a particular meal. One of the benefits of cooking regularly is that there are often some veggies or a block of tofu in the fridge. This recipe was cooked on such a night and used various left-over veggies. For this reason, any of the ingredients can be subbed out for whatever is in your refrigerator.

processed_20191012_131838.jpg

Serves: 4

Time: 30min

Ingredients

1 cup rice

1 block tofu

1/4 cup corn starch

1 tsp salt, divided

1/2 onion, sliced

3 cloves garlic, minced

1 inch ginger, minced

1 bell pepper, sliced

3 carrots, thick julienned

1/4 purple cabbage, sliced

1 small head broccoli and stem, broken into florets and slice the stem

5 tbsp, divided neutral oil like avocado, sunflower, or canola

1 tbsp tamari (gluten-free soy sauce) or coconut aminos

For the sauce:

2 tbsp tamari (gluten-free soy sauce) or coconut aminos

1/2 tsp hot sauce

1 tsp agave


Cook rice with 1 tsp of salt, for a more flavorful rice, add 1 tsp veggie bouillon to the water. While rice is cooking, put the cornstarch and 1 tsp salt in a small bowl.

Cut your block of tofu in half so that you have two, one inch thick rectangles. Press tofu between two kitchen towels, placing a cast iron pan, or something heavy on them to remove some of the liquid. This process can be done with a tofu press. Slice the tofu into cubes or thick sticks. Toss tofu in cornstarch salt mixture. Heat 2 tbsp of neutral oil in a frying pan. Once hot, fry the tofu on med-high making sure it gets golden brown on all sides.

To make the sauce, mix tamari (gluten-free soy sauce), hot sauce, and agave in a small bowl. When the tofu looks done, pour this sauce over the tofu and toss until coated and then remove from heat and set tofu aside.

In the same pan, add 1 tbsp of oil and sautee the onion for 2 minutes. Add garlic and ginger, and sautee for another minute. Add bell peppers. Cook until onions are soft and starting to caramelize and the peppers are tender with some color. Set aside.

In the same pan (or you can use 2 pans and do this at the same time as the onions) fry the carrot, cabbage, and broccoli at a med-low heat with 2 tbsp of oil. Cook until carrots and broccoli are bright and cabbage is soft, stirring frequently. Combine all the vegetables and stir in the last 1 tbsp of tamari (gluten-free soy sauce) and serve over rice with tofu.

Shiitake Bacon

This sweet and crispy bacon is great on pasta, polenta, or baked potatoes.

Tamari, coconut aminos, and soy sauce are all very similar. Tamari is a gluten-free soy sauce. Coconut aminos is a soy-free sauce that is on the sweeter side. If you don’t happen to have both tamari and coconut aminos on hand, feel free to use what you have. For example, if you don’t have tamari, substitute soy sauce or coconut aminos. Keep in mind that coconut aminos are sweeter so if you use more, reduce the maple syrup. Tamari is saltier so if you omit it, add a pinch of salt.

shitake bacon.jpg


Serves: garnish for 2 portions

Time: 1hr (30 min active)

Ingredients

3/4 lb shiitake mushrooms, (4 cups with stems removed and thinly sliced)

1 tbsp tamari/gluten-free soy sauce (optional) (omit for soy-free option)

3 tbsp coconut aminos (if you don’t have this substitute tamari or soy sauce)

1/2 tsp maple syrup

3 tbsp olive oil

1/2 tsp balsalmic vinegar

Pinch cayenne


Whisk together all the ingredients except the mushrooms in a medium bowl. Slowly add the mushrooms, mixing with a folding motion to make sure all the mushrooms are coated. Allow to sit, mixing every 10 minutes, for at least a half hour.

Heat a large frying pan to medium low and use a fork or slotted spoon to transfer the mushrooms to the pan. Cook, stirring regularly, until the mushrooms are dark brown, the edges may start to blacken, and the liquid makes a sticky coating, about 20 to 25 minutes.

Any leftover marinade can be used in any number of other ways, like to season stir fry, coat carrots for roasting, or put in rice.

Cashew Cheese

This cashew cheese recipe is easy to make and has so many uses! It can be a delicious spread on bagels (add some chives to make it super fancy), pour it over some pasta for an easy cream sauce, put it on pizza for a white sauce, add it to soups for some creamy goodness, or add to some mashed potatoes for that cheesy deliciousness. Since I make nut milk a couple times a week, I usually use the pulp from that milk as a base for my cashew cheese. If you don’t have nut milk pulp to use up, don’t worry, simply substitute additional cashew pieces for the pulp.

cashew+cheese.jpg

Serves: 2 cups

Time: 30min (15min active)

Ingredients

1 1/4 cups nut pulp

3/4 cups cashews

1 tbsp olive oil

1/3 cup water

1 tsp salt

1/2 tsp garlic powder

1 small clove garlic roughly chopped

juice of half a lemon (2 tbsp)


Soak the cashews in hot water for 15 minutes.

Combine all ingredients and blend until smooth, scraping down the sides of your blender or food processor as you go. Keeps for 1 week. You can freeze and use later if you don’t need the whole batch.

You can use either a food processor or a Vitamix blender for this. Using a food processor will give the cheese slightly more texture and a Vitamix will make the cheese extra silky/creamy. Both are good! I would not recommend trying to make this cheese in a blender that isn’t high powered, as the nuts can be hard on the motor and the cheese will come out with a strange texture. Note, I don’t always soak the cashews and can say from first hand it isn’t 100% necessary when using a Vitamix. It does however help take care of your equipment and can make the final product creamier, so I do recommend it, if you have the time.

Fingerling Potatoes with Ginger and Mint

A new year and a new blog! This year Camille (formerly Gluten-free Soy-free Vegan) and Anne (formerly Hungry Griffin) have teamed up to co-create a blog featuring delicious recipes. We will be cooking food, eating food, and sharing our recipes with all of you to cook and enjoy as well. This time of year can be hard for us because starting January 1st so many people start to try to “eat healthy” or diet. We aren’t interested in encouraging people to make their bodies smaller, take up less space, or try to change because someone said they “should”. What interests us is joy, pleasure, and honoring our own bodies. In celebration of joy, pleasure, and honoring our bodies we’ll start the new year and our new blog with one of our favorite foods: potatoes!

This delicious side dish is an interpretation on a recipe that was found in an issue of Gourmet magazine about ten years ago. Time has not diminished our enthusiasm for these spicy and tangy potatoes. They are a delicious treat on their own or make a nice compliment to roasted cauliflower and garlicky greens.

processed_20171229_110837.jpg

Serves 4 (as a side dish)

Time: 40min (10min active)

Ingredients

3 tbsp sesame oil (divided)

2 tbsp sunflower oil

1.5 lbs fingerling potatoes, halved

3 tbsp minced ginger (divided)

2 cups water

1/2 tsp chili powder

1/4 tsp turmeric

1/2 cup mint leaves, chopped

3/4 tsp salt

1/4 tsp black pepper

Zest and juice of one lime


Heat 2 tbsp sesame oil and the sunflower oil in a frying pan over medium high heat. Once the oil is hot, add the potatoes and 1.5 tbsp ginger. Cook the potatoes turning regularly for ten minutes. Some of the edges should be slightly browned. Remove from the heat and slowly add the water, chili, turmeric, salt, and pepper. Return the pan to the heat and cook the potatoes uncovered until almost all the water has evaporated, stirring occasionally.

This should take about half an hour, but watch to make sure the bottom isn’t sticking and stop before then. At this point, the potatoes should be tender, if they are not, add a little more water and continue to cook until they are. If you need to add water, remember, the potatoes will not be drained, so be careful not to add too much. Once tender, add the remaining one tablespoon of sesame oil, the remaining 1.5 tbsp ginger, the lime zest, and mint. Stir until this sticks to the potatoes, about 1 minute. Stir in the lime juice and enjoy!