Arugula Pesto Pasta with roasted Brussels Sprouts and Roasted Cherry Tomatoes

This meal came out of wanting to use up leftovers and is especially easy to throw together if you’ve already cooked a batch of roasted brussels sprouts. We put together the pesto with arugula because we had some from a previous meal and wanted a fresh pesto. Many different greens or herbs could be substituted to good effect so if you don’t have arugula on hand, feel free to use the herbs/greens that you do have. We used the almond pulp because it was left-over from making almond milk. Feel free to use any nuts you have around; cashews, walnuts, or pine nuts would go well in the pesto. The brussels sprouts give this pasta dish a lovely filling feel while the tomatoes have a nice fresh burst when you bite into them. We love freshly roasted red peppers, but we also love to use roasted red peppers from a jar. Either would be a good choice.

processed_20210325_172019.jpg
processed_20210325_172023.jpg

Serves: 4

Time: 1 hour

Ingredients

1 batch roasted brussels sprouts

1 pint cherry tomatoes

1 lb pasta (gluten-free option, vegan-option)

2 red peppers

For the pesto:

1 bunch of arugula

1/3 cup almond pulp

3 cloves garlic

3 tbsp olive oil

3 tbsp nutritional yeast

1/2 tsp salt

generous squeeze of lemon


Pre-heat the oven to 375 F.

If you are roasting the red pepper in the broiler, that can be done before the vegetables go into the oven. If you are roasting on the stovetop, you can roast while the veggies are cooking. There are many ways to roast a red pepper. If you have a gas stove, you can place the pepper directly on the burner, turn the burner on and cook, flipping with tongs until all the sides are charred. If you don’t have a gas stove, it can be done in the broiler. Move a shelf to the top of the oven and turn on the broiler. Place the red peppers under the coils of the broiler and allow to cook about 6 minutes before rotating the peppers. The skins should char. Remove the peppers from the oven once the skins are charred on all sides (about 24 minutes). Either way you cook the peppers, once they are charred on all sides, quickly place them in a bowl and cover with lid (this makes them easier to peel). Set the bowl aside.

Roast the brussels sprouts according to the instructions. While these are cooking, boil salty water (should be as salty as the ocean) and cook the pasta according to instructions on the box.

Put the cherry tomatoes on a sheet pan drizzle with olive oil and sprinkle with salt. Bake for 10 minutes until the skins pop open and get a little wrinkly.

Remove the roasted pepper from the covered bowl and remove the skin over the sink, rinsing off the char. Remove the seeds and stems. Cut the roasted pepper into strips.

To make the pesto, add all the pesto ingredients in the food processor and blend until smooth. If you need it to be thinner in order to process, you can add 1-2 tbsp of the pasta water.

Toss the prepared ingredients together, serve, and enjoy!

Creamy Gnocchi with Roasted Tomato and Basil

We have recently started using premade gnocchi in our kitchen. We really like having a quick cooking option to add gnocchi to a dish. This dish is one that feels fast to pull together while still feeling luxurious and delicious. We have access to Delallo brand gnocchi and we like it. They make a gluten-free version and a version with gluten. While neither version have dairy products in the ingredients list, the gluten-free version does have an allergy warning saying “May contain milk”.

Serves 4-6

Time 30 minutes

Ingredients

2 box of gnocchi (gluten-free option, dairy-free option)

1 pint cherry tomatoes

2 tbsp olive oil

a handful of basil leaves

for the sauce:

1 tbsp olive oil

1 cippolini onion

3/4 cup cashews soaked for at least 30 min

1 1/4 cup water

1/2 lemon, juiced

1/2 tbsp garlic granules

1/2 tsp salt

1 pinch of red pepper flakes


Cover the cashews with water to soak. Preheat the oven to 350 F. Put on a large pot of salty water to boil.

When the water boils, cook the gnocchi according to the instructions on the package. Meanwhile, rinse the tomatoes and put them on a sheet pan. Drizzle with 2 tbsp olive oil and then sprinkle with some salt. Put in the oven to roast until the skins pop open, about 12 minutes. Next, drain your soaked cashews and add them to a high powered blender with the water, lemon juice, and garlic granules. Blend until smooth. Finally, slice the onion thinly.

Once you have drained the gnocchi, put the remaining tbsp of olive oil in the pan and return to medium high heat. Put the onion in the pan and add some salt. Cook until the onion is soft and starting to brown, stirring constantly. Add the hot pepper flakes and stir in. Add the cashew alfredo sauce to the pan and stir until slightly thickened. Remove from heat.

Add the gnocchi and roasted tomatoes to the pot. The tomatoes will break down and mix with the creamy sauce. Garnish generously with torn basil leaves. Enjoy!


Cilantro Tomato Black Eyed Peas

Hi, Camille speaking here. I love black eyed peas because they are a bean that doesn’t need any soaking to cook from dry! It’s great when I haven’t planned ahead and still want a fairly quick meal (extremely quick if you have an Instant Pot) and still not too long if you are cooking on the stove. When I lived in Senegal, bean sandwiches was a common and delicious breakfast if you had enough money to afford it. This recipe is very similar to the sauced beans that I ate there and would be delicious served on a baguette. We also used them in our Last Chance Veggie Skillet.

Serves: 4 as a side

Time: 25 minutes

Ingredients

1 Can Black Eyed Peas or 3/4 cup dried black eyed peas

1/2 onion

olive oil

2 cloves garlic

1 tbsp tomato paste

1 tbsp oil from Mama Lil’s Peppers

salt

1 cup vegetable stock (or bouillon cube and water), gluten-free option, soy-free option

handful of cilantro


If you are using dry black eyed peas, cook them according to the instructions at the end of this recipe. If you are using canned black eyed peas then open the can and rinse the cooked peas.

Chop the onion so that the pieces are about the same size as the peas. Mince the garlic. Cook the onions on medium heat with olive oil until they begin to become transparent. Add the garlic for an additional minute. Add the hot pepper oil and tomato paste. Stir to coat the onions. Add the cooked beans and stock. Stir well. Bring to a boil and then turn down to a simmer and cook until it’s the consistency that you like, stirring regularly. Wilt the cilantro in. Stir and enjoy!

*Cooking black eyed peas from dry:

In the Instant Pot:

To cook in an Instant Pot, add 3/4 cup of dried black eyed peas to the pot.  Cover the beans with water (in the small Instant Pot this is about 6 cups of water), season with 1 tbsp kosher salt. Additionally if you happen to have the following add these as well: 1 tbsp cumin, 2 tsp garlic powder, and 1/8 tsp cayenne.  Set the Instant Pot to pressure cook for 6 minutes letting depressurize naturally.  Drain and rinse before adding to the dish.

On the stove:

If you don’t have an Instant Pot, you can easily black eyed peas from scratch with no planning. They are a bean that doesn’t need any soaking, yay! Put the black eyed peas in a pot with salty water. These will be cooking for about 45 minutes so you don’t want as much salt as you would use for pasta, but you do want to add enough that you can taste the salt. The best way to get good at this is to practice. Each time you salt the water, taste it and when the beans are done taste them to see if they are well salted. A well salted bean should taste flavorful but not salty. If it tastes like you are eating salt, you added too much. If the bean lacks flavor then you didn’t have enough salt.

Additionally if you happen to have the following add these as well: cumin, garlic powder, and a tiny amount of cayenne. 

Cook the peas until they are soft but not falling apart (this will take about 45 minutes).  We recommend checking the beans at 20 minutes and then every 10 minutes o cook until they are soft but not disintegrating. Make sure your pot has enough water as I have definitely cooked all the water off before and burnt the beans!

Spinach and Sausage Bowl

We’re happy to be celebrating a new year with a hearty bowl of greens and vegan sausage!

Serves: 4

Time: 30 minutes

Ingredients

1 1/2 cups white rice

vegetable bouillon (optional, gluten-free option, soy-free option))

2 tbsp high heat oil (like avocado)

1 package Beyond Meat Italian Sausage

1 onion

1 bell pepper

1 handful shitake mushrooms

2 large handfuls of spinach

3 tbsp white wine or rice vinegar

Salt

Pepper


Cook the rice according to package. We like to cook rice in vegetable stock or with vegetable bouillon and a pinch of salt for more flavor.

Slice the onion while heating a pan to medium high heat with the oil. Add the onion to the pan, stirring occasionally until softened. While the onions are cooking, slice the bell peppers and mushrooms and add them to the pan as well. Slice the sausages and add them to the pan as well. Season to taste with salt and pepper. Cook on med-high heat until the veggies are fully cooked and the sausages are browned. As things start to stick, add the white wine or rice vinegar. When everything is fully cooked, add the spinach and stir. Allow to cook until the spinach is wilted and bright green.

Serve over rice and enjoy!

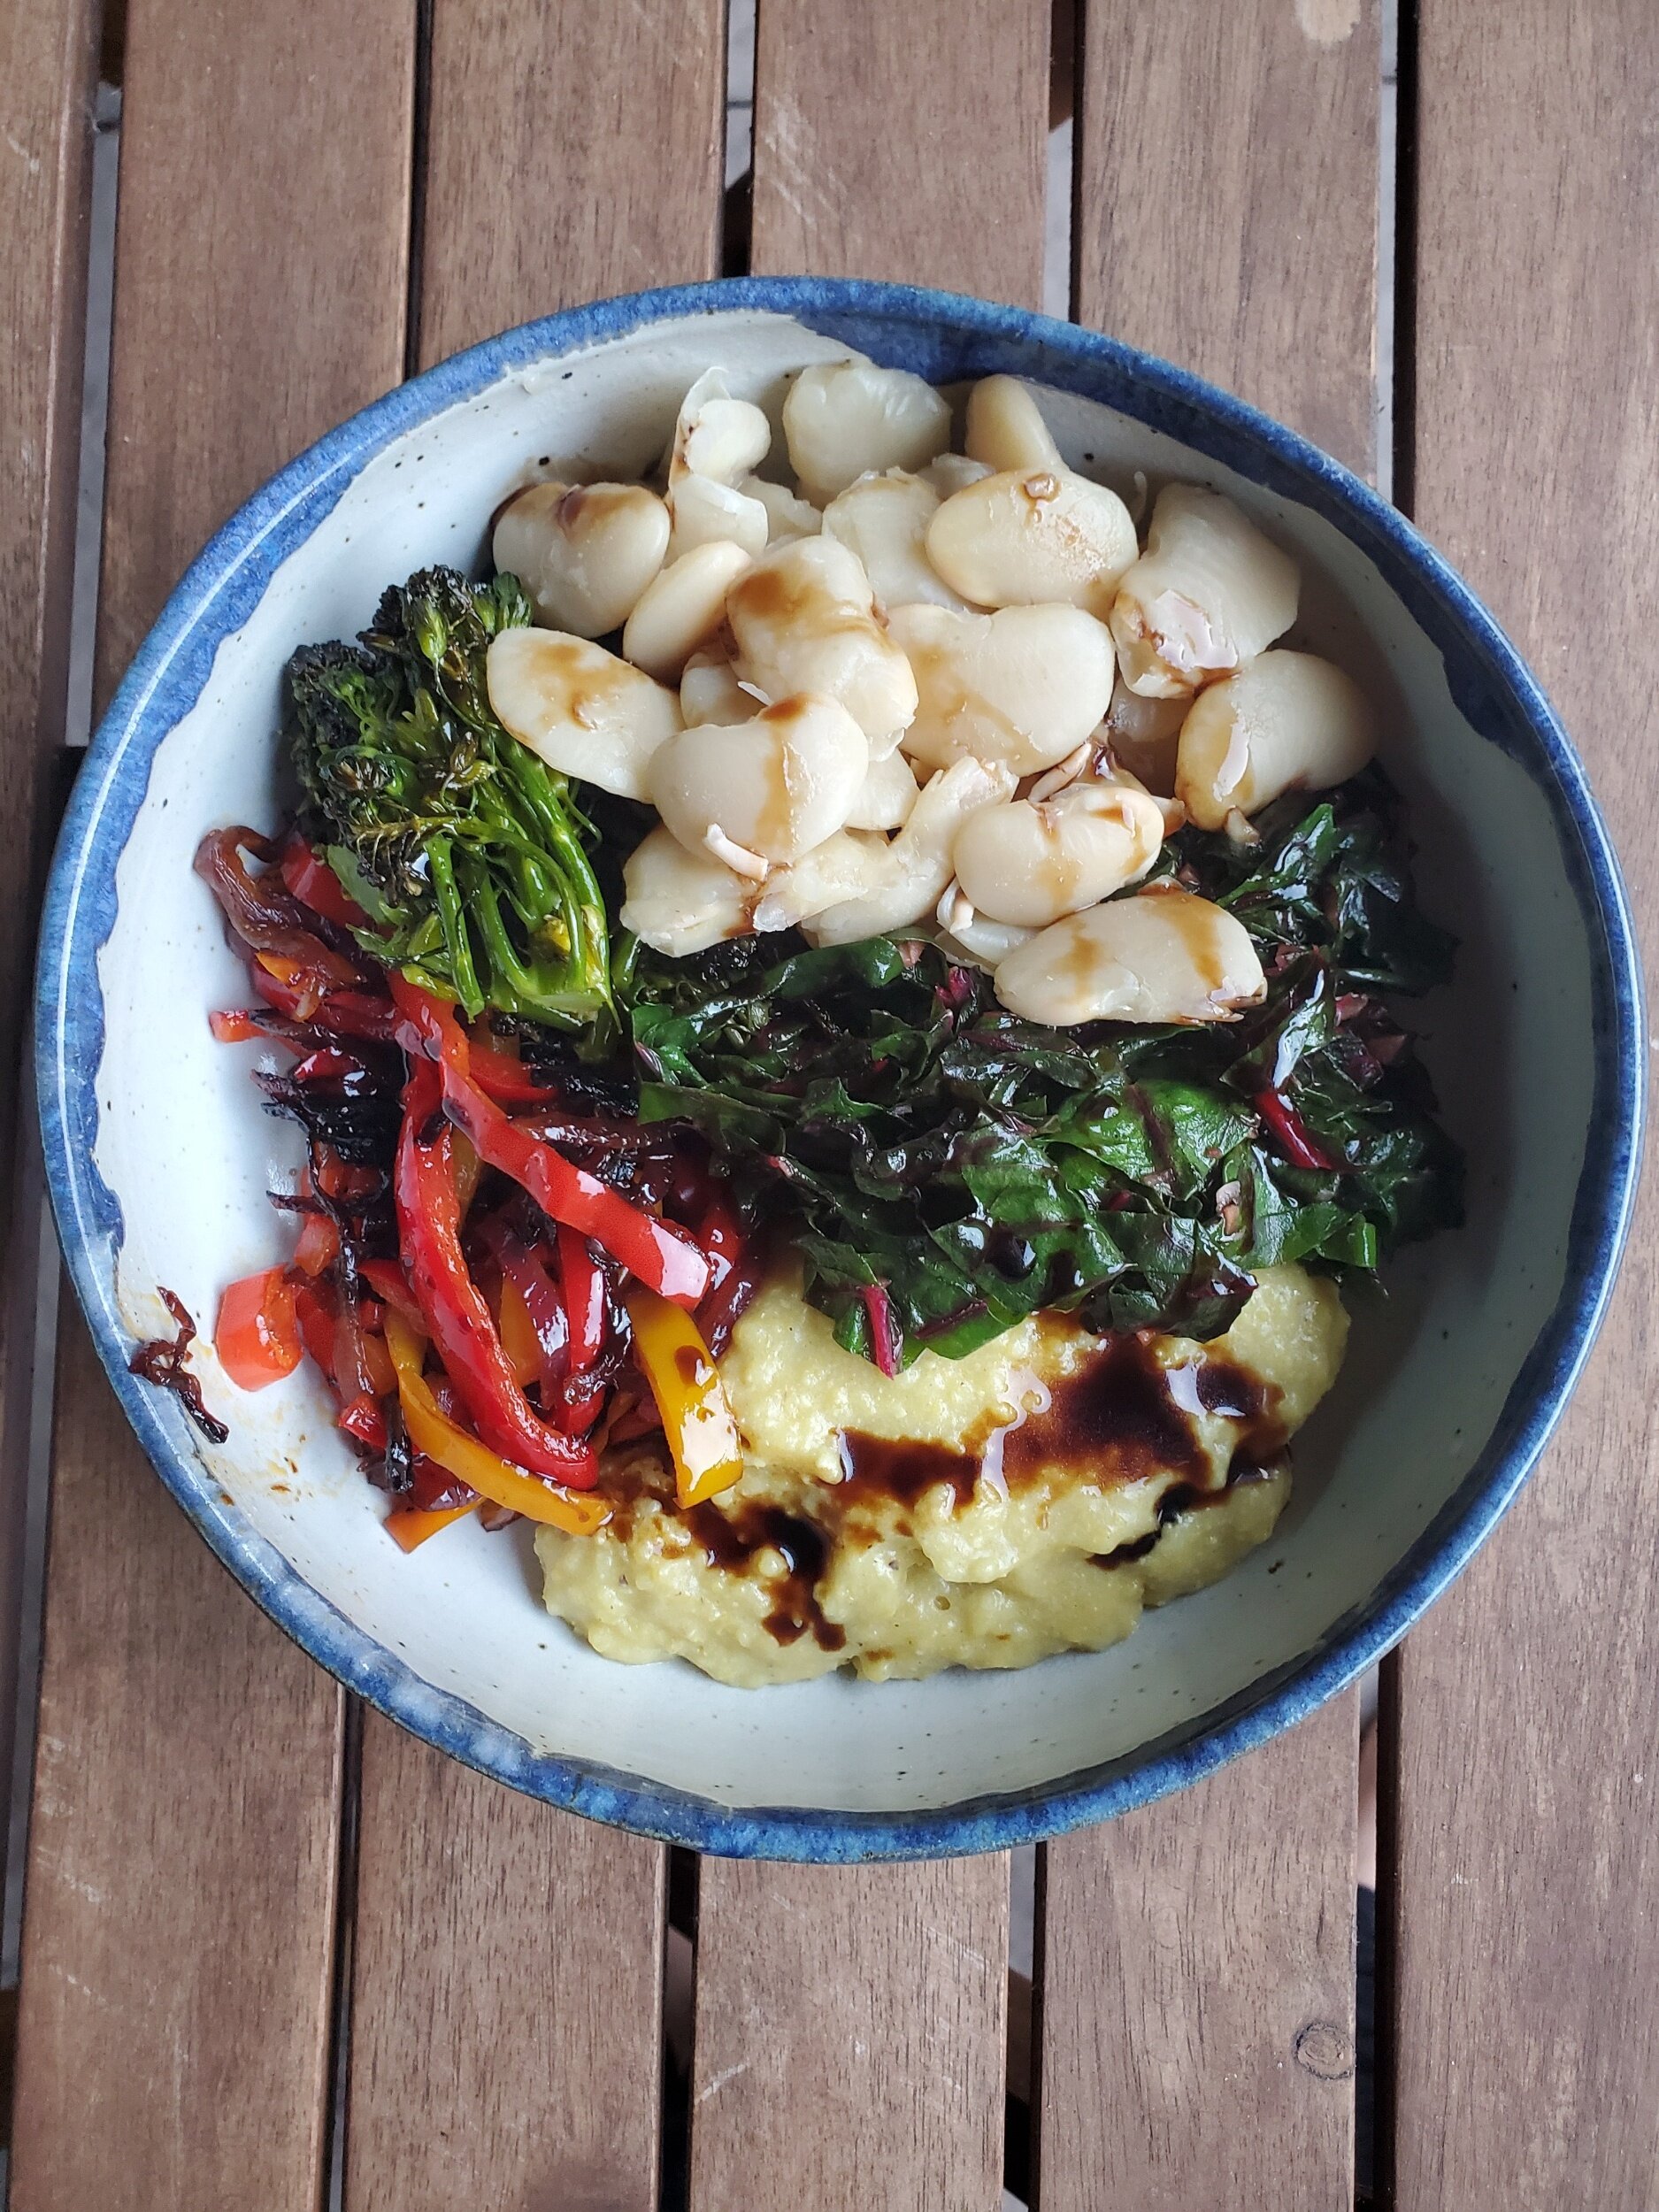
Late Summer Polenta Harvest Bowl

We love to top polenta bowls with aged balsamic vinegar. If you can afford it, balsamic that has been aged has a much lower acidity than non-aged, and the result is a syrupy and sweeter vinegar. Sometimes we’ve lived in places that have specialty stores that focus on olive oil and balsamic vinegar. Having been exposed to multiple producers has given us a real appreciation for tasty balsamic. One of our absolute favorite balsamic vinegars is apple balsamic from Rockridge Orchards and Cidery which is unfortunately only available at their farm stand in Enumclaw, Washington or at some Seattle farmers markets. The reason we include vinegar in this dish is the acidity can lift other flavors. When we don’t have access to aged balsamic, we use lemon juice, and it is delicious as well. If you have extra funds and like vinegar, we encourage experimenting with the many different types of balsamic!

processed_20201006_181859.jpg
processed_20201006_181913.jpg

Serves: 4-6

Time: 1hr with Instant Pot (or pre-cooked beans)

Ingredients

1 serving polenta

aged balsamic vinegar

For the broccolini

1 bunch broccolini

salt

oil

For the butter beans (lima beans)

1 1/3 cups (or 1 can) cooked butter beans*

For the Peppers and Onions:

1 red onion, thinly sliced

2 bell peppers, cored and sliced,

salt

oil

For the Chard:

1/2 bunch chard

3 cloves garlic

salt

oil


Make the polenta & cook the beans*.

Pre-heat the oven to 375 F. Cut the ends of the broccolini. Slice the peppers and onions. Mince the garlic for the chard and de-stem the chard and cut into small ribbons.

Toss the broccolini in olive oil, sprinkle with salt and put in the oven. Flip the broccolini after 15 minutes and cook a total of around 25 minutes at which point the broccolini should be bright green but with parts of it golden brown and crisp.

Heat a pan with 2 tbsp of oil. Add the onions and salt them. Cook for about 10 minutes (stirring regularly) or until they are starting to soften and add the peppers. Cook for an additional 10 minutes and set aside in a bowl.

Add 2 tbsp of oil to the hot pan. Add the garlic and cook until fragrant (about 1 minute since the pan is hot). Add the chard, toss with the garlic and sprinkle the whole thing with salt. Once the chard is wilted (about 2 minutes) you are ready to assemble the bowls.

To serve, layer polenta, brocolini, peppers & onions, and chard into a bowl. Drizzle the entire meal with some aged balsamic vinegar and enjoy!

processed_20201006_181903.jpg

*Cooking butter beans (lima beans) from dry:

In the Instant Pot:

To cook the butter beans in an Instant Pot, add 3/4 cup of dried butter beans to the pot.  Cover the beans with water (in the small Instant Pot this is about 6 cups of water), season with 1 tbsp kosher salt, 1 tbsp cumin, 4 garlic cloves, and 1/8 tsp cayenne.  Set the Instant Pot to pressure cook for 15 minutes letting depressurize naturally.  Drain and rinse before adding to the dish.

On the stove:

If you don’t have an Instant Pot, you can easily cook butter beans from scratch with a little planning. First you will need to soak the beans which can be done one of two ways. 1. you can soak them overnight making sure they have enough water and space to double in size or 2. you can put them in a pot and bring to boil, then turn off the water and let soak for one hour. Again, make sure you have enough water and space that they can double in size.

Once you have soaked your beans, rinse them and then put in a pot with salty water. These will be cooking for about 2 hours so you don’t want as much salt as you would use for pasta, but you do want to add enough that you can taste the salt. The best way to get good at this is to practice. Each time you salt the water, taste it and when the beans are done taste them to see if they are well salted. A well salted bean should taste flavorful but not salty. If it tastes like you are eating salt, you added too much. If the bean lacks flavor then you didn’t have enough salt.

For this recipe, also add 1 tbsp cumin, 4 garlic cloves, and 1/8 tsp cayenne to the butter beans as they cook. Cook the beans until they are soft but not falling apart (this will take 1.5-2 hours).  We recommend checking the beans at about an hour and then every 20 minutes until they are soft but not disintegrating. Make sure your pot has enough water as I have definitely cooked all the water off before and burnt the beans! This may seem like a lot of work, however once you get the hang of it the work is almost all passive and the reward is high: butter beans cooked from scratch taste much better and are much cheaper!

Polenta veggie bowl

We are fully loving spring and asparagus season. We are sharing a spring veggie polenta recipe with you today. We used broccoli greens instead of swiss chard this time because we had a lot from our spring broccoli harvest.

processed_20210612_190655.jpg

Serves: 2-4

Time: 1 1/2hrs

Ingredients

1 batch basic polenta

1 batch of shittake bacon

olive oil

salt and pepper

1 bulb fennel

1 bunch asparagus

1 tbsp lemon juice

1 red onion

1 small head of broccoli

1 bunch of swiss chard (feel free to substitute other spring greens)

2 cloves garlic

2 tbsp aged balsamic vinegar


Preheat the oven to 375 F. Begin to make the basic polenta and shiitake bacon.

Cut the fennel into slices and the broccoli into florets. Toss them with olive oil and spread on a lined baking sheet. Salt. Roast in the oven about 45 minutes, stirring every 15 minutes. Slice the onion and saute until caremilzed. Mince the garlic and cut the chard into thin strips. Fry the garlic until fragrant, no longer than 2 minutes, add the chard and salt to taste. Saute until wilted. If you have multiple frying pans these steps can be done simultaneously.

Set the oven to broil. Trim the ends off the asparagus and put on a baking sheet with olive oil and salt. Broil for 7 minutes, flip, and broil for another 7 minutes. Remove from the oven and sprinkle with lemon juice.

To assemble, place polenta in a bowl and then add a bit of each element. Finish with a drizzle of balsamic vinegar and enjoy!

Harissa Tofu with Polenta Crusted Potatoes and Fried Broccoli

This week we are combining two previous recipe to make a full plate meal. Enjoy this tofu and potatoes with broccoli on the side!

processed_20210211_120514.jpg

Serves: 2-4

Time: 1 1/2hrs

Ingredients

1 batch of polenta crusted potatoes

1 batch of harissa tofu

1 bunch of broccoli

olive oil

salt


Cook the polenta crusted potatoes and harissa tofu. Cut the broccoli into florets and cut up the stem into small pieces, removing the first inch which is very fibrous. Heat up a frying pan with olive oil and stir fry broccoli until soft (about 5 minutes). Add salt to taste. To serve assemble potatoes, tofu, and broccoli on a plate and enjoy!

processed_20210211_120410.jpg

Sesame Tofu Noodle Bowl

This is a meal we often make when we aren’t sure what else to make because it is easy to keep the needed ingredients on hand. While the recipe calls for swiss chard, we often use whatever is in our fridge. For us this is often red cabbage (since it lasts a long time in the fridge). We also love this meal with broccolini.

processed_20210215_094817.jpg
processed_20210215_094657.jpg

Serves: 4-6

Time: 1 hr 30 minutes

Ingredients

1 batch sesame tofu

1 lb pad thai rice noodles

1 bunch of swiss chard

4 cloves of garlic

1 tbsp tamari

1 tbsp sesame oil


Prepare the sesame tofu.

While the tofu is cooking, boil the pad thai noodles according to instructions on the package. Important: when the rice noodles are cooked rinse them with cold water so they don’t continue to cook into a large blob of noodle. Stir the sesame oil and tamari into the cooked noodles.

Then, wash the swiss chard and strip the leaves from the stem. Cut the chard into ribbons. Mince the garlic. Heat a pan with some olive oil. Cook the garlic until fragrant, add chard. Sautee until wilted. Toss the noodles with the chard and tofu and eat. Enjoy!

Sweet and Sour Tofu

This recipe is yet another adaptation on a strongly American-ized take on the sweet and sour flavor pairing found in some traditional Chinese cooking. We love the complementary nature of the sour and sweet pineapple and the umami and saltiness of the tamari. We like it as written, but for a saucier experience double the sauce.

processed_20210327_190409.jpg

Serves: 4-6

Time: 1 1/2 hrs

Ingredients

oil

medium onion

2 bell peppers

1 cup rice

water

For the tofu:

2 blocks tofu

cornstarch

salt

For the sauce (if you prefer your food to be very saucy consider doubling this section):

1 cup pineapple juice

3/4 cup water

3 tbsp tamari

1 1/2 tbsp agave

1 tbsp cornstarch

salt

Red pepper flakes


processed_20210327_190421.jpg

If you are cooking brown rice, you want to start your rice first. If you are cooking white rice we would put this on to cook after frying the veggies but before frying the tofu. Cook rice according to instructions on the package.

Cut your blocks of tofu in half so that you have four, one inch thick rectangles. Press the tofu between two kitchen towels, placing a cast iron pan, or something heavy on them to remove some of the liquid. This process can alternatly be done with a tofu press.

While the tofu is being pressed, slice the peppers and onions and heat a pan to medium high heat with some high heat oil. Add the onions and about 1/2 tsp of salt and cook until they start to soften about 7 minutes. Add the peppers and cook for another 7-10 minutes until the peppers are starting to brown. Then remove from heat and set aside.

Next slice the tofu into cubes or thick sticks. Combine the cornstarch and a generous pinch of salt in a shallow bowl. Toss the tofu, a couple of pieces at a time in the cornstarch mixture until coated on all sides. Heat 2 tbsp of neutral oil in a frying pan. Once hot, fry the tofu in batches on med-high making sure it gets golden brown on all sides. Feel free to add more oil if your pan gets dry. Be careful not to crowd the tofu as that will make it all stick together. We use tongs to turn each piece separately.

In a small saucepan combine all of the sauce ingredients except the cornstarch and bring to a low boil. Turn down to a simmer, add the cornstarch stirring consistently until it thickens and gets sticky. Taste and add salt as needed.

Once the tofu is finished cooking, add all tofu and the fried peppers and onions into the pan and cover with sauce. Toss until the tofu is completely coated, but not too long or the sauce will burn (about 1 minute).

Serve over rice and enjoy!


Orange Tofu and Rice Stir Fry

It’s nearing the end of citrus season where we live, and we are soaking up every last citrus filled recipe. We enjoyed adapting this deeply American-ized take on the sweet and sour flavor pairing found in some traditional Chinese cooking.

processed_20210223_145454.jpg

Serves: 4-6

Time: 1.5 hours

Ingredients

high heat oil such as avocado oil

green onions, finely chopped as garnish (optional)

For the tofu

2 firm blocks tofu

1/2 cup cornstarch

1 tsp salt

For the veggies

3 bell peppers, thinly sliced

1 large onion, thinly sliced

1 head of broccoli, chopped into small florets

For the Sauce

2 tbsp. mirin

2 tbsp. rice vinegar

1/4 cup water

1 tbsp. toasted sesame oil

3 tbsp. coconut aminos

1 tsp salt

3 tbsp. agave

1/4 tsp red pepper flakes

1 tsp siracha

Juice and zest from 1 large navel orange (1/2 cup of orange juice and 1 tbsp. of zest)

1 inch ginger, peeled and diced

3 cloves garlic, peeled and diced

1 tbsp. cornstarch

For the rice

2 cups jasmine rice

4 cups of water

1 tsp salt

1 tsp bouillon cube or paste (vegan & gluten-free option)

1/4 tsp mirin


processed_20210223_145506.jpg

Note: when we were creating this recipe, we only had one large fry pan. If you have two, you can fry the veggies and the tofu at the same time.

Cut your blocks of tofu in half so that you have four, one inch thick rectangles. Press the tofu between two kitchen towels, placing a cast iron pan, or something heavy on them to remove some of the liquid. This process can be done with a tofu press. Slice the tofu into cubes or thick sticks.

While the tofu is being pressed, slice the onions, peppers, and broccoli. Dice the ginger and the garlic and finely chop the green onion if using.

Heat up a pan with oil and stir fry the onions, peppers, and broccoli until golden brown (about 20 minutes). Remove these from the pan and set aside. Meanwhile, cook the rice. Put the rice, water, salt, bouillon paste, and mirin in a pot and bring to a boil. Stir well (making sure the bouillon is broken down fully) and lower to a simmer. Cook with lid on for about 15 minutes or until rice is done. One way to tell if the rice is done is by watching the steam coming out of the pot, once the steam stops, your rice is most likely cooked. After 15 minutes let sit off the heat for 5 minutes and then fluff with a fork.

Combine the cornstarch and a generous pinch of salt in a shallow bowl or on a small plate. Toss the tofu, a couple of pieces at a time in the cornstarch mixture until coated on all sides. Heat 2 tbsp of neutral oil in a frying pan. Once hot, fry the tofu in batches on med-high making sure it gets golden brown on all sides. Feel free to add more oil if your pan gets dry. Be careful not to crowd the tofu as that will make it all stick together. We use tongs to turn each piece separately.

Put the finished tofu and veggies in a large bowl.

To make the sauce combine mirin, rice vinegar, water, sesame oil, coconut aminos, salt, red pepper flakes, siracha, agave orange juice and zest all in a small bowl and whisk until fully incorporated. Once you’ve finished cooking all the veggies and tofu, put a small amount of oil in your pan. Add the ginger and garlic and cook for 2 minutes. Add the bowl of sauce ingredients and cornstarch. Stir for 1 minute to thicken.

Pour the sauce over the large bowl of veggies and tofu and stir until everything is coated with sauce. Spoon the mixture over rice and garnish with green onions (optional). Enjoy!

processed_20210223_145446.jpg

Swiss chard, mushroom, & tofu bowl with toasted cashews

This dish was inspired by the food that Camille had in her fridge. At the time, she had 4 mushrooms, so that is what she used. If you have more, it’s really good with about 2 cups of sliced mushrooms and I’m sure it would be good with anywhere in between. We’ve enjoyed it with both cremini and oyster mushrooms and would bet it would also taste good with shiitake mushrooms and chestnut mushrooms.

Also, we realize that yesterday was Indigenous People’s Day. If you’re interested in why we feel so called ‘Columbus Day’ should be changed federally to Indigenous People’s Day check out this beautiful episode from the All My Relations Podcast.

processed_20200705_200304.jpg

Serves: 4

Time: 30 minutes

Ingredients

For the greens:

1 bunch Swiss chard, de-stemmed and thinly sliced

some mushrooms (see intro)

salt

1/4 tsp pepper

2 tbsp olive oil

2 tbsp coconut aminos

1 tsp pomegranate molasses (optional)

For the tofu:

1 block tofu

1/4 cup sesame oil

1 tsp salt

1/4 cup nutritional yeast

For the rice:

1 cup sushi rice

2 cups slightly salted water

1 tsp rice or champagne vinegar

1/2 tsp sugar

For the garnish:

1/4 cup cashews, toasted

1/2 bunch thinly sliced green onion


Slice the mushrooms and sautee until golden brown with salt and pepper. Taste to make sure these are seasoned to your preference. While they are cooking, de-stem the chard and slice into small ribbons. When the mushrooms are fully cooked, add the swiss chard, pomegranate molasses, a bit of salt, and coconut aminos. Cook 1 minute until the chard is shiny and soft but not yet browning.

Cook the sushi rice in salted water until done. You want to add some salt, but since you won’t be draining the rice it shouldn’t be as salty as sea water. We used about 1/2 tsp salt, but this will depend on the type of salt you are using. Once it is cooked, add all the other ingredients to the rice and fluff with a fork.

Slice the tofu into 1 inch squares. Heat the sesame oil in a pan, once hot add the tofu. Cook undisturbed on one side until golden brown. Salt and flip. Cook until crispy on the second side and then pour all the nutritional yeast in the pan and stir to coat.

Toast the cashews if they are raw and slice the green onions.

To serve, assemble rice on the bottom, then tofu, then greens. Top with toasted cashews and green onion and enjoy!

processed_20200705_200307.jpg

Eggplant Chickpea Curry

After gorging ourselves on Italian style eggplant tomato dishes all summer long, we love this recipe that uses up some late summer garden crops! We particularly enjoy the ribbons of chard running through it.

Serves: 6

Time: 1.5 hrs

Ingredients

1.5 cups cooked and spiced chickpeas* (1 can)

1 onion, chopped

3 cloves garlic, minced

1 inch ginger, minced

1 tsp ground cumin

1 tsp ground coriander

1 tsp turmeric

1 tsp ground fenugreek (this spice can be a challenge to find, the curry is perfectly good without it if you cannot get your hands on some)

1 tsp salt

1/4 tsp cayenne pepper

1/2 bunch of cilantro

5 roma tomatoes or two beefsteaks, diced (or 14.5oz canned diced tomatoes)

.5 lb (2 small) potatoes (we like the waxy kind like a carola or yukon gold)

16 oz of water

1 can coconut milk

1 bunch of swiss chard, cut in ribbons

1 cup rice

olive oil

For the eggplant:

2 lbs eggplant (preferably Japanese if available), cut into 1 inch cubes

1/2 tsp cayenne pepper


If you are using dry chickpeas, follow the instructions at the end of this recipe.

Chop and salt the eggplant and let sit 20 min. This is best done in a colander over the sink as the eggplant will release liquid. Pre-heat the oven to 375 F. Drain eggplant and toss with 1/2 tsp cayenne, and 2 tbsp oil. Lay out the seasoned eggplant on a sheet pan and roast until soft and browning on the edges, this takes 45 minutes in our oven, stirring every 15 minutes. Taste a piece, it should be sweet. If bitter or crunchy, it is not done yet.

Cook the rice. Chop and boil the potatoes in well salted water. Drain when fork tender.

Sweat the onions in olive oil over medium heat about 10 minutes. Add garlic and ginger, cook another 2 minutes. Add remaining spices, stir to coat onions and allow to cook about 2 minutes. Add the tomatoes and 16 oz water and simmer until the tomatoes are soft and beginning to form a sauce, about 20 minutes, stirring regularly. Add eggplant, chickpeas, boiled potatoes, and coconut milk, simmer about 5 minutes. Add swiss chard and cook until wilted. Garnish with cilantro, and serve over rice.

*Cooking chickpeas from dry:

In the Instant Pot:

To cook the chickpeas in an Instant Pot, add 3/4 cup of dried chickpeas to the pot. Cover the chickpeas with water (in the small Instapot this is about 6 cups of water), season with 1 tbsp kosher salt, 1 tbsp turmeric, 1 tbsp coriander, and 1/4 tsp cayenne. Set the Instapot to pressure cook for 35 minutes letting depressurize naturally. Drain and rinse before adding to the dish.

On the stove:

If you don’t have an Instant Pot, you can easily cook chickpeas from scratch with a little planning. First you will need to soak the chickpeas which can be done one of two ways. 1. you can soak them overnight making sure they have enough water and space to double in size or 2. you can put them in a pot and bring to boil, then turn off the water and let soak for one hour. Again, make sure you have enough water and space that they can double in size.

Once you have soaked your beans, rinse them and then put in a pot with salty water. These will be cooking for about 2 hours so you don’t want as much salt as you would use for pasta, but you do want to add enough that you can taste the salt. The best way to get good at this is to practice. Each time you salt the water, taste it and when the beans are done taste them to see if they are well salted. A well salted bean should taste flavorful but not salty. If it tastes like you are eating salt, you added too much. If the bean lacks flavor then you didn’t have enough salt.

For this recipe, also add 1 tbsp turmeric, 1 tbsp coriander, and 1/4 tsp cayenne to the chickpeas as they cook. Cook the chickpeas until they are soft but not falling apart (this will take 1.5-2 hours). We recommend checking the beans at about an hour and then every 20 minutes until they are soft but not disintegrating. Make sure your pot has enough water as I have definitely cooked all the water off before and burnt the beans! This may seem like a lot of work, however once you get the hang of it the work is almost all passive and the reward is high: chickpeas cooked from scratch taste much better and are much cheaper!

Sweet N Salty Pitaya Bowl

This week our hearts are heavy and our bodies are exhausted as we continue the process of unlearning. We didn’t mention the 4th of July (Independence Day here in the U.S.) last week because we didn’t remember that it was coming up. Camille has many fond memories of celebrating this day with food, fireworks, and family. Never once did she stop think what this holiday is actually celebrating. She was taught that we were celebrating a great feat of independence, but today we are wondering independence for whom? While the core values claimed by the Declaration of Independence ‘life, liberty, and the pursuit of happiness’ seem worthy of pursuit, the fact is that it was only White cis-gendered heterosexual Christian colonists who were meant to receive these benefits. On July 4th, 1776 when the colonies adopted the Declaration of Independence chattel slavery was both legal and integral to the economy of the colonies. As the settlers claimed independence from the British Empire, we did so on stolen lands while committing genocide of indigenous people. This year we are seeing amazing protests sweep the world asking that our institutions stop killing Black people because of the color of their skin. While in 2020 chattel slavery isn’t supposed to exist anymore the prison industrial complex partners with police brutality to a similar affect. Feeling lost at how to reply to well-intentioned folks wishing her “happy 4th of July”, Camille used Rachel Cargle’s wise words “happy for who?”.

We are sitting with the questions of how to hold all of this knowledge. How do we hold the fond memories, the love of the values that should be core to our existence as a country, and also the death and brutality that this nation is built on. And, as we face this knowledge, how do we move forward? What do we do now that we know this? If you’re also having these thoughts reach out to us through email or text. If you’re also wondering how to hold the complexity of the life we are living, we are too. Let’s do this together.

This week we are celebrating with gratitude the full moon, the long July nights, and having fresh berries in season! In honor of these berries we’ve decided to share Camille’s favorite pitaya bowl recipe. We recognize that this bowl will be pretty expensive if you don’t already have a number of these ingredients on hand, and we don’t recommend trying to make it without a Vitamix with a tamping attachment. Feel free to play around with your own base and toppings and let us know what you love best!

We cook at home for a number of reasons including the pandemic, food allergies, money, and our love of cooking. Also, sometimes it makes more sense to eat out. For example, some recipes require so many ingredients that buying all of them to make one dish is very expensive and creates a lot of waste. For us, pitaya bowls often fall in the ‘makes more sense to eat out’ category. However, if you do want to make pitaya bowls from scratch at home, have some money to spend on ingredients, and have a Vitamix blender with tamping attachment then we highly recommend this pitatya recipe. It is sweet, fruity, salty, hearty, and delicious!

IMG_3673.jpeg

Time: 15 minutes

Serves: 1

Ingredients

for the pitaya base:

6 oz almond milk

6 oz frozen banana (if you have 24 hours you can chop your own banana and freeze the night before)

6 oz frozen mango

1 pack of frozen pitaya

1 tbsp chia seeds (optional)

1 tsp maca root powder (optional)

for the topping:

1/2 cup granola (gluten-free option)

2 tsp coconut oil, melted (optional)

1/4 tsp spirulina powder (optional)

1/2 banana, sliced

2 strawberries, sliced

12 blueberries (roughly)

1 tbsp chopped salted almonds, lightly toasted

2 tbsp peanut butter (we love Once Again for the flavor)

1 tbsp coconut flakes

2 tbsp coconut whip cream

1 tsp bee pollen (optional)

honey drizzle (as much/little as you like, if you don’t have coconut whip you might want extra honey)


IMG_3671.jpeg

If you want to experience the spirluna coconut ‘shell’ then start by melting the coconut oil and stir in the spirulina powder. If you aren’t using this you can start by slicing your almonds, and toasting them lightly in a dry pan.

Put all the pitaya base ingredients in Vitamix blender and blend on high using tamper to make sure everything gets fully incorporated. Be careful not to over-blend. Aim for a sorbet-like texture.

To assemble, layer the granola then the pitaya base. Next drizzle the warm coconut oil/spirulina mixture over the pitaya base (optional). As it cools it will form a coconut oil shell. On top of this, put sliced banana, sliced strawberry and blueberries around the bowl. Add the peanut butter in a clump and the coconut whip cream in a clump. Sprinkle the toasted almonds on top of the peanut butter and then sprinkle the whole bowl with coconut flakes. Top the whip cream with the bee pollen and then drizzle the entire bowl with local honey. Enjoy!

IMG_3669.jpeg

Black Beans and Rice with Cilantro Crema

When we were kids, our understanding of vegetarians was all they ate were black beans and rice. We now know that isn’t true at all, however we do love going back to this as a staple. Warm rice and beans with zesty cilantro cream on top is straight up delicious. It’s also quick and it’s easy to substitute whatever veggies you have on hand to help you clean out the fridge. Also, if you don’t have sunflower seeds you can substitute cashews or pumpkin seeds in the crema. If you aren’t using an Instant Pot to cook your beans, you will need to add 2-3 hrs of bean cooking time in addition to an overnight soak. We don’t recommend using canned beans for this recipe since much of the flavor comes from how the beans are cooked.

Black beans and rice is a staple in many cuisines and we didn’t want to post this without talking briefly about cultural appropriation. Part of being raised and socialized white in the US is not being taught our rich ancestral traditions and ethnic origins. These were purposefully taken from us in the 1600s during the process of making us white and others non-white. Not having those rich historical traditions at our fingertips, and being settlers on a foreign land, it is easy to be hungry for traditions be they spiritual, musical, artistic, or food/recipes. For us, the food culture we grew up with was largely invented in the 1950s and revolved around meat. When we moved away from those food traditions, we felt like we were missing something. We had no cultural knowledge of how to cook vegetables deliciously or how to have a varied diet that fed all our body’s needs. It is here that we need to acknowledge that many of the foods and food preparations we learned were from cultures other than our own. Often ones that have been historically dominated by white people. How do we justify sharing these recipes that are neither all our own nor authentic to an originating culture? How do we know when we are appropriating and when we aren’t?

We don’t have the answers to these questions and we aren’t going to stop ourselves from living in hopes of not doing harm (harm is inevitable). What we offer is this: here is one of our recipes for a staple from a culture that isn’t ours. Cook with it, enjoy it, and if you feel harmed by us sharing it please let us know - we are ready and open to learning publicly. If you are interested about learning more on cultural appropriation check out one of our favorite articles or favorite podcast episode on the topic.

What’s Wrong with Cultural Appropriation? These 9 Answers Reveal Its Harm

In a Metal Mood - Revisionist History

processed_20200227_194922.jpg

Time: 1 hr with Instant Pot

Serves: 6

Ingredients

1 avocado

For the Beans:

1 1/3 cup dry black beans

1 clove garlic

1 tbsp kosher salt

2 tsp cumin

1/4 tsp chili

sprinkle of cayenne

squeeze of lime

For the Rice:

1 1/2 cup brown rice

3 cups of water (or stock)

1 tsp bouillon (gluten-free option; soy-free option)

1/4 tsp salt

3 tbsp minced cilantro

squeeze lime

For the Veggies:

1 tbsp olive oil

1 small onion, thinly sliced

2 medium bell peppers (I like yellow and orange), thinly sliced

1 small zucchini, cut in half coins

1 tsp cumin

1 tsp salt, divided

squeeze of lime

For the Sauce:

2/3 cup sunflower seeds

1 cup water

1/2 bunch cilantro

juice of half a lime

3/4 tsp salt

1/2 tsp sriracha


Soak the sunflower seeds in a bowl of water.

Add the all bean ingredients to an Instant Pot. Cover the beans and seasonings with water (in the small Instant Pot this is about 6 cups of water). Set the Instant Pot to pressure cook for 19 minutes letting depressurize naturally. Drain and rinse the beans before adding to the dish. If you don’t have an Instant Pot, see bean cooking instructions at the bottom*.

While the beans are cooking, put rice and water in a small pot. Bring to a boil add bouillon and salt, stir to dissolve. Reduce to a simmer and simmer about 45 minutes or until the rice has absorbed all of the water. Remove from heat, stir in cilantro, and a squeeze of lime juice.

While the rice is cooking, thinly slice the onions and bell peppers. Cut the zucchini into half coins. In a frying pan heat 2 tbsp olive oil and 1/2 tsp salt. When the oil is hot add onions and cook until starting to brown, about 7 minutes. Add the bell peppers and zucchini and fry. When veggies start to turn oily, after about 2 minutes add the remaining salt and cumin. Continue frying until golden brown, about 5 more minutes. Remove from heat and add a squeeze of lime.

To make the sauce, drain the soaked sunflower seeds and add them with the other sauce ingredients to a high powered blender and blend until smooth. Taste and season accordingly.

Slice avocado and add a pinch of salt and a squeeze of lime juice.

To assemble: layer rice, beans, veggies, and top with sliced avocado and a thick drizzle of sauce. Enjoy!

*To Cook Beans without an Instant Pot:

If you don’t have an Instant Pot, you can easily cook beans from scratch with a little planning. First you will need to soak the beans which can be done one of two ways. 1. you can soak them overnight making sure they have enough water and space to double in size or 2. you can put them in a pot and bring to boil, then turn off the water and let soak for one hour. Again, make sure you have enough water and space that they can double in size.

Once you have soaked your beans, rinse them and then put in a pot with salty water. These will be cooking for about 2 hours so you don’t want as much salt as you would use for pasta, but you do want to add enough that you can taste the salt. The best way to get good at this is to practice. Each time you salt the water, taste it and when the beans are done taste them to see if they are well salted. A well salted bean should taste flavorful but not salty. If it tastes like you are eating salt, you added too much. If the bean lacks flavor then you didn’t have enough salt. You should also add the other bean seasonings listed in this recipe.

Winter Bounty Kale Salad

My dear friend Meredith shared this recipe with me. It is perfect in the fall or winter when what you have in abundance is root vegetables, apples, and kale. I love all the colors in this salad; it’s a treat for the eyes and on the palette! We usually don’t peel the vegetables (sweet potato and apple are left un-peeled) however we recommend peeling the carrot because peeled carrot tastes sweeter when you roast it. You can totally leave the carrot peel on, however it will add a bit of bitterness to the dish.

Photo Credit: Meredith Hickson

Photo Credit: Meredith Hickson

Serves: 2-4

Time: 1 1/2 hrs (45 minutes active time)

Ingredients

1 medium sweet potato (1 lb), 1/4“ diced

2 root vegetables (3/4 lb), peeled and 1/4” diced (we used carrots but parsnips and beets are also nice)

4 tbsp olive oil

1 1/2 tsp salt

1/2 tsp pepper

1 medium green apple, diced

1/2 cup raw un-salted pumpkin seeds or sunflower seeds

for the chickpeas:

1 15-oz can chickpeas or 1 1/2 cups cooked chickpeas*, drained

1 tbsp oil

1 tsp curry powder

1 tsp paprika

1/4 tsp turmeric

1/4 tsp garlic powder

for the kale:

1 generous bunch kale, chopped into thin ribbons

1 tsp apple cider vinegar

1 pinch of salt

for the dressing:

2 tbsp maple syrup

1/4 cup tahini

1 tsp apple cider vinegar

3 tbsp hot water

1 tsp curry powder

1 tsp tamari (gluten-free soy sauce)

1/4 tsp garlic powder

1/4 tsp paprika

1/8 tsp cayenne

1/8 tsp turmeric


Pre-heat the oven to 400 F. Dice the sweet potato and root vegetables. Toss in a bowl with 4 tbsp olive oil, 1 1/2 tsp salt, and 1/2 tsp pepper. Spread on baking sheet and bake until golden brown, stirring every 10 minutes. This should be about 45 min. Toss chickpeas in a bowl with 1 tbsp oil, 1 tsp curry powder, 1 tsp paprika, 1/4 tsp turmeric, and 1/4 tsp garlic powder. Spread on baking sheet and cook until golden brown and slightly crispy, stirring every 15 minutes. This should be about 45 min.

Wash and de-stem the kale. Cut into tiny strands (chiffanade). Pour 1 tsp apple cider vinegar and a pinch of salt over the kale and massage until the kale turns a bright green color.

Combine all ingredients for the dressing and whisk until smooth. Toast pumpkin seeds or sunflower seeds in a dry pan on medium heat until fragrant. Raw seeds can burn quickly, so remove from heat if starting to brown. Dice the green apple.

Combine kale, chickpeas, roasted vegetables, apple, and pumpkin seeds. Dress each serving of salad before eating. Enjoy!

Hot tip: If you end up with extra dressing, it makes a great sauce to use in wraps.

*Cooking chickpeas from dry:

In the Instant Pot:

To cook the chickpeas in an Instant Pot, add 3/4 cup of dried chickpeas to the pot.  Cover the chickpeas with water (in the small Instant pot this is about 6 cups of water), season with 1 tbsp kosher salt, 1 tsp turmeric, 1/4 tsp garlic powder, and a pinch of cayenne.  Set the Instant pot to pressure cook for 35 minutes letting depressurize naturally. Drain and rinse before adding to the dish.

On the stove:

If you don’t have an Instant Pot, you can easily cook chickpeas from scratch with a little planning. First you will need to soak the chickpeas which can be done one of two ways. 1. you can soak them overnight making sure they have enough water and space to double in size or 2. you can put them in a pot and bring to boil, then turn off the water and let soak for one hour. Again, make sure you have enough water and space that they can double in size.

Once you have soaked your beans, rinse them and then put in a pot with salty water. These will be cooking for about 2 hours so you don’t want as much salt as you would use for pasta, but you do want to add enough that you can taste the salt. The best way to get good at this is to practice. Each time you salt the water, taste it and when the beans are done taste them to see if they are well salted. A well salted bean should taste flavorful but not salty. If it tastes like you are eating salt, you added too much. If the bean lacks flavor then you didn’t have enough salt.

For this recipe, also add 1 tsp turmeric, 1/4 tsp garlic powder, and a pinch of cayenne to the chickpeas as they cook. Cook the chickpeas until they are soft but not falling apart (this will take 1.5-2 hours).  We recommend checking the beans at about an hour and then every 20 minutes until they are soft but not disintegrating. Make sure your pot has enough water as I have definitely cooked all the water off before and burnt the beans! This may seem like a lot of work, however once you get the hang of it the work is almost all passive and the reward is high: chickpeas cooked from scratch taste much better and are much cheaper!

Photo Credit: Meredith Hickson

Photo Credit: Meredith Hickson