Eggplant Pesto Pizza

Eggplant season is here again and we are eating it every chance we get! With this pizza recipe the time varies widely depending on how you choose to make your pizza crust. You can buy pizza crust from the store to make the process quicker and easier, or you can make pizza from scratch. If you make it from scratch, make sure to check your recipe to get a sense of how much time that will take. Another option one of our friends does is to make dough from scratch and freeze it for later.

Makes: 1 large pizza

Time: 1 hr + additional time if making pizza dough from scratch

Pizza Crust (Anne uses the Joy of Cooking recipe, but any recipe or store bought would do just fine), for gluten-free pizza crust we recommend Simple Mills Brand

1 medium eggplant

1 medium zucchini

1 batch of sun-dried tomato pesto, on the thicker side

3 garlic cloves, minced

(optional) 1/2 bunch of kale, chiffonaded


If you are making the pizza dough from scratch, check your recipe to see how long you need for dough preparation. Prepare your crust for toppings, remembering to take into account any resting or cooling time it might need. Now we will discuss how to prepare the toppings.

Turn on your broiler. Peel the eggplant and cut it into long slabs about 1/2 inch thick. Brush both sides with olive oil and place on a broiler pan. Broil about 7 minutes on each side, or until golden brown. When broiling, it’s very easy to burn the eggplant, so make sure to set a timer each time and listen to the timer. When the eggplant is soft and browned on both sides, remove it from the oven and set aside. The browning may be splotchy, but that is ok.

Pre-heat the oven according to your pizza dough instructions. If you need to do any more work on the crust before adding the toppings, now is a good time to do that.

Next, mince the garlic and then slice the zucchini into long thin strips. Heat up a pan with oil and sauté the zucchini until it is golden brown on one side, and lightly browned on the other side, about 15 minutes. Then add the garlic and cook an extra 3 minutes until the garlic is fragrant.

If you have a pizza peel and a pizza stone, you will build your pizza on the peel sprinkled with cornmeal or semolina flour and cook it on the stone. If you don’t, it is easy to cook this pizza on a cookie sheet. Or to use a cookie sheet, pizza stone combo.

If you are adding the optional kale, you can wilt it in a pan with a little oil while the pizza is in the oven.

Spread the pesto onto the pizza crust. Cut or tear your eggplant into long strips and cover the pesto with the eggplant.  The combination of eggplant and pesto will make everything hold together nicely.  Top with the zucchini and put in the oven.  Bake about ten minutes and then optionally add the kale.  Continue to bake until the crust is golden (about 5 more minutes, but can vary a lot depending on the crust). Remove from oven, let cool slightly. Slice, serve, and enjoy!

Creamy Gnocchi with Roasted Tomato and Basil

We have recently started using premade gnocchi in our kitchen. We really like having a quick cooking option to add gnocchi to a dish. This dish is one that feels fast to pull together while still feeling luxurious and delicious. We have access to Delallo brand gnocchi and we like it. They make a gluten-free version and a version with gluten. While neither version have dairy products in the ingredients list, the gluten-free version does have an allergy warning saying “May contain milk”.

Serves 4-6

Time 30 minutes

Ingredients

2 box of gnocchi (gluten-free option, dairy-free option)

1 pint cherry tomatoes

2 tbsp olive oil

a handful of basil leaves

for the sauce:

1 tbsp olive oil

1 cippolini onion

3/4 cup cashews soaked for at least 30 min

1 1/4 cup water

1/2 lemon, juiced

1/2 tbsp garlic granules

1/2 tsp salt

1 pinch of red pepper flakes


Cover the cashews with water to soak. Preheat the oven to 350 F. Put on a large pot of salty water to boil.

When the water boils, cook the gnocchi according to the instructions on the package. Meanwhile, rinse the tomatoes and put them on a sheet pan. Drizzle with 2 tbsp olive oil and then sprinkle with some salt. Put in the oven to roast until the skins pop open, about 12 minutes. Next, drain your soaked cashews and add them to a high powered blender with the water, lemon juice, and garlic granules. Blend until smooth. Finally, slice the onion thinly.

Once you have drained the gnocchi, put the remaining tbsp of olive oil in the pan and return to medium high heat. Put the onion in the pan and add some salt. Cook until the onion is soft and starting to brown, stirring constantly. Add the hot pepper flakes and stir in. Add the cashew alfredo sauce to the pan and stir until slightly thickened. Remove from heat.

Add the gnocchi and roasted tomatoes to the pot. The tomatoes will break down and mix with the creamy sauce. Garnish generously with torn basil leaves. Enjoy!


Cilantro Tomato Black Eyed Peas

Hi, Camille speaking here. I love black eyed peas because they are a bean that doesn’t need any soaking to cook from dry! It’s great when I haven’t planned ahead and still want a fairly quick meal (extremely quick if you have an Instant Pot) and still not too long if you are cooking on the stove. When I lived in Senegal, bean sandwiches was a common and delicious breakfast if you had enough money to afford it. This recipe is very similar to the sauced beans that I ate there and would be delicious served on a baguette. We also used them in our Last Chance Veggie Skillet.

Serves: 4 as a side

Time: 25 minutes

Ingredients

1 Can Black Eyed Peas or 3/4 cup dried black eyed peas

1/2 onion

olive oil

2 cloves garlic

1 tbsp tomato paste

1 tbsp oil from Mama Lil’s Peppers

salt

1 cup vegetable stock (or bouillon cube and water), gluten-free option, soy-free option

handful of cilantro


If you are using dry black eyed peas, cook them according to the instructions at the end of this recipe. If you are using canned black eyed peas then open the can and rinse the cooked peas.

Chop the onion so that the pieces are about the same size as the peas. Mince the garlic. Cook the onions on medium heat with olive oil until they begin to become transparent. Add the garlic for an additional minute. Add the hot pepper oil and tomato paste. Stir to coat the onions. Add the cooked beans and stock. Stir well. Bring to a boil and then turn down to a simmer and cook until it’s the consistency that you like, stirring regularly. Wilt the cilantro in. Stir and enjoy!

*Cooking black eyed peas from dry:

In the Instant Pot:

To cook in an Instant Pot, add 3/4 cup of dried black eyed peas to the pot.  Cover the beans with water (in the small Instant Pot this is about 6 cups of water), season with 1 tbsp kosher salt. Additionally if you happen to have the following add these as well: 1 tbsp cumin, 2 tsp garlic powder, and 1/8 tsp cayenne.  Set the Instant Pot to pressure cook for 6 minutes letting depressurize naturally.  Drain and rinse before adding to the dish.

On the stove:

If you don’t have an Instant Pot, you can easily black eyed peas from scratch with no planning. They are a bean that doesn’t need any soaking, yay! Put the black eyed peas in a pot with salty water. These will be cooking for about 45 minutes so you don’t want as much salt as you would use for pasta, but you do want to add enough that you can taste the salt. The best way to get good at this is to practice. Each time you salt the water, taste it and when the beans are done taste them to see if they are well salted. A well salted bean should taste flavorful but not salty. If it tastes like you are eating salt, you added too much. If the bean lacks flavor then you didn’t have enough salt.

Additionally if you happen to have the following add these as well: cumin, garlic powder, and a tiny amount of cayenne. 

Cook the peas until they are soft but not falling apart (this will take about 45 minutes).  We recommend checking the beans at 20 minutes and then every 10 minutes o cook until they are soft but not disintegrating. Make sure your pot has enough water as I have definitely cooked all the water off before and burnt the beans!

Vegan Coconut Custard Pie

Coconut custard pie is one of Camille’s absolute favorites. They love eating it in the morning with a cup of natural coffee or some (oat)milky black tea. This recipe is inspired by the Minimalist Baker (one of Camille’s favorite food blogs). If you want to make their version of the pie you can find it here: minimalist baker’s coconut cream pie.

Makes: 1 pie

Time: 30 minutes active time, 3 hours (or overnight) resting time

Ingredients

For the crust:

1 cup gluten-free rolled oats (optionally sub gluten-free oat flour)

1 cup almond flour

1/4 tsp sea salt

2 tbsp coconut sugar

5 tbsp vegan butter, soy-free option

For the filling:

6 tbsp cornstarch

1/3 cup coconut sugar

1 pinch sea salt

2 cans full fat coconut milk

1 tsp vanilla extract

1/2 cup shredded coconut, plus more for garnish


Pre-heat oven to 350 F and grease a standard size pie dish. If you don’t own one of these, you can use any 8X8 pan, or if you use multiple smaller pans adjust cooking time for crust.

Pulse oats in a high speed blender or food processor until it is the texture of fine flour. If you are using oat flour, you can skip this step. Mix this oat flour with the almond flour, sea salt, and coconut sugar in a bowl. Cut the 5 tbsp of butter into the dry mixture until it the butter is pea sized and you have dough that holds up when you squeeze it between your fingers. The dough may look crumbly. If it crumbles apart completely when you squeeze it, you can work in a bit more butter. Using your hands, press this dough into the pre-greased pie dish until it is an even thickness on all sides. If you find it’s very thick or it seems like you have extra, you can pull this toward the top edge to create thicker edge around the rim. Bake the crust for 15-25 minutes until it is starting to brown and smells cooked. Note, sometimes the crust doesn’t look very much browner to me even when it is fully cooked. Remove and set aside to cool.

When the pie crust is done cooking, or is only 10 minutes away from being done, add the cornstarch, canned coconut milk, coconut sugar, and sea salt to a sauce pan and stir to as smooth a texture as possible (you may not be able to break up all the lumps before you heat it). Add this to medium heat and continue stirring focusing on removing all lumps. Once this starts to boil, cook for about 6 more minutes stirring constantly. The mixture should be bubbling and getting thicker. Use a rubber spatula to keep scraping the bottom and sides to keep the custard from burning. Once the mixture is thicker and looks jiggly, remove from heat and stir in 1/2 cup of shredded coconut and the vanilla extract. Stir this, and then pour it into the pre-cooked pie crust. Garnish with coconut shreds.

Let the pie cool on the countertop until it is room temperature, and then place it in the fridge at least 2-3 hours, ideally overnight, to set up. Note: if you your pie dish is made of glass, be especially careful not to put it in the fridge while still hot. Hot ceramic or glass cookware will break if you move it from cold to hot or hot to cold too quickly. Slice and enjoy!

Spinach and Sausage Bowl

We’re happy to be celebrating a new year with a hearty bowl of greens and vegan sausage!

Serves: 4

Time: 30 minutes

Ingredients

1 1/2 cups white rice

vegetable bouillon (optional, gluten-free option, soy-free option))

2 tbsp high heat oil (like avocado)

1 package Beyond Meat Italian Sausage

1 onion

1 bell pepper

1 handful shitake mushrooms

2 large handfuls of spinach

3 tbsp white wine or rice vinegar

Salt

Pepper


Cook the rice according to package. We like to cook rice in vegetable stock or with vegetable bouillon and a pinch of salt for more flavor.

Slice the onion while heating a pan to medium high heat with the oil. Add the onion to the pan, stirring occasionally until softened. While the onions are cooking, slice the bell peppers and mushrooms and add them to the pan as well. Slice the sausages and add them to the pan as well. Season to taste with salt and pepper. Cook on med-high heat until the veggies are fully cooked and the sausages are browned. As things start to stick, add the white wine or rice vinegar. When everything is fully cooked, add the spinach and stir. Allow to cook until the spinach is wilted and bright green.

Serve over rice and enjoy!

Veggie Bean 'N Noodle Soup

The rains are starting here in the Pacific Northwest and we are enjoying cozying up with this warm, quick, veggie soup.

processed_20210914_132049.jpg
processed_20210914_132103.jpg

Serves: 4-6

Time: 30 minutes

Ingredients

1 tbsp tomato paste

3 cups seasoned white beans* (2 cans)

1 medium onion

3 carrots

4 cloves garlic

1 medium zucchini

dried oregano

dried thyme

pinch hot pepper flakes

14.5 oz diced tomatoes

4 cups vegetable broth, gluten-free option and soy-free option

14.5 oz water

1/2 lb pasta shells, gluten free option

4 large broccoli leaves (replace with chard if broccoli leaves are unavailable)

1/2 cup bean water


If you are cooking beans from dry, put them in Instant pot to cook (or cook these from scratch before you start your soup).

Heat a large pot of salty water (for cooking pasta). When this water comes to a boil, cook the pasta el dente (usually about 2 minutes less than the recommended cook time). Drain and rinse with cold water until fully cooled down to prevent clumping.

Heat oil in a large soup pot. Cut the onions and carrots and cook over medium high heat until onions are soft, about 10 minutes, stirring frequently. While these are cooking, cut the garlic and zucchini. Add the garlic and zucchini to the pot and cook for an additional 4 minutes. Add the oregano, thyme, hot pepper flakes, and tomato paste. Stir to coat, cooking for about 1 minute. Add the diced tomatoes, vegetable broth and the water. Bring to a boil and then reduce to a simmer.

Cut the greens into ribbons. Add the cooked pasta, beans, and greens to soup and simmer for a final 5 minutes. Add salt to taste. If you like, instead of using salt you can use bean water (if you cooked the beans from scratch) or vegetable bouillon paste. Serve and Enjoy!

*Cooking white beans from dry:

In the Instant Pot:

To cook the white beans in an Instant Pot, add 1 1/3 cups of dried white beans to the pot.  Cover the beans with water (in the small Instant Pot this is about 6 cups of water), season with 1 1/2 tbsp kosher salt, 2 cloves garlic, 1 tbsp cumin, a sprig of rosemary, and 1/8 tsp cayenne.  Set the Instant Pot to pressure cook for 28 minutes letting depressurize naturally. Drain and rinse, reserving 1/2 cup of the liquid, before adding to the dish.

On the stove:

If you don’t have an Instant Pot, you can easily cook white beans from scratch with a little planning. First you will need to soak the beans which can be done one of two ways. 1. you can soak them overnight making sure they have enough water and space to double in size or 2. you can put them in a pot and bring to boil, then turn off the water and let soak for one hour. Again, make sure you have enough water and space that they can double in size.

Once you have soaked your beans, rinse them and then put in a pot with salty water. These will be cooking for about 2 hours so you don’t want as much salt as you would use for pasta, but you do want to add enough that you can taste the salt. The best way to get good at this is to practice. Each time you salt the water, taste it and when the beans are done taste them to see if they are well salted. A well salted bean should taste flavorful but not salty. If it tastes like you are eating salt, you added too much. If the bean lacks flavor then you didn’t have enough salt.

For this recipe, also add 1 1/2 tbsp kosher salt, 2 cloves garlic, 1 tbsp cumin, a sprig of rosemary, and 1/8 tsp cayenne to the white beans as they cook. Cook the beans until they are soft but not falling apart (this will take 1.5-2 hours).  We recommend checking the beans at about an hour and then every 20 minutes until they are soft but not disintegrating. Drain and rinse, reserving 1/2 cup of the liquid, before adding to the dish.

Make sure your pot has enough water as I have definitely cooked all the water off before and burnt the beans! This may seem like a lot of work, however once you get the hang of it the work is almost all passive and the reward is high: beans cooked from scratch taste much better and are much cheaper! 

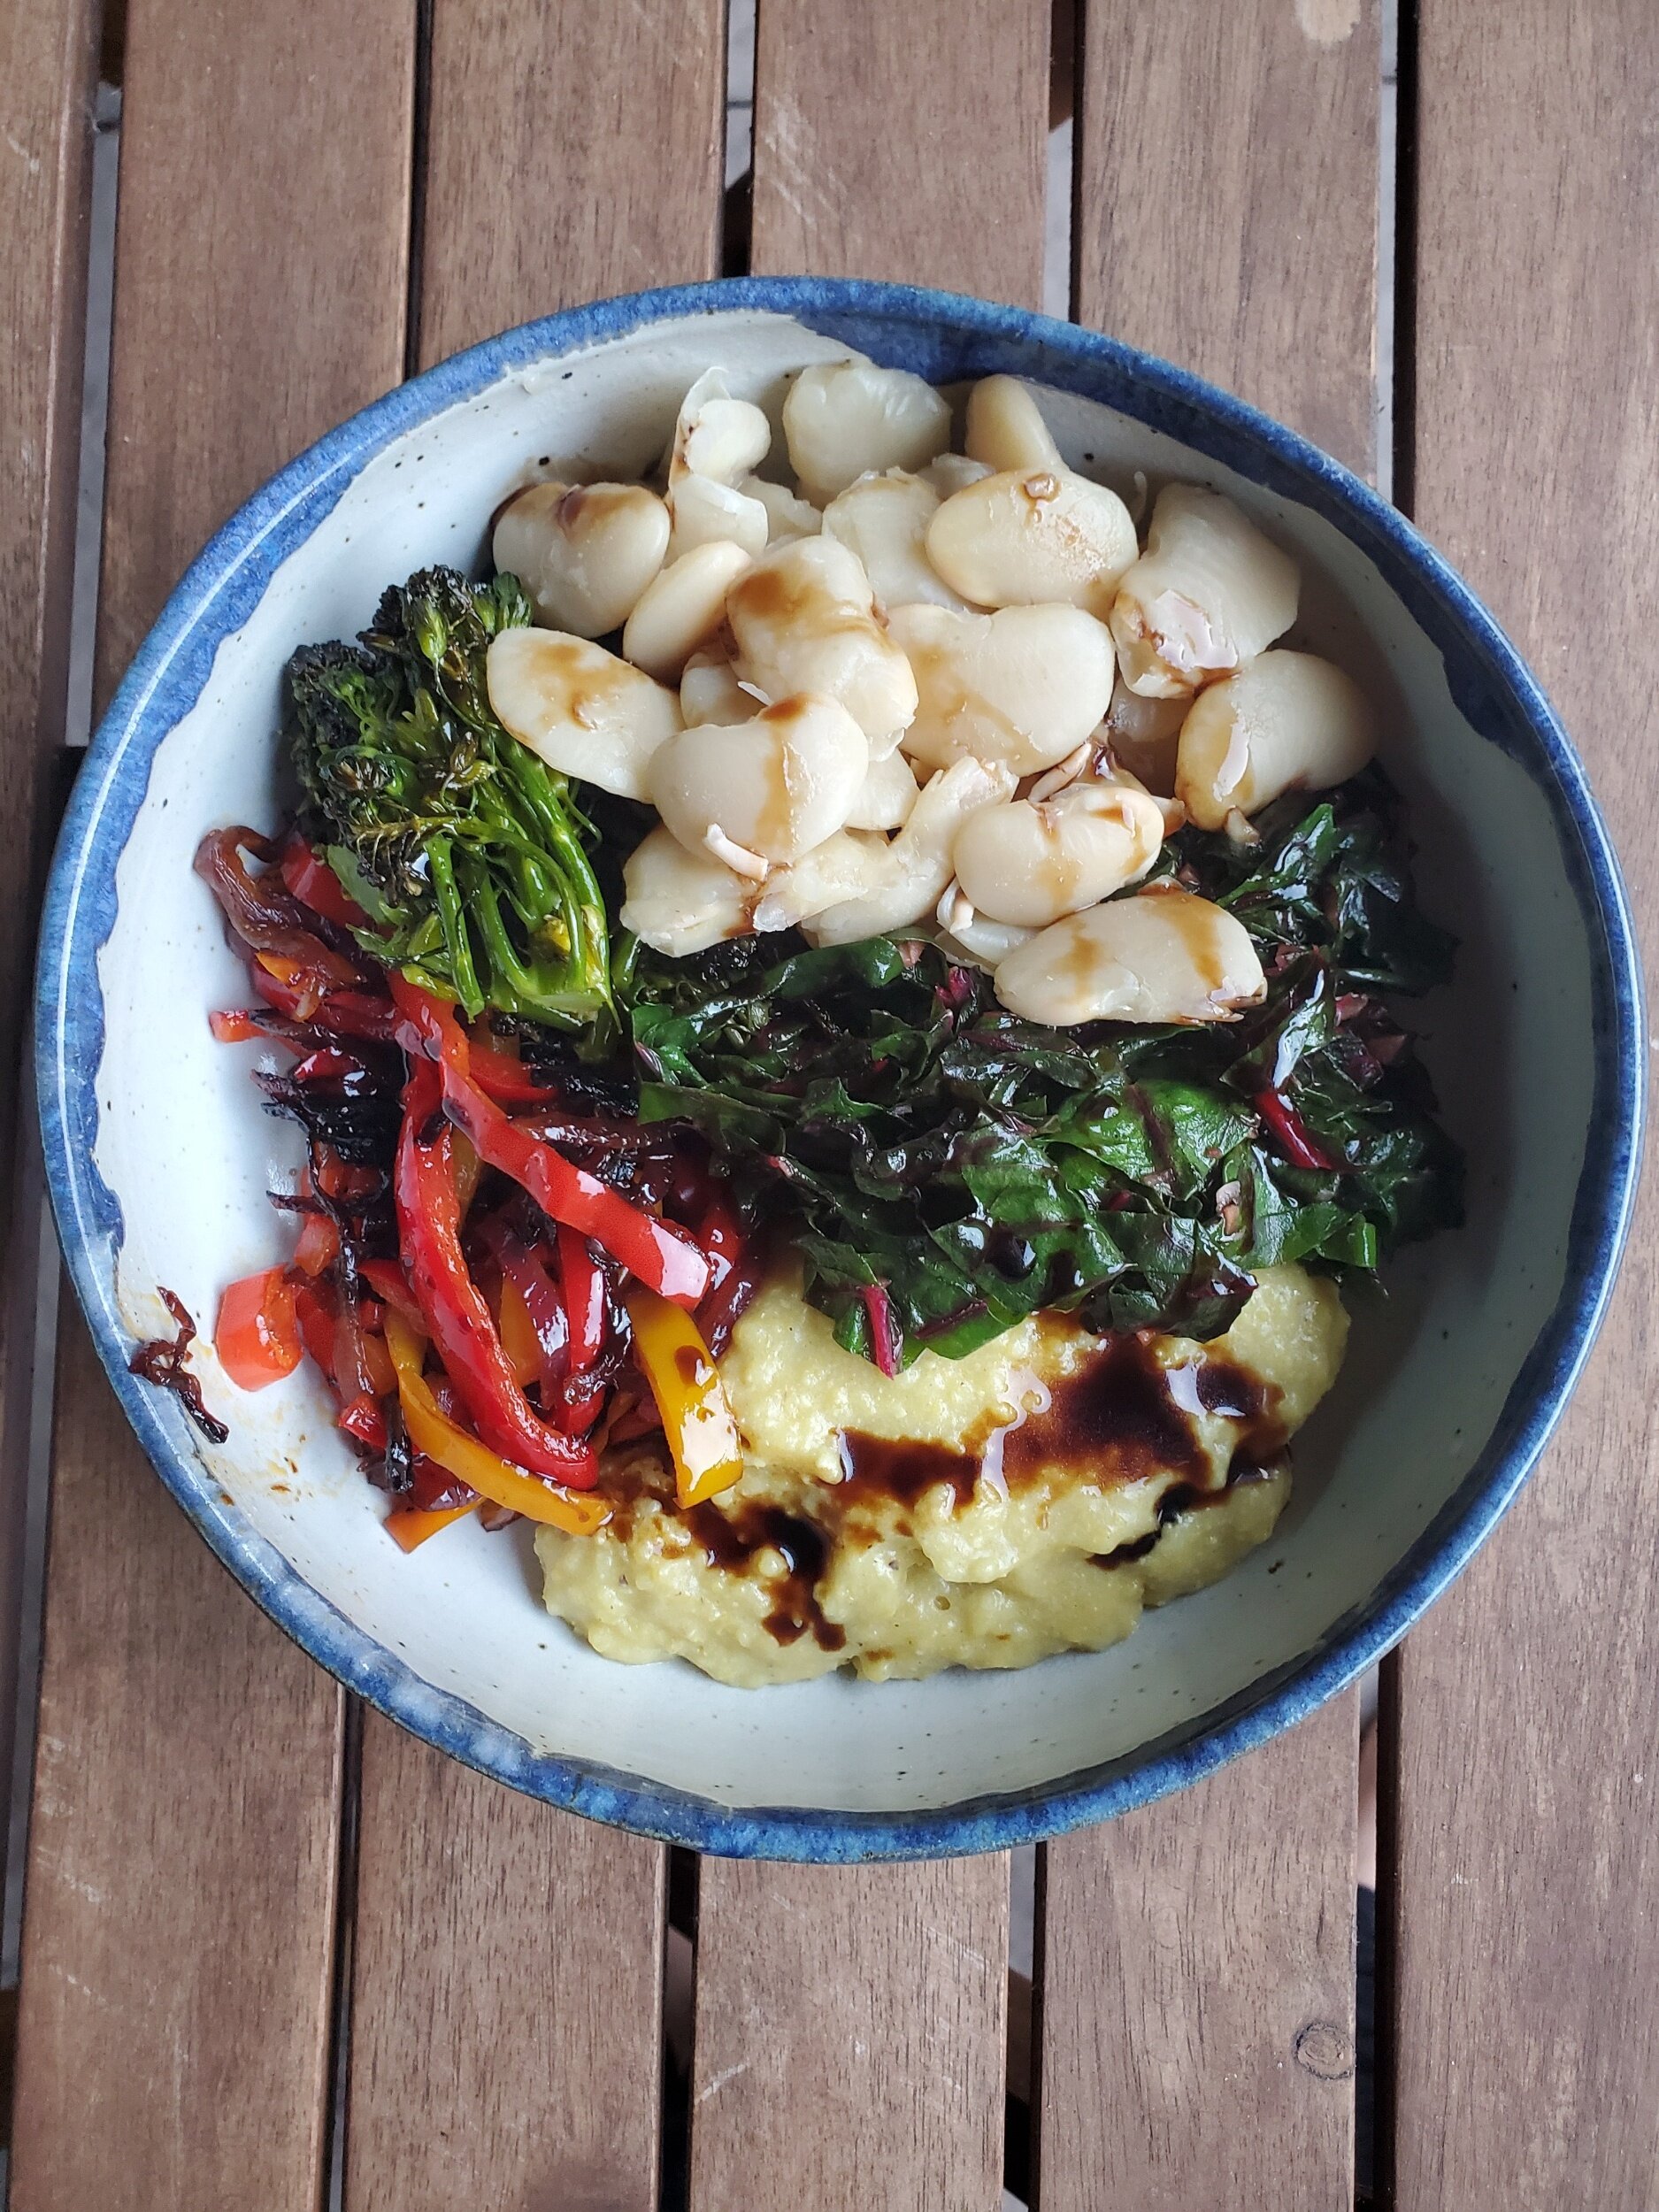
Late Summer Polenta Harvest Bowl

We love to top polenta bowls with aged balsamic vinegar. If you can afford it, balsamic that has been aged has a much lower acidity than non-aged, and the result is a syrupy and sweeter vinegar. Sometimes we’ve lived in places that have specialty stores that focus on olive oil and balsamic vinegar. Having been exposed to multiple producers has given us a real appreciation for tasty balsamic. One of our absolute favorite balsamic vinegars is apple balsamic from Rockridge Orchards and Cidery which is unfortunately only available at their farm stand in Enumclaw, Washington or at some Seattle farmers markets. The reason we include vinegar in this dish is the acidity can lift other flavors. When we don’t have access to aged balsamic, we use lemon juice, and it is delicious as well. If you have extra funds and like vinegar, we encourage experimenting with the many different types of balsamic!

processed_20201006_181859.jpg
processed_20201006_181913.jpg

Serves: 4-6

Time: 1hr with Instant Pot (or pre-cooked beans)

Ingredients

1 serving polenta

aged balsamic vinegar

For the broccolini

1 bunch broccolini

salt

oil

For the butter beans (lima beans)

1 1/3 cups (or 1 can) cooked butter beans*

For the Peppers and Onions:

1 red onion, thinly sliced

2 bell peppers, cored and sliced,

salt

oil

For the Chard:

1/2 bunch chard

3 cloves garlic

salt

oil


Make the polenta & cook the beans*.

Pre-heat the oven to 375 F. Cut the ends of the broccolini. Slice the peppers and onions. Mince the garlic for the chard and de-stem the chard and cut into small ribbons.

Toss the broccolini in olive oil, sprinkle with salt and put in the oven. Flip the broccolini after 15 minutes and cook a total of around 25 minutes at which point the broccolini should be bright green but with parts of it golden brown and crisp.

Heat a pan with 2 tbsp of oil. Add the onions and salt them. Cook for about 10 minutes (stirring regularly) or until they are starting to soften and add the peppers. Cook for an additional 10 minutes and set aside in a bowl.

Add 2 tbsp of oil to the hot pan. Add the garlic and cook until fragrant (about 1 minute since the pan is hot). Add the chard, toss with the garlic and sprinkle the whole thing with salt. Once the chard is wilted (about 2 minutes) you are ready to assemble the bowls.

To serve, layer polenta, brocolini, peppers & onions, and chard into a bowl. Drizzle the entire meal with some aged balsamic vinegar and enjoy!

processed_20201006_181903.jpg

*Cooking butter beans (lima beans) from dry:

In the Instant Pot:

To cook the butter beans in an Instant Pot, add 3/4 cup of dried butter beans to the pot.  Cover the beans with water (in the small Instant Pot this is about 6 cups of water), season with 1 tbsp kosher salt, 1 tbsp cumin, 4 garlic cloves, and 1/8 tsp cayenne.  Set the Instant Pot to pressure cook for 15 minutes letting depressurize naturally.  Drain and rinse before adding to the dish.

On the stove:

If you don’t have an Instant Pot, you can easily cook butter beans from scratch with a little planning. First you will need to soak the beans which can be done one of two ways. 1. you can soak them overnight making sure they have enough water and space to double in size or 2. you can put them in a pot and bring to boil, then turn off the water and let soak for one hour. Again, make sure you have enough water and space that they can double in size.

Once you have soaked your beans, rinse them and then put in a pot with salty water. These will be cooking for about 2 hours so you don’t want as much salt as you would use for pasta, but you do want to add enough that you can taste the salt. The best way to get good at this is to practice. Each time you salt the water, taste it and when the beans are done taste them to see if they are well salted. A well salted bean should taste flavorful but not salty. If it tastes like you are eating salt, you added too much. If the bean lacks flavor then you didn’t have enough salt.

For this recipe, also add 1 tbsp cumin, 4 garlic cloves, and 1/8 tsp cayenne to the butter beans as they cook. Cook the beans until they are soft but not falling apart (this will take 1.5-2 hours).  We recommend checking the beans at about an hour and then every 20 minutes until they are soft but not disintegrating. Make sure your pot has enough water as I have definitely cooked all the water off before and burnt the beans! This may seem like a lot of work, however once you get the hang of it the work is almost all passive and the reward is high: butter beans cooked from scratch taste much better and are much cheaper!

Roasted Potatoes with Curried Mayonaise

Potatoes, have we mentioned how much we love them? We can’t get enough of this super simple yet delightfully delicious dish!

Serves: 2-4 as a side

Time: 1 hr 15 minutes (15 minutes active)

Ingredients

6 medium sized potatoes (we like the waxy kind for this)

2 tbsp olive oil

salt

For the mayonnaise:

1 small shallot

2 tbsp olive oil

1/4 tsp kosher salt

2.5 tsp curry powder

1/3 cup of vegan mayonnaise, soy-free option


Pre-heat the oven to 375 F. Wash and cut the potatoes into 1-2 inch chunks (or in 8ths). Put on cookie sheet (optionally use a silpat or parchment paper). Drizzle with olive oil and sprinkle with salt. Roast for 45 minutes to one hour, stirring every 15 minutes, or until golden brown and slightly crispy.

While the potatoes are roasting, mince the shallot and heat up a pan to medium high heat with some olive oil. Add the onions and salt and cook, stirring constantly until caramelized. Add the curry powder and cook stirring for about 30 seconds until it is a fragrant paste. Combine all of these ingredients with the mayonaise in a small bowl, whisking to emulsify.

Dip the roasted potatoes in the curried mayonnaise and enjoy!

Backpacking Food

I (Camille) went on my first backpacking trip last week! It was amazing to spend four days by a lake, swimming, watching fish jump, and filtering my water from cold mountain streams. The best part of the trip: being full on delicious food the whole time! I’m going to list here some of my favorite (and least favorite) meals that I tried.

I also realized in the process that next time I fly on a plane or travel to a place that is less vegan/gf friendly I can bring this food with me and won’t have to worry about not having access to a kitchen or restaurant where I can eat. In airports or cities you can go to any coffee shop and get boiling water to re-hydrate these meals. Also, lots of these meals only need cold water so that’s even easier.

As I write this, I’m living through a heat wave in the Pacific Northwest and enjoying eating some of these backpack foods so that I don’t have to turn on the stove and add to the heat in the house.

For this post I’m going to focus on meal-like foods although I stocked up on granola bars and chips as well, however that will have to be another post!

Eating 1.JPG
Eating 2.JPG

Outdoor Herbivore: love this company! While I sometimes struggle to navigate their website, their food is both scrumptious and feels good inside my body. Lots of great veggie options that remind me of the food I eat at home and make me feel like I could spend weeks on the trail.

Pacific Northwest.JPG

Favorites

Sunrise Tofu Scramble - salty deliciousness. Note: I love salt and this is the perfect amount for me - if you aren’t a salt lover this might be too salty for you.

Hop Pea Slop - I’m so in love with this creamy crunchy veggie salad - this is probably my favorite thing by Outdoor Herbivore.

Open Sky Yasai - such good veggie yumminess. Would go GREAT in Ramen.

Naked Freckle Burrito - so good, medium spicy (perfect for me) and very beany. Ate with corn chips and that was delightful!

Instant Hummus - medium spicy very flavorful hummus.

Did not Love

Lemongrass Thai Curry — If you love spice you will love this, however for me it was too spicy to even finish.

Maya Kamal Everyday Chana and Everyday Dal: Pre-made food that needs to be re-heated (when we ran out of cooking fuel I ate them cold and that was delicious as well!)

Right Rice: *This brand uses some pretty heavy food moralizing claiming that rice made from beans and vegetables is more ‘right’ than rice. The centering of thin white beauty standards and attempting to label rice (a staple product eaten all over the world, and integral to many food cultures) as ‘wrong’ is deeply disturbing. It is also about twice as expensive as pre-made rice. Labeling this more expensive product as the correct or superior option is another way that, as a society, we label people with less money as morally inferior.* I choose to eat their product because de-hydrated rice-substitute made of beans and veggies feels good in my body. I want to share this as an option for folks who are looking for different tasty food options and am mindful that this product has very harmful packaging and ethos.

Tasty Bites: We really enjoy their brown rice and have yet to try their other products.

Miracle Noodle Pad Thai: *The amount of food moralizing on this package stresses my body out, so adding a trigger warning for diet culture.* I did enjoy the flavor and texture of this pre-made ‘pad thai’ it was a low to medium spice level and good both cold and hot. I needed two packages for 1 serving.

Mustard Brussels Sprouts

We got this recipe from Anne’s sister Virginia who got it from her mother in-law. We’ve made some changes for how we like to eat it, and love that it reminds us of family. We find this recipe works best for smaller sized brussels sprouts.

processed_20210404_185114.jpg
processed_20210404_185150.jpg

Serves: 2-4 as a side

Time: 45 minutes

Ingredients

1 lb brussels sprouts

2 tbsp high heat oil, like avocado

2 tbsp olive oil

1 tbsp mustard seed

2 tbsp mustard (gluten-free option, soy-free option)

1/2 tsp salt

pinch hot pepper flakes


Cut a cross into the base or stem end of your brussels sprouts. Make sure not to cut these too deeply as you still want the stem to hold the sprouts together. The goal is to allow the stem to soften more in the cooking process without having it lose shape completely. Par boil them about 3 minutes in heavily salted water.

Next heat a pan to med-high with 2 tbsp high heat oil and fry the brussels sprouts until golden brown and slightly crispy. Take them out of the pan, put in a bowl and set aside.

In the same frying pan on medium heat, add 2 tbsp olive oil and the mustard seeds. Keep them moving. They will begin to make a popping noise and jump up on the pan. Add the mustard and stir to combine. Add the brussels sprouts and stir to coat. Add salt and hot pepper flakes. Saute until the sauce is thick, about 2 minutes.


Wild Mushroom Artichoke Heart Pasta

This recipe was inspired from Purple Carrot. We love how easy it is to keep most of the ingredients in the house (canned artichokes shelf stable, pasta shelf stable). Then when we need something quick and easy we pick up some local mushrooms and voila, a fancy hassle free meal!

We often like to double this recipe so that we have leftovers in the fridge to snack on during the week. Because artichokes and mushrooms are expensive, this can be more of an upfront cost which is why we are sharing the smaller portion size. Just know if you love it, it is great doubled!

Camille is gluten free and likes to eat this with Banza chickpea pasta. This pasta, made from chickpea flour, has so much protein that they often will leave out the crispy chickpeas entirely. That means both one less step to this quick and easy meal!

processed_20210309_125411.jpg

Serves: 2-3

Time: 30 minutes

Ingredients

For the chickpeas:

3/4 cups cooked chickpeas (1/2 can) optional

1/2 tbsp olive oil

1/2 tsp garlic powder

1/2 tsp

pinch of cayenne

1/2 lb pasta (gluten-free option)

olive oil

1 can artichoke hearts

1/3 lb local mushrooms (shittake, trumpet, chestnut, and oyster, all work really well)

freshly ground pepper

1 1/2 tbsp nutritional yeast

1 tsp garlic powder

1 1/2 tbsp vegan butter (soy-free option, nut-free option)

1/2 tbsp lemon juice

pinch hot pepper flakes

salt to taste


Drain and rinse the chickpeas. Pre-heat oven to 350 F. Toss the chickpeas with olive oil salt, garlic powder, and cayenne. Spread them out on a baking sheet. Roast in the oven, stirring every 15 minutes until the rest of the meal is done or they turn golden brown. If you are using a can of chickpeas feel free to use the entire can and then snack on the chickpea nuts you don’t add to the pasta!

Boil salty water (water should be as salty as the ocean) and cook the pasta according to instructions.

Slice the mushrooms. Cook them about 10 minutes on med-high heat with oil, stirring frequently until they brown and have an almost crispy texture. In last 2 minutes grind some fresh pepper over top of them. Remove from heat and set the mushrooms aside.

Drain and rinse artichoke hearts. Put olive oil in the pan and fry. Allow the artichoke hearts to sit on one side until brown and then flip on other side until they brown. They are fully cooked in the can, you are just browning them.

Mix the cooked pasta and butter until the butter melts. Add 3 tbsp of olive oil. Add all the other ingredients and stir to combine.

Enjoy!

processed_20210309_125356.jpg

Chickpea Crepe with Dill Aioli and cumin roasted carrots

Hi All! Today I (Camille) have a story that I want to share. About 9 years ago I was living with a homestay family in a small village near Matam in Northern Senegal. One day a very wealthy ‘uncle’ came to visit the village. We each took turns going to great him. When my turn came, he handed me a bunch of money (like if I were to hand someone $100) and said “for you to buy soda'“. I told him I didn’t need the money and he laughed and pushed it into my hands. I put this money away for a day when I would need it.

Later that night, my 3 year old homestay sister said “look look, Uncle gave me $5”. My homestay mom asked her what she wanted to do with the money and she said, “well I’m going to buy myself some new sandals, and then my brother some new sandals, and new sandals for my sister, and wait how much is left can I also buy new sandals for my mom too”. My mom smiled and told her she was so wonderful and yes there would be enough for all of those sandals and they could buy them next week at market.

This story came back to me as I was listening to Braiding Sweetgrass by Dr. Robin Wall Kimmerer. Dr. Kimmerer talks about the gift economy and how when you receive a gift you give back to both the giver and to others. In this way the value increases as it is shared.

All this is moving through me because this week I received my stimulus check. For some, this is needed to pay rent, however for me right now this is a bonus. Through COVID I have been lucky to have a job that gives me enough money to be comfortable and also allows me to work remotely. So, when I received this extra money I thought, what should I do with this gift?

I have some of my own answers to that question and for today, I just want to share the question with you all. For those of you who are comfortable and for whom the stimulus check is a gift, how will you choose to share?

IMG-0317.JPG

Serves: 4
Time: 1 1/2 hours

Ingredients

For the Veggies:

1 bunch lacinato kale

1 tbsp coconut aminos

1 bunch of small carrots

1/2 tbsp of cumin seeds (or ground cumin)

1 tsp salt

1 tsp pepper

olive oil

For the Crepe:

1 1/2 cups chickpea flour

1 tsp sea salt

1 3/4 cups water

3 tbsp olive oil

1 tsp turmeric

1 tsp coriander

1 tsp cumin

For the dill aioli:

1/2 cup vegan mayo (soy-free option)

1 1/2 tsps of lemon juice

1 tbsp dried dill


IMG-0316.jpg

Preheat the oven to 375 F. Mix the chickpea flour, salt, water, olive oil, and spices. Whisk until smooth and let sit for 30 minutes.

Strip the lacinato kale from the stem, and cut into thin ribbons. Cut the carrots into sticks. Toss the carrots with salt, cumin, pepper, and olive oil. Spread the carrots out on a baking sheet and put in the preheated oven. Cook the carrots until they are soft and slightly golden which takes about 40 minutes (stir every 20 minutes). While you are doing this, heat a pan with olive oil and stir fry the ribbons of lacinato kale for about 3 minutes or until the kale has softened and is a darker green color. Add some salt and the coconut aminos and stir for another 30 seconds. Remove the kale from the heat and set aside.

In a large frying pan, heat a small amount of oil. Once the oil is hot, add about 1/3 cup of chickpea batter to the hot pan. Tilt the pan to spread out the batter, and cook until golden brown and crispy on one side. Be patient, when the bottom is golden brown and crispy, the edges of the top will start to show color. Flip the crepe over and cook until speckled with golden brown on the second side. Cooking crepes to have a crisp but flexible texture takes some practice. Some tips are make sure your oil and pan are hot before you add the batter. Don’t add too much batter. Allow the first side to cook until an even color is achieved before flipping. Remember, the first pancake rule applies to crepes as well. Your first crepe might come out under cooked and crumbly. Don’t be discouraged, keep cooking, be patient, and future crepes will be better.

We often cook as many crepes as we want to eat when we first make this dish. We then refrigerate the batter and fry fresh crepes for leftovers. When cooking batter that has been refrigerated, make sure to stir thoroughly before frying and, if it is too thick, you can add a little water to thin it out.

To prepare the aioli, mix all the ingredients together in a mason jar or small bowl. To serve, top chickpea crepes with the aioli, kale, and roasted carrots. Enjoy!

The Best Vegan Burger

Black Seeded Cult Burger is one of Camille’s favorite restaurants and this burger is an homage to what they do so beautifully!

IMG-0307.JPG
IMG-0309.jpg

Serves: 2

Time: 30 minutes

Ingredients

2 hamburger buns (gluten-free option, vegan option)

2 Beyond Burger or Lightlife Burger patties

8 bread and butter pickles

4 pieces romaine lettuce

1 very small onion or 1/2 of a medium onion

olive oil

2 tbsp white wine (optional)

ketchup

For the dill aioli:

1/2 cup vegan mayo (soy-free option)

1 1/2 tsps of lemon juice

1 tbsp dried dill


Slice the onions and heat a frying pan to medium high with olive oil. Add the onions and cook stirring consistently for about 15 minutes. When the onions are fairly caramelized, if you are using wine, add the white wine and continue to stir until the wine disappears (about 2 minutes).

Remove the onions, scrape the pan clean and leave the heat on. You do not need to add extra oil as the burger patties have oil in them. Add the burger patties to the pan and cook according to package instructions. Meanwhile, toast the burger buns. While this is happening, mix the aioli ingredients together and set aside.

To assemble, spread aioli on both pieces of the hamburger bun. Next add the burger patty, some caramelized onions, pickles, some extra aioli, ketchup, and romaine lettuce. Close up your burger sandwich and enjoy!

Kidney Bean Chili

It’s been raining here all week which made us really want some warm, cozy chili. We especially love this chili served over mashed potatoes but it also grows great with tortilla chips or some garlic bread.

processed_20210201_124319.jpg

Serves: 4

Time: 1.5 hours (30 minutes active time)

Ingredients

3 cups cooked beans* or two cans kidney beans

8 oz crimini mushrooms, sliced

2 bell peppers, chopped

black pepper

1 onion, (2 cups) chopped

5 cloves garlic, minced

1 tsp chili powder

1 tsp salt

1/4 tsp cayenne

2 cans diced tomatoes

2 cups veggie stock (gluten-free option, soy-free option)


If you are cooking the beans from dry, cook the beans according to the instructions below.

While the beans are cooking, saute the mushrooms in olive oil until browned, about 15 minutes. Grind some fresh black pepper onto the mushrooms about halfway through cooking. Once the mushrooms are done, set them aside and saute the chopped peppers in olive oil about 10 minutes and set aside.

Once the beans are cooked, in a large pot, sweat the onions over medium low heat until they start to go translucent, about 7 minutes. Add the garlic, cook for an additional 2 minutes before adding the spices. Continue to cook, stirring, about 1 minute until fragrant.

Add the tomatoes, sauteed mushrooms, and stock and bring to a boil. Reduce heat and simmer about 45 minutes, stirring frequently, until the liquid is thickened. Add the beans after 25 minutes of simmering. Add the sauteed peppers and serve hot with garlic bread, tortilla chips, or mashed potatoes.


*Cooking kidney beans from dry:

In the Instant Pot:

To cook the kidney beans in an Instant Pot, add 1 1/3 cup of dried kidney beans to the pot.  Cover the beans with water (in the small Instant pot this is about 6 cups of water), season with 1 tbsp kosher salt, 1 tsp chili powder, and 1 tsp cumin.  Set the Instant Pot to pressure cook for 17 minutes letting depressurize naturally. Drain and rinse before adding to the dish.

On the stove:

If you don’t have an Instant Pot, you can easily cook kidney beans from scratch with a little planning. First you will need to soak the kidney beans which can be done one of two ways. 1. you can soak them overnight making sure they have enough water and space to double in size or 2. you can put them in a pot and bring to boil, then turn off the water and let soak for one hour. Again, make sure you have enough water and space that they can double in size.

Once you have soaked your beans, rinse them and then put in a pot with salty water. These will be cooking for about 2 hours so you don’t want as much salt as you would use for pasta, but you do want to add enough that you can taste the salt. The best way to get good at this is to practice. Each time you salt the water, taste it and when the beans are done taste them to see if they are well salted. A well salted bean should taste flavorful but not salty. If it tastes like you are eating salt, you added too much. If the bean lacks flavor then you didn’t have enough salt. For this recipe, also add 1 tsp chili, and 1 tsp cumin to the kidney beans as they cook.

Cook the kidney beans until they are soft but not falling apart (this will take 1.5-2 hours).  We recommend checking the beans at about an hour and then every 20 minutes until they are soft but not disintegrating. Make sure your pot has enough water as I have definitely cooked all the water off before and burnt the beans! This may seem like a lot of work, however once you get the hang of it the work is almost all passive and the reward is high: kidney beans cooked from scratch taste much better and are much cheaper!

Vegan Chocolate Chip Cookies

Sometimes I think about how much I love being an adult. Cookies are one of the things that remind me how awesome it can be to be “grown up”. When I was super little, cookies were these magical delicacies that I would scheme over. I was always wondering, how do I get more of these? As an adult I can buy them or make them whenever I want! It’s magical and I love it! For adults and children alike, if you can eat gluten we bet you will love these.

20201122_135745.jpg

Makes: 1 dozen

Time: 1 hour (15 min active)

Ingredients

1 tbsp flax meal + 2 tbsp water

1/2 cup vegan butter (we recommend Miyokos)

3 tbsp almond butter

1/2 cup coconut sugar

1 cup + 2 tbsp flour

1/2 tsp baking soda

1/2 tsp salt

1/2 tsp vanilla

1 cup chocolate chunks

flaky salt, optional


Mix ground flax & water and set aside.

In a large bowl cream the butter, almond butter, and sugar together until smooth. Add the flax egg and stir until combined. Fold in the flour, baking soda, salt, and vanilla until barely combined, there will still be some patches of flouriness. Next fold in your chocolate chips until the flour just disappears. Put the dough in the fridge and pre-heat the oven to 375 F.

Line a cookie sheet with a silpat or parchment paper. Once the oven is pre-heated, remove the dough from the fridge and spoon even portions onto a cookie sheet leaving space in-between the cookies. This recipe should give you between 10-12 cookies. At this point, if you are using flaky salt, sprinkle it over the cookies. We think it tastes equally good with or without the flaky salt garnish. Bake 15-18 minutes rotating once in the middle. Remove from the oven and cool. Enjoy!

Butternut Squash Chowder

This soup has the creamy chowder goodness and butternut squash yumminess that makes cool weather so exciting! It makes a great side and when we’re cooking it as a stand-alone dish we love to add cooked chickpeas to increase heartiness. This is another dish that goes great with garlic bread!

Squash Chowder

Photo credit: Tommy Uckert

Serves: 4-6

Time: 1 hr

Ingredients

2 tbsp olive oil

1 onion, sliced

1 tbsp + 1 tsp salt, divided

1/4 cup white wine

3 cloves garlic, minced

4 tbsp vegan butter (we like Miyoko’s)

1/3 cup all purpose flour (gluten free or regular)

1 medium butternut squash, chopped in 1/2inch pieces

7 cups of vegetable stock

1/2 tsp ground nutmeg

2 tsp pepper

3 bay leaves

1 (4 inch) sprig rosemary

1 cup cashew cheese

1 tbsp fresh thyme, minced

1 tbsp fresh sage, minced

1 can chickpeas drained and rinsed (optional)


Heat soup pot with olive oil. Add onions and 1 tsp of salt. Stir until brown (about 10 min). Add garlic and and stir for an additional 1 minute. Add nutmeg, stir for 30 seconds and then add white wine and cook until wine is gone. Add broth, butternut squash, 1 tbsp salt, pepper, bay leaves, rosemary (whole sprig).

Meanwhile, in a small saucepan, combine butter and flour over a low heat until it darkens and smells a little toasty (this is how a roux is made). Add about a cup of broth from the soup to the roux, and stir until roux is dissolved fully in liquid, then add the liquid containing the roux to the soup. Bring the soup to a boil and simmer for 30 minutes or until butternut squash is tender. Add cashew cream, thyme, and sage. If using chickpeas, add them now.

Serve warm, and enjoy!

Black Bean Chili

Delicious warm chili for these cold nights. Happy solstice y’all!

We love eating this chili with garlic bread.

processed_20200629_193604.jpg

Serves: 4-6

Time: 1 hour 30 minutes (35 minutes active)

Ingredients

1 medium onion, chopped

5 cloves of garlic, minced

salt and pepper

1+ 1/4 tsp chili powder

1 tsp salt

1/2 tsp taco mix

1/2 tsp garlic powder

2 medium zucchini, chopped

2 medium tomatoes, chopped

1 cup of corn, optional

2 cups drained and rinsed black beans*

3 cups vegetable broth (gluten-free option, soy-free option)

2 tbsp tomato paste

1/2 cup brown or wild rice

1-3 cups of water

1/2 tsp apple cider vinegar


In a big soup pot over medium heat saute the onion and garlic in a little olive oil until the onions are soft and fragrant about 7 minutes.  Add the chili powder, taco mix, garlic powder, salt, pepper, tomato paste, and zucchini.  Stir well and continue to cook about 5 minutes.  Add the tomatoes and corn (optional) and cook another 3 minutes until the tomatoes start to release their juice. 

Add the rice and the broth. Reduce heat to an active simmer and cook about 40 minutes until the rice is almost tender.  Add 1 cup of water, beans, and apple cider vinegar and cook another 15 minutes, stirring regularly.  If it starts to stick on the bottom, add more water. Enjoy!

processed_20200629_193556.jpg

*Cooking black beans from dry:

In the Instant Pot:

To cook the black beans in an Instant Pot, add 1 cup of dried black beans to the pot.  Cover the beans with water (in the small Instant Pot this is about 6 cups of water), season with 1 tbsp kosher salt, 2 tsp cumin, 1 tsp garlic powder, and 1/4 tsp cayenne.  Set the Instant Pot to pressure cook for 19 minutes letting depressurize naturally.  Drain and rinse before adding to the dish.

On the stove:

If you don’t have an Instant Pot, you can easily cook black beans from scratch with a little planning. First you will need to soak the beans which can be done one of two ways. 1. you can soak them overnight making sure they have enough water and space to double in size or 2. you can put them in a pot and bring to boil, then turn off the water and let soak for one hour. Again, make sure you have enough water and space that they can double in size.

Once you have soaked your beans, rinse them and then put in a pot with salty water. These will be cooking for about 2 hours so you don’t want as much salt as you would use for pasta, but you do want to add enough that you can taste the salt. The best way to get good at this is to practice. Each time you salt the water, taste it and when the beans are done taste them to see if they are well salted. A well salted bean should taste flavorful but not salty. If it tastes like you are eating salt, you added too much. If the bean lacks flavor then you didn’t have enough salt.

For this recipe, also add 2 tsp cumin, 1 tsp garlic powder, and 1/4 tsp cayenne to the black beans as they cook. Cook the beans until they are soft but not falling apart (this will take 1.5-2 hours).  We recommend checking the beans at about an hour and then every 20 minutes until they are soft but not disintegrating. Make sure your pot has enough water as I have definitely cooked all the water off before and burnt the beans! This may seem like a lot of work, however once you get the hang of it the work is almost all passive and the reward is high: black beans cooked from scratch taste much better and are much cheaper!

Twice Baked Potatoes

Twice baked potatoes are one of Camille’s family recipes. It’s something her mom would always make for dinner parties, holidays, and when she just wanted the family to feel special. Adding a bit of sweet potato to the regular potatoes makes these morsels just the right amount of salty, sweet, fatty goodness!

A note on potatoes. Any kind of white potatoes can be used for this recipe, but Russet (or Idaho) potatoes are the easiest because they have more durable skin. Camille also likes waxy potatoes because of the tenderness of the potato skins. When using waxy potatoes, cook for a shorter period of time (about 45 minutes) and be gentle when scooping out the insides. Leave some extra potato on the skin to create a more stable cup.

We like to pair these potatoes with Mushroom Gravy and/or Cranberry Sauce, especially for the fall! Mushroom gravy is a great pairing not only because of the flavor combination, but also because together these recipes use a whole head of roasted garlic. If you opt to just make the potatoes, roast the garlic in a small cast iron pan at 350 F for about 20 minutes or until soft, flipping the cloves 10 minutes in.

This recipe is great for holidays when oven space is sparse because they can be prepared in advance and warmed up the day of. We highly recommend turning leftovers into a gourmet brunch experience by serving a fried egg over the open face of a twice baked potato. Garnish with chives and voila: glamour brunch!

processed_20200812_131041.jpg

Serves: 8 as a side

Time: 2 hours 15 minutes (active 30 minutes)

Ingredients:

3 lbs of russet potatoes (about 4)

1 orange sweet potato/yam

olive oil

4 garlic cloves, roasted and smashed (optional)

3/4 cup cashew cheese

2 T vegan butter (soy-free option, we like Miyokos)

salt

pepper

paprika (optional)


Pre-heat the oven 375 F. Stab the potatoes with a fork and bake in the oven for 1 hour 15 minutes or until tender when poked with a fork. If you have time, baking the potatoes the night before makes this a quick side. You can roast the garlic at the same time. Once tender, remove from the oven and cool.

Slice the potatoes in half lengthwise and spoon the innards out into a large bowl. Mash with the other ingredients (except paprika) until you have a nice mashed potato consistency (we like lumps, but if you like smooth, go for that)! Spoon this mixture back into the empty potato shells. Sprinkle with paprika (optional) and bake for another 15 minutes. The second bake serves the purpose of re-warming the potatoes and achieving some crispiness on top.

Mushroom Gravy

Fall cozy food season has arrived here and we are loving this crowd favorite mushroom gravy. It is creamy, umami, and pairs well with mashed potato, roasted cauliflower, and cranberries.⁠

processed_20201005_183402.jpg

Makes: 20 oz

Time: 30 minutes

Ingredients

8 oz cremini mushrooms, sliced

1/2 tsp black pepper

1/2 tsp salt

Most of a head of roasted garlic (you can save a couple of cloves to eat on bread or use the whole head)

1 1/4 cups hot vegetable broth (gluten-free option, soy-free option)

1/2 tsp apple cider vinegar

1/2 cup mashed potato or 1/2 of a medium waxy potato, roasted or boiled (if you can’t eat nightshades, parsnips work well as a replacement for the potato)


Saute the mushrooms until browned, over medium heat, about 20 minutes, adding pepper after 15 minutes.

In a blender, combine all the ingredients including the cooked mushrooms. Blend until smooth. For a thicker gravy, add more potato. Season to taste.

processed_20201005_183325.jpg

Curried Chickpea Salad

We’re grieving the loss of summer potlucks, picnics, and days at the beach with friends. Normally we would bring this chickpea salad, a bag of local cherries, and some chips to the river and just relax all day. With COVID, we’ve been traveling less but we still enjoy eating this delicious salad. I like to toast bread, cover it with mayo and then add this salad for a chickpea salad sandwich!

IMG-0069.JPG

Serves: 4 as side

Time: 20 minutes + chickpea cooking time

Ingredients

3/4 cup halved red grapes

2 cans chickpeas (1 1/3 cup dry*)

for the sauce:

1/2 med onion (1 cup) chopped

2 tbsp cooking oil

1 1/2 tsp curry powder

1/4 cup vegan mayo (soy-free option)

1/2 tsp salt

juice of 1/2 lemon (2 tbsp lemon juice)


IMG-0070.JPG

Slice grapes in half and chop the onion. Saute the onion in oil until it’s starting to be translucent, about 10 minutes.

While the onion is cooking, mash the chickpeas in a medium bowl. When mashing, the texture is important. You are looking to crush the chickpeas into a meaty texture but you do not want to over-mash as you could end up with hummus! Toss the chickpeas with the lemon juice and salt and set aside.

Once the onions are translucent, add the curry powder, stir for an additional minute and then remove from heat. In the pan you cooked the onions in, add the mayo, stirring to combine. Pour sauce into mashed chickpeas and stir to coat. Fold in the grapes and enjoy!

*Cooking Chickpeas from dry:

In the Instant Pot:

To cook the chickpeas, in an Instant Pot, add 1 1/3 cup of dried chickpeas to the pot.  Cover the beans with water (in the small Instant Pot this is about 6 cups of water), season with 1 tbsp kosher salt, 1 tsp turmeric, 1/2 tsp ground ginger, and 1/8 tsp cayenne.  Set the Instant Pot to pressure cook for 35 minutes letting depressurize naturally. Drain and rinse before adding to the dish.

On the stove:

If you don’t have an Instant Pot, you can easily cook chickpeas from scratch with a little planning. First you will need to soak the chickpeas which can be done one of two ways. 1. you can soak them overnight making sure they have enough water and space to double in size or 2. you can put them in a pot and bring to boil, then turn off the water and let soak for one hour. Again, make sure you have enough water and space that they can double in size.

Once you have soaked your beans, rinse them and then put in a pot with salty water. These will be cooking for about 2 hours so you don’t want as much salt as you would use for pasta, but you do want to add enough that you can taste the salt. The best way to get good at this is to practice. Each time you salt the water, taste it and when the beans are done taste them to see if they are well salted. A well salted bean should taste flavorful but not salty. If it tastes like you are eating salt, you added too much. If the bean lacks flavor then you didn’t have enough salt.

For this recipe, also add 1 tsp turmeric, 1/2 tsp ground ginger, and 1/8 tsp cayenne to the chickpeas as they cook. Cook the chickpeas until they are soft but not falling apart (this will take 1.5-2 hours).  We recommend checking the beans at about an hour and then every 20 minutes until they are soft but not disintegration. Make sure your pot has enough water as I have definitely cooked all the water off before and burnt the beans! This may seem like a lot of work, however once you get the hang of it the work is almost all passive and the reward is high: chickpeas cooked from scratch taste much better and are much cheaper!