Harissa Tofu Harvest Plate

This dish was inspired by a Purple Carrot recipe. We love how fast it is to prepare and how the harissa tofu pairs with sweet potato fries. Here we’ve given the recipe to make your own sweet potato fries, however we equally love frozen sweet potato fries and cooking them for this meal. If you go that route, the meal takes about 30 minutes instead of 1 hr. Feel free to substitute whatever veggies you have in your fridge. When we cooked this we happened to have some tomatoes and greens from the garden, but it tastes equally good without these.

Harissa Tofu Harvest Plate

serves: 4

cooking time: 1hr 5min (15min is active)

Ingredients

for the tofu:

1 block tofu

1/2 cup cornstarch

1/2 tsp salt

3 tbsp harissa

2 tbsp lemon juice

1 tbsp agave (option to substitute coconut nectar, maple syrup, or other liquid sweeteners)

Pinch salt

for the sweet potatoes:

2 small sweet potatoes (about 1 1/2 lbs), cut into wedges (we used white sweet potatoes)

1 1/2 tsp olive oil

1/2 tsp salt

1/2 tsp cumin

for the sides:

1 bunch swiss chard, thinly sliced

2 cloves garlic, minced

1 batch of roasted Brussels sprouts

fresh sliced tomato (optional)

salt

pepper


Pre-heat oven to 375 F. Roast brussels sprouts according to recipe. Cut sweet potato into wedges. In a large bowl, toss wedges with olive oil, salt, and cumin. Lay out on a lined baking pan (we use Silpat liners) and roast sweet potato wedges about one hour flipping them over after half an hour. They should be soft on the inside and have a little bit of browning on the outside. If you don’t know how hot your oven runs, check on the wedges more frequently to make sure they don’t burn.

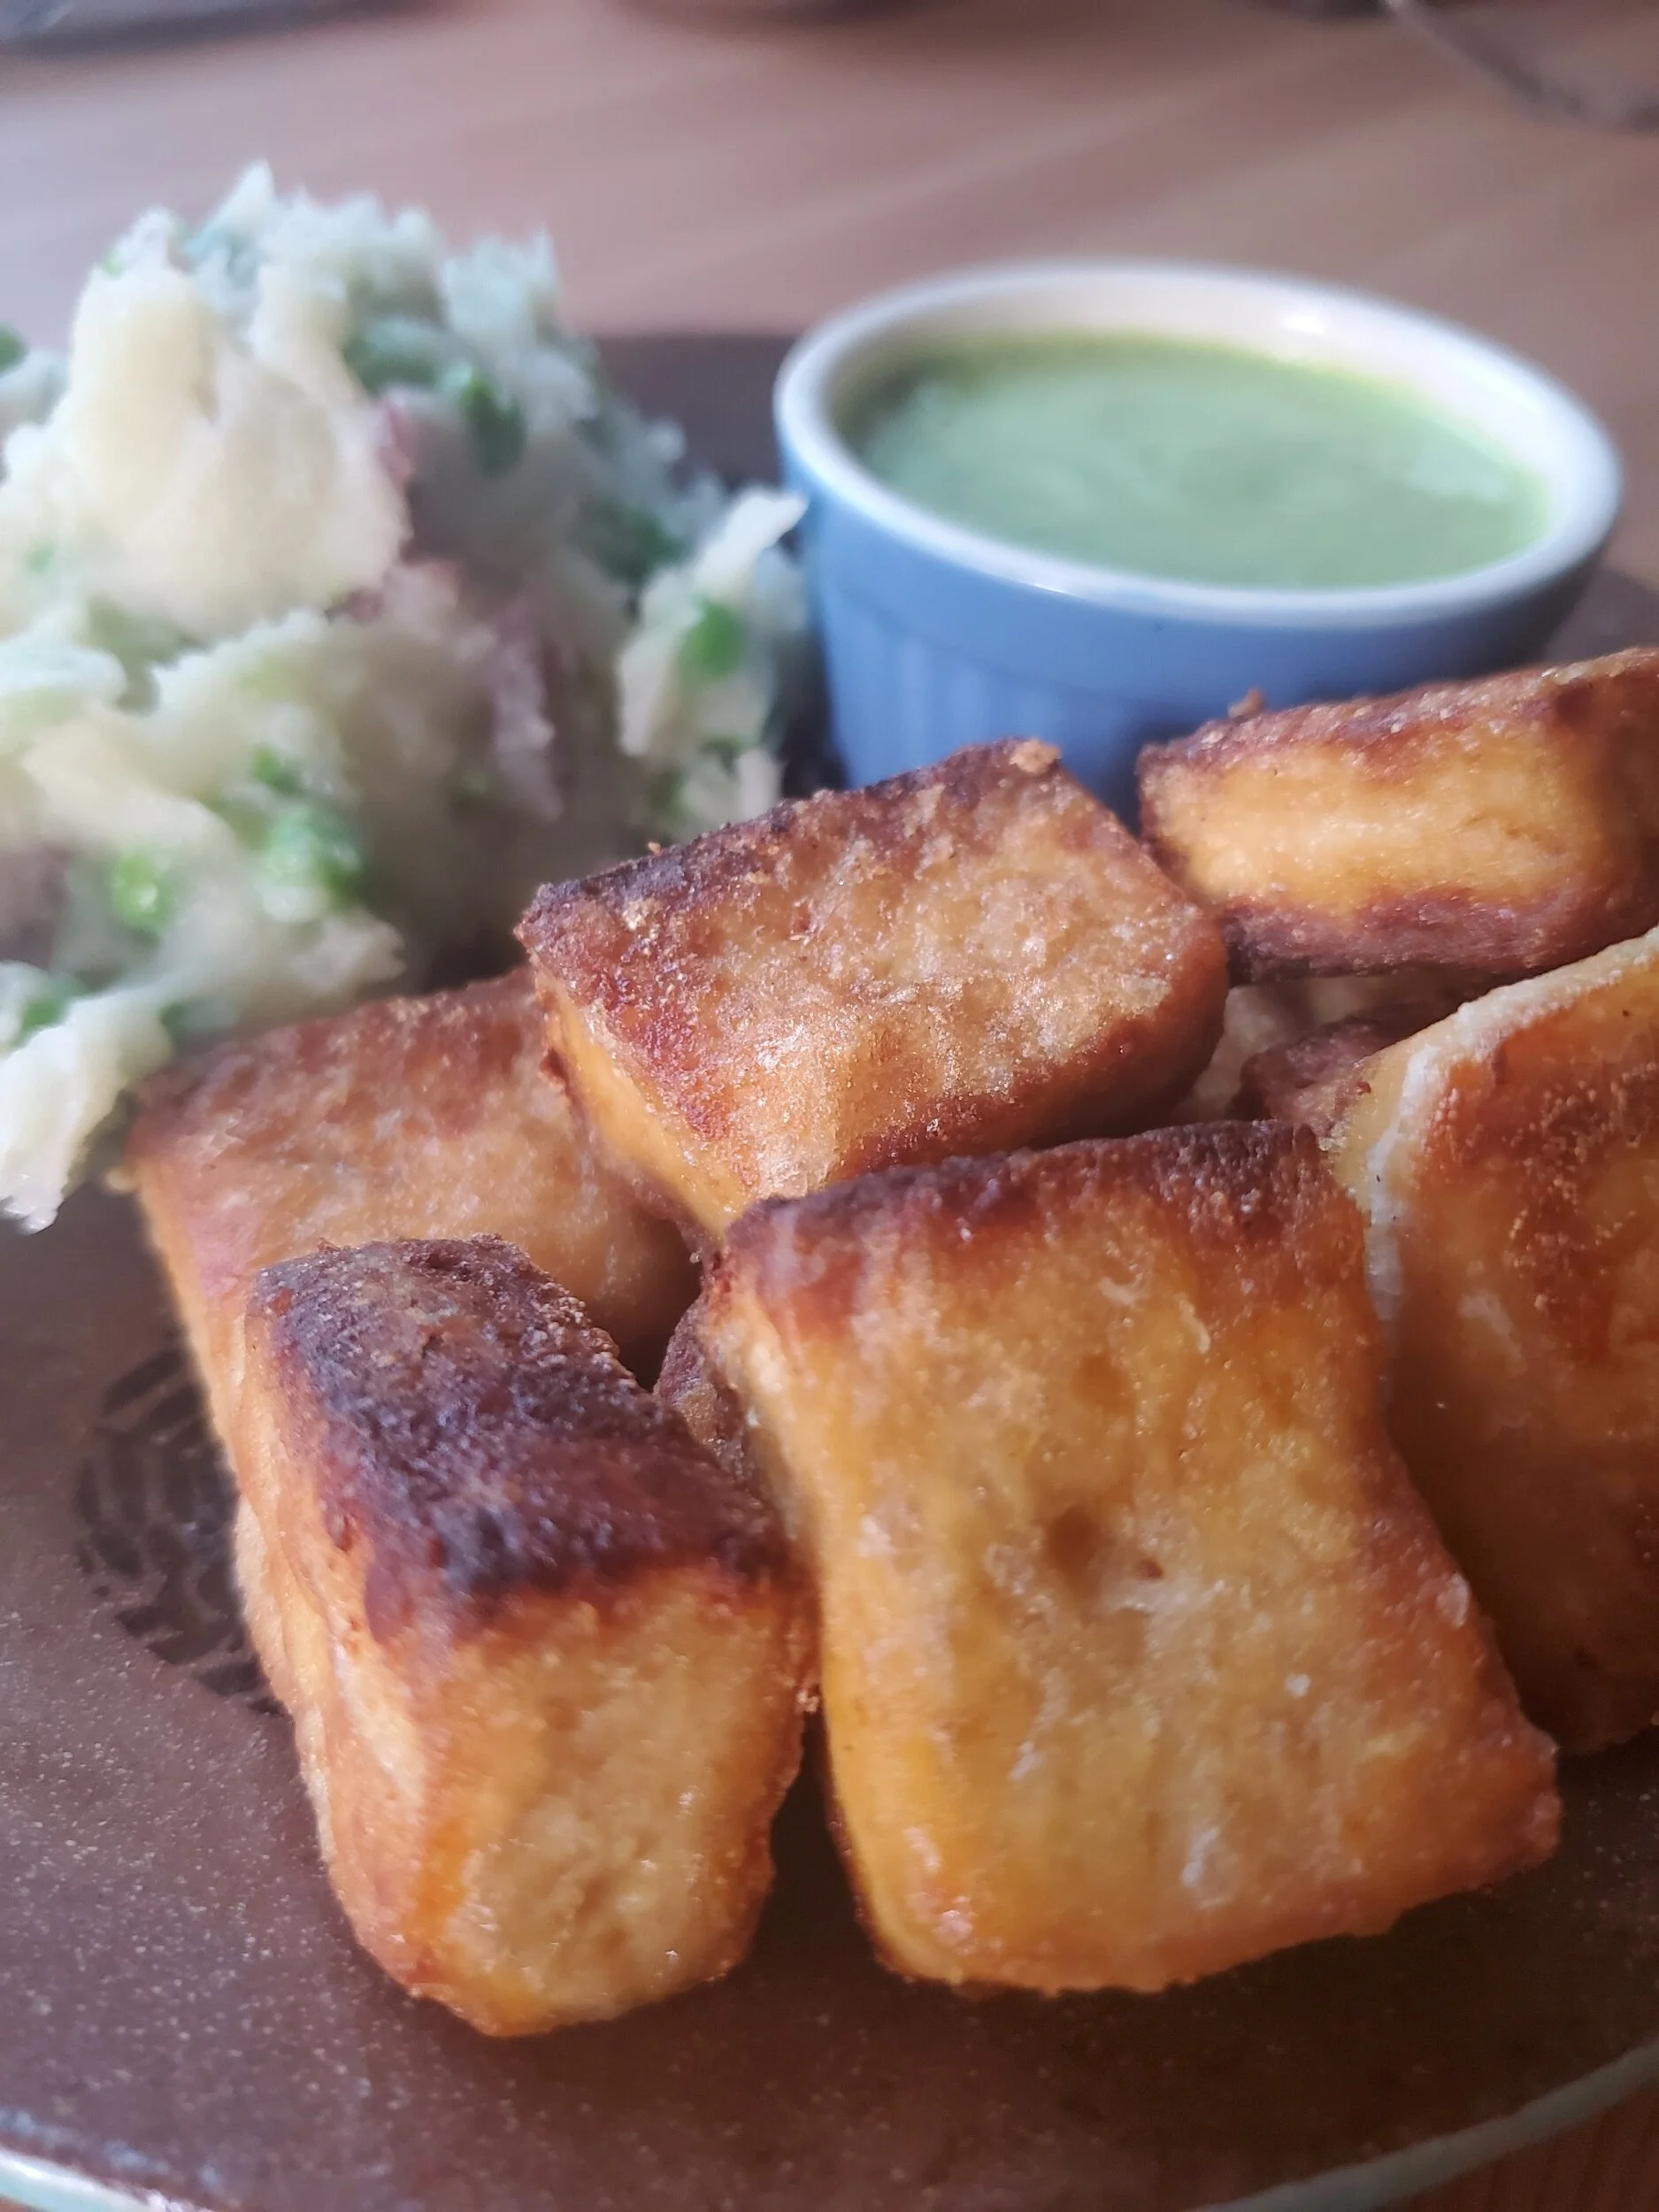
Cut your block of tofu in half so that you have two, one inch thick rectangles. Press tofu between two kitchen towels, placing a cast iron pan, or something heavy on them to remove some of the liquid. This process can be done with a tofu press. Cut the tofu into sticks about 3 inches by one inch by one inch. Put the cornstarch and 1/2 tsp salt in a shallow bowl. Toss the tofu, a couple of pieces at a time in the cornstarch mixture until coated on all sides. Heat 2 tbsp of neutral oil in a frying pan. Once hot, fry the tofu in batches on med-high making sure it gets golden brown on all sides. Feel free to add more oil if your pan gets dry. Be careful not to crowd the tofu as that will make it all stick together. We use tongs to turn each piece separately. Mix the harissa, agave, pinch of salt, and lemon juice in a small bowl. Once the tofu is crispy, add harissa sauce to the pan, stir to coat the tofu, and remove from heat.

To cook the chard, add one tablespoon oil to a shallow pan. Add the minced garlic and sauté until fragrant, about one minute. You do not want the garlic to brown. Add the thinly sliced chard and toss with the oil until wilted, about two or three minutes.

If you have a tomato, slice it and sprinkle with salt. Plate and enjoy!

processed_20191007_125841.jpg

Swiss chard, mushroom, & tofu bowl with toasted cashews

This dish was inspired by the food that Camille had in her fridge. At the time, she had 4 mushrooms, so that is what she used. If you have more, it’s really good with about 2 cups of sliced mushrooms and I’m sure it would be good with anywhere in between. We’ve enjoyed it with both cremini and oyster mushrooms and would bet it would also taste good with shiitake mushrooms and chestnut mushrooms.

Also, we realize that yesterday was Indigenous People’s Day. If you’re interested in why we feel so called ‘Columbus Day’ should be changed federally to Indigenous People’s Day check out this beautiful episode from the All My Relations Podcast.

processed_20200705_200304.jpg

Serves: 4

Time: 30 minutes

Ingredients

For the greens:

1 bunch Swiss chard, de-stemmed and thinly sliced

some mushrooms (see intro)

salt

1/4 tsp pepper

2 tbsp olive oil

2 tbsp coconut aminos

1 tsp pomegranate molasses (optional)

For the tofu:

1 block tofu

1/4 cup sesame oil

1 tsp salt

1/4 cup nutritional yeast

For the rice:

1 cup sushi rice

2 cups slightly salted water

1 tsp rice or champagne vinegar

1/2 tsp sugar

For the garnish:

1/4 cup cashews, toasted

1/2 bunch thinly sliced green onion


Slice the mushrooms and sautee until golden brown with salt and pepper. Taste to make sure these are seasoned to your preference. While they are cooking, de-stem the chard and slice into small ribbons. When the mushrooms are fully cooked, add the swiss chard, pomegranate molasses, a bit of salt, and coconut aminos. Cook 1 minute until the chard is shiny and soft but not yet browning.

Cook the sushi rice in salted water until done. You want to add some salt, but since you won’t be draining the rice it shouldn’t be as salty as sea water. We used about 1/2 tsp salt, but this will depend on the type of salt you are using. Once it is cooked, add all the other ingredients to the rice and fluff with a fork.

Slice the tofu into 1 inch squares. Heat the sesame oil in a pan, once hot add the tofu. Cook undisturbed on one side until golden brown. Salt and flip. Cook until crispy on the second side and then pour all the nutritional yeast in the pan and stir to coat.

Toast the cashews if they are raw and slice the green onions.

To serve, assemble rice on the bottom, then tofu, then greens. Top with toasted cashews and green onion and enjoy!

processed_20200705_200307.jpg

Roasted Brussels sprouts

It is starting to feel like autumn here in the Pacific Northwest and we are feeling called to delicious fall vegetables. This recipe made us into brussels sprouts lovers. It’s the perfect amount of crispy, cheesy, salty deliciousness that will keep you coming back for more! As a bonus, it only takes 15 minutes of active time and then you have time to do other things while these morsels roast.

processed_20191007_125924.jpg

Serves: 4 (as a side dish)

Time: 1 hr (15 minutes active time)

Ingredients

1 lb brussels sprouts, quartered and rinsed

3 tablespoons olive oil

1 tsp salt

1/2 tsp garlic powder

2 tbsp nutritional yeast


Preheat the oven to 375°F.  In a large bowl, drizzle the brussels sprouts with olive oil, sprinkle with salt, garlic powder, and nutritional yeast.  Stir to coat. Spread the brussels sprouts on a lined baking sheet (lined with parchment or a silicone baking mat). Bake for 45 minutes, flipping the sprouts every 15 minutes.  The larger, loose leaves should be brown and crispy, the insides of the sprouts should be soft and creamy.

Eggplant Chickpea Curry

After gorging ourselves on Italian style eggplant tomato dishes all summer long, we love this recipe that uses up some late summer garden crops! We particularly enjoy the ribbons of chard running through it.

Serves: 6

Time: 1.5 hrs

Ingredients

1.5 cups cooked and spiced chickpeas* (1 can)

1 onion, chopped

3 cloves garlic, minced

1 inch ginger, minced

1 tsp ground cumin

1 tsp ground coriander

1 tsp turmeric

1 tsp ground fenugreek (this spice can be a challenge to find, the curry is perfectly good without it if you cannot get your hands on some)

1 tsp salt

1/4 tsp cayenne pepper

1/2 bunch of cilantro

5 roma tomatoes or two beefsteaks, diced (or 14.5oz canned diced tomatoes)

.5 lb (2 small) potatoes (we like the waxy kind like a carola or yukon gold)

16 oz of water

1 can coconut milk

1 bunch of swiss chard, cut in ribbons

1 cup rice

olive oil

For the eggplant:

2 lbs eggplant (preferably Japanese if available), cut into 1 inch cubes

1/2 tsp cayenne pepper


If you are using dry chickpeas, follow the instructions at the end of this recipe.

Chop and salt the eggplant and let sit 20 min. This is best done in a colander over the sink as the eggplant will release liquid. Pre-heat the oven to 375 F. Drain eggplant and toss with 1/2 tsp cayenne, and 2 tbsp oil. Lay out the seasoned eggplant on a sheet pan and roast until soft and browning on the edges, this takes 45 minutes in our oven, stirring every 15 minutes. Taste a piece, it should be sweet. If bitter or crunchy, it is not done yet.

Cook the rice. Chop and boil the potatoes in well salted water. Drain when fork tender.

Sweat the onions in olive oil over medium heat about 10 minutes. Add garlic and ginger, cook another 2 minutes. Add remaining spices, stir to coat onions and allow to cook about 2 minutes. Add the tomatoes and 16 oz water and simmer until the tomatoes are soft and beginning to form a sauce, about 20 minutes, stirring regularly. Add eggplant, chickpeas, boiled potatoes, and coconut milk, simmer about 5 minutes. Add swiss chard and cook until wilted. Garnish with cilantro, and serve over rice.

*Cooking chickpeas from dry:

In the Instant Pot:

To cook the chickpeas in an Instant Pot, add 3/4 cup of dried chickpeas to the pot. Cover the chickpeas with water (in the small Instapot this is about 6 cups of water), season with 1 tbsp kosher salt, 1 tbsp turmeric, 1 tbsp coriander, and 1/4 tsp cayenne. Set the Instapot to pressure cook for 35 minutes letting depressurize naturally. Drain and rinse before adding to the dish.

On the stove:

If you don’t have an Instant Pot, you can easily cook chickpeas from scratch with a little planning. First you will need to soak the chickpeas which can be done one of two ways. 1. you can soak them overnight making sure they have enough water and space to double in size or 2. you can put them in a pot and bring to boil, then turn off the water and let soak for one hour. Again, make sure you have enough water and space that they can double in size.

Once you have soaked your beans, rinse them and then put in a pot with salty water. These will be cooking for about 2 hours so you don’t want as much salt as you would use for pasta, but you do want to add enough that you can taste the salt. The best way to get good at this is to practice. Each time you salt the water, taste it and when the beans are done taste them to see if they are well salted. A well salted bean should taste flavorful but not salty. If it tastes like you are eating salt, you added too much. If the bean lacks flavor then you didn’t have enough salt.

For this recipe, also add 1 tbsp turmeric, 1 tbsp coriander, and 1/4 tsp cayenne to the chickpeas as they cook. Cook the chickpeas until they are soft but not falling apart (this will take 1.5-2 hours). We recommend checking the beans at about an hour and then every 20 minutes until they are soft but not disintegrating. Make sure your pot has enough water as I have definitely cooked all the water off before and burnt the beans! This may seem like a lot of work, however once you get the hang of it the work is almost all passive and the reward is high: chickpeas cooked from scratch taste much better and are much cheaper!

Creamy Cauliflower with Breaded Eggplant Cutlets and Roasted Red Pepper Sauce

We posted a recipe for eggplant cutlets earlier this month and this is a new twist on how to serve cutlets. This recipe has many moving parts and they all come together to make a divine dining experience! The cauliflower is light and creamy and offers the perfect balance to spicy greens and delicious crispy eggplant. If you don’t want to spend a whole evening cooking this, you can easily make the cauliflower and red pepper sauce ahead of time and just heat it up when the eggplant and greens are finished cooking. This flavor combination can also be achieved with less labor by buying pre-made options. There are several frozen brands of breaded eggplant cutlets available on the market, and in many markets you can also buy roasted red pepper in a can or bottle. Either or both could be substituted in this recipe to achieve this flavor combination in a much faster way.

IMG_3749.JPG

Serves: 6-8

Time: 2 hours 45 minutes

Ingredients

for the mashed cauliflower:

1 head of cauliflower

3 cloves roasted garlic

1/4 cup olive oil

salt

for the roasted red pepper sauce:

2 red bell peppers, roasted

2 cloves roasted garlic

1 jalepeno, seeds removed

1/2 onion, chopped and sauteed

1/4 cup of almond pulp (can substitute 1/4 soaked cashew/almond blend)

1 tsp apple cider vinegar

water, until desired consistency

1 tsp salt

for the eggplant cutlet:

3 medium eggplants, cut into 1/4” coins

kosher salt

1/2 cup cornstarch

1/2 tsp salt

4 pieces of toast or two cups of bread crumbs (a gluten free bread or crumb will work here)

1/2 cup oats gluten-free option

3/4 cup sunflower seeds

2 tbsp garlic powder

1/4 cup nutritional yeast

1 tbsp salt, if your sunflower seeds are salted, you will need less salt.

3/4 tsp pepper, divided

3 or 4 eggs

olive oil

for the fried greens:

1 bunch dark leafy greens (kale, swiss chard, collards, spinach, etc)

3 T high heat oil (we like avocado)

1/4 tsp szechuan pepper (if available)

squeeze of lemon

Salt

IMG_3752.JPG

Cut eggplant into 1/4” thick coins. Layer them in a colander salting each layer generously. Leave eggplant to drain about 20 minutes. This will pull the moisture from the eggplant allowing it to cook faster and get sweeter.

There are many ways to roast a red pepper. If you have a gas stove, you can place the pepper directly on the burner, turn the burner on and cook, flipping with tongs until all the sides are charred. If you don’t have a gas stove, it can be done in the broiler. Move a shelf to the top of the oven and turn on the broiler. Place the red peppers under the coils of the broiler and allow to cook about 6 minutes before rotating the peppers. The skins should char. Remove the peppers from the oven once the skins are charred on all sides (about 24 minutes). Either way you cook the peppers, once they are charred on all sides, quickly place them in a bowl and cover with lid (this makes them easier to peel). Set the bowl aside.

Preheat the oven to 375 F. Roast garlic. You can do this a number of ways and our two favorite are to use a garlic roaster or a small cast iron pan. If you are using a garlic roaster, chop the tops off the garlic, drizzle a bit of oil into the garlic cloves, put this into the garlic roaster and roast in oven for about 45 minutes. To use a small cast iron pan, peel the garlic and place cloves in the cast iron pan with a small amount of olive oil. Roast this in the oven for about 20 minutes, stirring every 10 minutes. Either way, the garlic should look golden brown and be very soft. With the cast iron method, it is easier to burn the garlic so make sure to check on it.

Once the eggplant has been salted for 20 minutes it should have released some moisture that you will be able to see on the surface. Press the eggplant between kitchen towels to remove the moisture and some of the salt. Rip your toast into chunks before putting it into the food processor with the oats.  Blend them until they are sandy with slightly larger chunks.  Add the sunflower seeds, garlic powder, nutritional yeast, salt, and 1/2 tsp pepper.  Blend until the majority of the sunflower seeds have been cut at least once, but not so far that the mixture looks homogeneous.  Leave some sunflower seed chunks. Assemble a workstation with a shallow bowl of beaten eggs, a shallow bowl of cornstarch mixed with 1/2 tsp of salt and 1/4 tsp pepper, and a shallow bowl of the breadcrumb mixture. Dip the egg in the cornstarch, then the egg, and then breadcrumbs. Start with two eggs and add more as necessary to coat all the eggplant. Place on oiled baking sheet and bake in the oven for 1 hr flipping every 20 minutes.

While your eggplant cooks chop and saute the onion about 7 minutes until soft and starting to caramelize.

Put a pot of salty water on to boil. The water should taste about as salty as sea water so that the potatoes soak in the water and are perfectly salted when done. Don’t worry if these feels like a lot of salt; you will be draining the water.

Rough chop the cauliflower removing the core and leaves. Add the cauliflower to the heavily salted water and cook until fork tender (about 15 minutes). Drain the cauliflower and allow to sit for 10 min.

Next create the roasted red pepper sauce. Remove the roasted pepper from the covered bowl and remove the skin over the sink, rinsing off the char. Remove the seeds and stems. Add to a food processor with the remaining roasted red pepper ingredients and blend until mostly smooth. If you are using almond pulp, you will need a bit of water to make the sauce a nice texture. If you are using almond milk or cashew crema you may not need water. Put the sauce in a small jar or bowl.

Rinse your food processor and then combine all ingredients for the mashed cauliflower and blend until smooth and fluffy.

Lastly, rinse, de-stem, and thinly slice your greens. Heat a pan with 3 tbsp of high heat oil and wait until oil is very hot. Add greens and flip with tongs until greens are wilted and maybe a bit golden brown on some sides. If using szchuan pepper add to the pan right as greens are starting to wilt. Garnish with a squeeze of lemon juice and a pinch of salt.

To assemble, layer mashed cauliflower on a plate. Next place the eggplant cutlet and pour roasted red pepper sauce over the eggplant. Finally top with fried greens and enjoy!

Hibiscus Tea Hot or Iced

Living on un-ceded lands of many tribes including Clackamas, Cowlitz, Multinomah (to name a few) and the lands of the Duwamish people past and present, it’s impossible to ignore the wildfires raging up and down the coast.

Today we are feeling grief for the genocide that was intentionally committed by our European ancestors against native peoples on this land. We’re feeling grief for the land that was kidnapped and held hostage by colonists separating it from loving tribes who had deep relationships with this place. We’re feeling the sadness of lack of tribal burning practices and increased global warming that have led to fire seasons which feel out of balance.

Camille’s mentors at Holistic Resistance are often using song as they ‘holistically resist’. So, today Camille’s been listening to and singing this song to the trees.

In addition to singing and feeling our grief, we are working on staying hydrated and flushing the grief and smoke through our bodies. Below is a recipe for hibiscus tea because that’s what Camille had in her house and she is avoiding going outside. If you are looking for pre-made tea blends to support your lungs Camille loves adapta-lung tea which is being sold sliding scale from an herbalist who is a friend of the family. We also recommend getting tea from Clary Sage which is a local apothecary run by Laurie Lava-Books, who is a member of the Karuk tribe.

IMG-0241.JPG
IMG-0246.JPG

Serves: 16 oz

Time: 10 minutes

Ingredients

1 tbsp hibiscus leaves

2 inches ginger, finely chopped

1 tbsp agave (or to taste)

Ice cubes

Water

1/2 small lime (optional)

mint (optional)


For hot tea: add 16 oz of boiling water to the hibiscus leaves and ginger. Steep for five minutes and strain. Add agave to taste and enjoy!

For iced tea: add 3/4 cup of water to a small sauce pan with the chopped ginger. Bring to a boil. Once boiling, add the hibisucs leaves and turn off the heat. Add the agave and let steep for 5 minutes. If you are using mint, add this after 2 minutes so that it only steeps for 3 minutes total. If you are using lime, squeeze this in at any time after the heat has been turned off.

While this tea is steeping prepare a 16 oz glass and fill to the rim with ice. Anne likes to add a long metal spoon to the cup of ice which can help absorb the thermal shock and potentially prevent breaking the glass when you add hot water over ice. Camille uses mason jars and hasn’t had an issue with breakage since they are designed to take more thermal shock. Once the tea is finished steeping, strain the liquid over the glass of ice. The hot tea will melt the ice leaving you with perfectly iced tea! If you want more ice, add some, if you want less ice add some cold water until you have 16 oz of tea (or to taste).

Note: A special thank you to our houseplants who are helping us filter this air!

Eggplant Lasagna

Celebration of eggplant season continues with this delicious lasagna. Layers of delicious cheesiness, soft perfectly salted eggplant, and beautiful ribbons of chard make this a summer delight. This makes 8-10 servings making it perfect for a family dinner or just for one if you love lasagna. We also love to freeze the leftovers of this meal. What’s better when you have nothing left to eat than looking into your freezer and seeing some home-made lasagna all ready for you to bake?

processed_20191112_112738.jpg

Serves: 8-10

Time: 2hr 15min; 1.5 hours is inactive

Ingredients:

2 eggplants (1.5lb)

Salt

Olive oil

1 block of firm tofu, pressed

2 tbsp cornstarch

1 tsp veggie bouillon (We like Better than Bouillon)

1/2 cup hot water

1 bunch chard

26 oz jar tomato sauce (Feel free to use homemade or store-bought)

1 batch cashew cheese

1 box of lasagna noodles (gluten-free option)


Cut eggplant into 3/4 inch cubes. Salt them generously and leave to drain in a strainer over the sink for at least half an hour.

Preheat the oven to 375 F.

Wrap the eggplant in a kitchen towel and squeeze to remove any surface moisture and some of the salt. Toss the eggplant in olive oil on a cookie sheet and roast about 45 minutes, turning every 15 minutes. The eggplant should be soft but not disintegration.

Put a 4-6 quart pot of water on the stove to boil. Add salt generously, it should be similar to seawater.

Press the tofu between two layers of kitchen towel with a weight (like a cast iron pan) for about 10 minutes. Add 3 tbsp olive oil to a pan over medium heat. Crumble the tofu into the hot pan and scramble about 10 minutes until it is starting to color. Add 1/2 tsp salt and the cornstarch to the tofu and cook an additional 5 minutes until you get some crispy bits. Dissolve the bouillon in the hot water and add to the tofu. The water should boil immediately. Mix the tofu until the water has mostly boiled off, about 3 minutes.

Make cashew cheese if you have not already done so.

Boil the pasta in the salted water according to the instructions on the box.

Cut the chard into ribbons.

To layer the lasagna, start with tomato sauce on the bottom, then layer noodles, eggplant, cheese, chard, tomato sauce, noodles, tofu, cheese, chard, tomato sauce, and repeat until you have used all the ingredients. I like to end with a layer of tomato and cheese on top of the final layer of noodles. Bake in the preheated oven 45 minutes or as long as the box of noodles says.

If you plan to freeze, wait until it has cooled completely. Freeze within 24 hours of baking, good for about 5 days after thawing.

processed_20191110_193835.jpg

Breaded Eggplant

We love eggplant so much and all year we look forward to eggplants being in season. In celebration, this is the first of many eggplant centered posts!

20160307_193853.jpg

Makes: 2 1/2 sheet pan’s worth of cutlets

Time: 2 hrs

Ingredients:

3 medium eggplants, cut into 1/4” coins

kosher salt

1/2 cup cornstarch

1/2 tsp salt

4 pieces of toast or two cups of bread crumbs (a gluten free bread or crumb will work here)

1/2 cup oats gluten-free option

3/4 cup sunflower seeds

2 tbsp garlic powder

1/4 cup nutritional yeast

1 tbsp salt, if your sunflower seeds are salted, you will need less salt.

3/4 tsp pepper, divided

3 or 4 eggs

olive oil


Cut the eggplants into round slices between 1/4 and 1/2 inch in thickness.  We leave the skins on, but if you want less fiber, skin the eggplant before cutting. Layer them in a colander salting each layer generously. Leave eggplant to drain about 20 minutes. This will pull the moisture from the eggplant allowing it to cook faster and get sweeter. During this time, prepare the bread crumb mixture and pre-heat the oven to 375 F.

Rip your toast into chunks before putting it into the food processor with the oats.  Blend them until they are sandy with slightly larger chunks.  Add the sunflower seeds, garlic powder, nutritional yeast, salt, and 1/2 tsp pepper.  Blend until the majority of the sunflower seeds have been cut at least once, but not so far that the mixture looks homogeneous. Leave some sunflower seed chunks. Once the eggplant has been salted for 20 minutes it should have released some moisture that you will be able to see on the surface. Press the eggplant between kitchen towels to remove the moisture and some of the salt. Assemble a workstation with a shallow bowl of beaten eggs, a shallow bowl of cornstarch mixed with 1/2 tsp of salt and 1/4 tsp pepper, and a shallow bowl of the breadcrumb mixture. Dip the eggplant in the cornstarch, then the egg, and then breadcrumbs. Start with two eggs and add more as necessary to coat all the eggplant.

Lay the coated eggplant out on baking sheets. Using a pastry brush, dab oil onto both sides of each eggplant. If you don’t have a pastry brush you can use a spoon to gently put a bit of oil onto the eggplant at a time. Bake in the oven for 1 hr flipping every 20 minutes.

The photo we’re sharing today is these babies served with pasta, tomato sauce, and Kite Hill Almond Ricotta.  It was fantastically delicious, but far from the only way we like to eat them!  We like to make a big batch of these on the weekend and eat them during the week when it is hard to fit in cooking with work.  We love them on a bagel as a sandwich, or just eating them as a snack.  We have also cut them up and thrown them on top of a salad.

Watermelon Slushie

This August we are soaking in the heat and all the delicious watermelon. If you have a Vitamix and a tamper (an attachment for the blender that allows you to push the things you are blending into the blades while it is running), here is another delicious way to consume your watermelon! We prefer different levels of sweetness, so the agave is optional. Make sure to taste and add sweetener to the level you prefer.

processed_20200725_144451.jpg

Makes: 16 oz

Time: 15 minutes (but the watermelon needs at least a night to freeze)

Ingredients

2 heaping cups cubed frozen watermelon

3/4 coconut water (or sub tap water)

1 tsp agave (optional)

1 pinch salt

Heavy squeeze lime

1/4 cup loosely packed mint leaves


Add all the ingredients in blender and blend until smooth. Serve and enjoy!

Chickpea Caesar Salad

August heat brings us delicious sweet tomatoes and crunchy cucumbers. One of our favorite ways to eat these are in this delicious Caesar salad. If you don’t want to cook the crispy chickpeas you can purchase these. Many natural food stores sell some sort of chickpea snack often found near other small snacks.

IMG-0166.JPG

Serves: 2-4 as a meal; 6-8 as a side

Time: 1 hr

Ingredients

1 head lettuce

1 medium cucumber, chopped

2 cups crispy chickpeas

1 cup cherry tomatoes, halved

1 bell pepper, cored and sliced

1/2 cup sliced radish

2 medium carrots cut into thin coins

6 tbsp capers

salt

For the dressing:

3/4 cup soaked cashews

1/2 cup water

3 tbsp olive oil

4 tsp lemon juice

1/2 tsp mustard powder

3/4 tsp garlic powder

1 clove garlic

1/4 tsp caper liquid

2 tsp capers

3/4 tsp salt

1/4 tsp black pepper

Optional garnish:

2 tbsp sesame seeds

2 tbsp nutritional yeast


Wash, spin or drip dry, and chop the lettuce. Rinse and slice all the veggies. Camille likes to remove the cucumber seeds by slicing the cucumber in half and scooping them out with a spoon before chopping the cucumber up into small bits. This can keep the cucumber extra crunchy, but if you love the seeds feel free to leave them in.

Scoop out 6 tbsp of capers and remove the liquid from them. Don’t throw this liquid away, as you will use some in the dressing. Heat a small pan with 1 tbsp olive oil until hot but not smoking. Add the capers to the hot oil. Then salt generously. Stir constantly for about 7 minutes until they are dark and slightly crispy but not blackened. Remove from oil and set aside.

If you are using the optional garnish, blend the sesame seeds and nutritional yeast together in a dry blender until it is powdery. Set aside. Do this step before mixing the salad dressing ingredients to save on dish washing and because once the blender is wet it is impossible to blend the dry garnish.

Next, put all the salad dressing ingredients in the blender and blend until smooth.

Anne’s favorite way to serve this salad is to put the lettuce and salad dressing in a bowl and toss until completely coated. Then add the toppings and enjoy!

IMG-0168.JPG

Alfredo Lasagna

We love alfredo pasta and we love lasagna, so we decided to put them together and use up some of the larger zucchinis we’ve had access to this summer!

processed_20200627_200200.jpg

Serves: 4-6

Time: 2 1/4 hrs (1 3/4 hrs active)

Ingredients

1 large head broccoli, cut in small florets

2 med zucchini, cut in half coins

3 cups chopped wild mushrooms

8 cloves garlic, minced or pressed

oil

1 box lasagna noodles, gluten-free option

4 large chard leaves, cut into ribbons

2 tbsp nutritional yeast

salt

For the sauce:

1 cup cashews soaked for at least 30 min

3 cups water, divided

1/2 lemon, juiced

1/2 tbsp garlic granules

1/4 cup nutritional yeast

1 tsp salt

1/8 tsp red pepper flakes

1 small onion, sliced

2 tbsp white wine (optional)

5 cloves garlic, minced or pressed


Put cashews in water to soak. Boil a pot of well salted water. If you aren’t sure how much salt to use, the water should taste similar to seawater. Once boiling, add pasta and cook to desired consistency (follow instructions on pasta package). Once pasta is done, strain and thoroughly cool down with cold water. Add a little bit of oil to keep the pasta from sticking.

While the pasta is cooking, cut your veggies. Cut mushrooms into small pieces. Cut broccoli into small florets and cut the stem into pieces the size of a penny. If you aren’t using a garlic press, mince the garlic. Cut the chard into ribbons and slice the onion.

Fry the mushrooms in oil at medium heat until you start to get browning. Set the cooked mushrooms aside and cook the broccoli the same way until some of the florets start to get browned. Then add 8 cloves of garlic, minced, or press the garlic straight into the broccoli and cook another couple minutes so the broccoli is browned and the garlic is fragrant but not burnt. Set aside. In the same pan, saute the zucchini until browned. Cook the zucchini long enough that most of its moisture has been removed, otherwise it will release the moisture while baking and make your lasagna soupy. Once this is browned, set aside.

Drain the soaked cashews. Add the cashews, 1 cup of water, lemon, garlic granules, nutritional yeast, salt, and red pepper flakes to a blender and blend until smooth. To test the consistency, put a small amount of sauce on your finger and rub your fingers together. If it is completely smooth then you are there! If it feels at all like there is some sandiness, keep blending.

Preheat the oven to 350 F.

Re-heat and add some oil to the pan you used to cook the vegetables. Saute the onion until it caramelizes and turns a beautiful brown color. You will need to stir less at the beginning, but as the onion starts to break down you will need to be stirring non-stop. When the onion is close to done add the garlic, and stir for another 2-3 minutes. If the onion starts to stick, de-glaze the pan with a bit of white wine (optional) or water. Add the cashew alfredo sauce to the pan and stir until slightly thickened. Add the remaining 2 cups of water to the blender and pulse briefly to clean out the blender and then add this to the sauce. Once the sauce is slightly thickened, turn off the heat.

Set aside 1/3 cup of alfredo sauce. To layer the lasagna, start with a bit of alfredo, then layer pasta, alfredo, broccoli and chard, pasta, alfredo, zucchini and mushrooms, and then repeat. End with a layer of noodles and cover with the reserved 1/3 cup of alfredo sauce. Sprinkle the remaining 2 tbsp nutritional yeast, swirl it into the top layer of sauce, and bake for 30 minutes, or until the top starts to crisp a bit.

Enjoy!

processed_20200627_200219.jpg

Chocolate Cake with Hazelnut Frosting

Hi, this is Anne writing the intro.

Today would have been my father’s 104th birthday so we are sharing a chocolate cake recipe with you all to celebrate. When I was a kid, probably about the age of 12, my father started putting a box of cake mix and a jar of icing at my place at the table the morning of his birthday. He loved cake, but I suppose he didn’t think that he should have to bake his own birthday cake. So from a young age it was my job to make sure he had a cake each year for his birthday, and he would remind me with the box of cake mix. My father passed away 12 years ago now, and the first year after he was gone his birthday rolled around and I was in the middle of a move and felt like I couldn’t do justice to the day. But a few days later I baked a chocolate cake in his memory. It’s now a tradition for me. I bake a cake on my father’s birthday, and over the years I have developed this recipe for a chocolate cake with chocolate hazelnut frosting. When I first started to modify the recipe so that it would feel better in my body I felt like I was betraying him. I worried that he wouldn’t approve of the changes, but over time I realized that the cake isn’t for him. It’s for me, a way to recognize my grief. Grief is a funny thing. For years, every day I wished that I could call my father, hug him, bake for him, cook for him, or just know he was still in the world. There were many times when something exciting happened in my life and I thought I should call him, before remembering that was not an option for me anymore. These days I still miss him, I still love him, but I go weeks or months without feeling the pain of his loss. I make a point of remembering him every year on his birthday with this cake, and I hope you will join me in celebrating this day.

This recipe calls for roasted hazelnuts and coconut sugar. If you can only find raw hazelnuts you can roast them at home in the oven in about 15-20 minutes. Put them on a baking sheet in a 350 F oven and give them a stir or shake every five minutes until the skins are darker brown. Coconut sugar is sold under multiple names including coconut palm sugar and brown coconut sugar. Any variation would work in this recipe including replacing with cane sugar, date sugar, or maple sugar.

processed_20200628_191802.jpg

Pans needed: 2 6-inch round cake pans (if you only have one you can make this in batches it will just take twice as long).

Serves: 4-6 servings

Time: 1 hr

Ingredients

For the cake:

3/4 cup + 2 tbsp all purpose flour

3/4 cup coconut sugar

1/4 cup + 2 tbsp cocoa powder

1 tsp baking soda

1/2 tsp baking powder

2 tsp vanilla powder (option to replace with vanilla extract)

1/2 tsp salt

1 room temperature egg

1/2 cup almond milk

1/2 tsp apple cider vinegar

1/4 cup neutral oil

1/2 cup hot coffee

For the icing:

3/4 cup roasted hazelnuts

3/4 cup soaked cashews

4 dates

1/4 cup cocoa powder

1 tsp vanilla powder (option to replace with vanilla extract)

1 tbsp maple syrup

1/4 tsp salt

1/4-1/2 water depending on how thick you want the icing to be. Less water is more fudgy, more water is fluffier.


processed_20200628_165410.jpg

This cake can be made by hand or with a mixer, however we use a mixer because we have one.

Pre-heat the oven to 350 F and make hot coffee. Spread oil into your cake pans and add 1 tbsp of cocoa powder and shake until bottom and sides are coated. Mix the dry ingredients (flour, sugar, cocoa powder, baking soda, baking powder, vanilla powder, salt). In a separate bowl or using a liquid 2 cup measuring device combine the almond milk, apple cider vinegar, neutral oil, and the egg. Break the yolk up, but no need to whisk the egg. Add this to the dry ingredients and mix until just combined, careful not to over mix. While you are stirring add the hot coffee and watch it transform into liquid smooth velvety cake batter.

Divide the batter between the two cake pans as equally as possible. Bake in pre-heated oven for about 30 minutes or until you can touch the center of the cake and it bounces back, however it should not be firm and should still have a slight wobble to it. Remove from the oven and let the cakes cool for about 5 minutes.

Wearing hot mitts, pick up the cake and tilt to about 45 degrees. Using the palm of your hand (in the hot mitt) pat the side of the cake pan and then turn the cake pan. Repeat this until you’ve tapped all the way around the pan. Next turn the pan upside-down, turning the cake onto a wire rack, clean counter top, or plate. Then lift the pan off of the cake. Flip your cake over so that the cake is right side up and let it cool completely before frosting.

Put roasted hazelnuts in your food processor and blend, stopping to scrape down the sides regularly until you have hazelnut butter. Drain your cashews and add them, with the rest of the icing ingredients, to the food processor. Blend, scraping down regularly until you have a smooth creamy icing. For the water, start with 1/4 cup and then add the water 1 tbsp at a time until you have the consistency that you like. The less water you use the more it will be like Nutella, the more water you add the more fluffy the icing will be.

Once your cakes have cooled, place the first cake onto a plate. Using a serrated knife, cut the rounded top of the cake off, just enough to create a flat surface. Generously spread icing onto the top of the first layer. Put the second layer on top, cutting off the top for a cleaner look or leaving it on for a rounded top. Spread icing over the top and sides. To get a smooth finish on your icing, use an icing spatula or knife to spread the icing onto the cake. In between strokes on the cake, wipe the icing off the spatula or knife and rinse in hot water. The hot knife will smooth the icing more effectively and stop the knife from creating a peak when you lift it off the icing.

Cut into slices and enjoy!

CulverAnne1987.jpg

Crispy Chickpeas

There are still protests happening all over the country and we are grateful for the years of Black leadership that have gone into the current set of uprisings. We are keenly aware that freedom will not be achieved until All Black Lives Matter and this will not happen because of White folks, but also not without White folks. One way to stand in solidarity and support Black Leadership is to donate to Holistic Resistance’s Grief to Action Camp Fundraiser. If you are confused by why people are protesting, we recommend watching The 13th. It is a great look at some of the underlying structures of racism that have led us to where we are today.

We love making these crispy chickpeas and keeping them on hand to snack on, take to protests, or to sprinkle on salads, or as a garnish on soup. This recipe calls for cooking the chickpeas from dried. It is best to start the chickpeas cooking in advance. You can even cook them the day before you bake them. If you don’t have access to dried beans or would prefer to have quicker crispy chickpeas canned chickpeas can be substituted. If you want a more flavorful experience when using canned beans, double the garlic powder.

IMG-0183.JPG

Makes: 2 cups

Time: 2.5 hrs with an Instant Pot, more if cooking on stove top half the time if using canned chickpeas

Ingredients

1 1/3 dried chickpeas* (option to replace with 2 cans of chickpeas)

3 T olive oil

2 tsp garlic powder

1 tsp salt


Step 1: Cook the chickpeas using an Instant Pot or on the stove. (If you are using canned chickpeas skip to step 2)

In the Instant Pot: Add 1 1/3 cup of dried chickpeas to the pot. Cover the beans with water (in the small Instant Pot this is about 6 cups of water), season with 1 tbsp kosher salt, 1 tbsp cumin, 1 tbsp garlic powder, and 1/4 tsp cayenne. Set the Instant Pot to pressure cook for 35 minutes letting depressurize naturally.

On the stove: If you don’t have an Instant Pot, you can easily cook chickpeas from scratch with a little planning. First you will need to soak the chickpeas which can be done one of two ways. 1. you can soak them overnight making sure they have enough water and space to double in size or 2. you can put them in a pot and bring to boil, then turn off the water and let soak for one hour. Again, make sure you have enough water and space that they can double in size. Once you have soaked your beans, rinse them and then put in a pot with salty water. These will be cooking for about 2 hours so you don’t want as much salt as you would use for pasta, but you do want to add enough that you can taste the salt in the water. The best way to get good at this is to practice. Each time you salt the water, taste it and when the beans are done taste them to see if they are well salted. A well salted bean should taste flavorful but not salty. If it tastes like you are eating salt, you added too much. If the bean lacks flavor then you didn’t have enough salt. For this recipe, also add 1 tbsp cumin, 1 tbsp garlic powder, and 1/4 tsp cayenne to the chickpeas as they cook. Cook the chickpeas until they are soft but not falling apart (this will take 1.5-2 hours). We recommend checking the beans at about an hour and then every 20 minutes until they are soft but not disintegrating. Make sure your pot has enough water as I have definitely cooked all the water off before and burnt the beans!

Step 2: Preheat the oven to 350 F. Drain and rinse the beans. Put the chickpeas on a sheet pan and drizzle with olive oil. Sprinkle the chickpeas with garlic powder and salt and stir to coat evenly. Spread the chickpeas out into a single layer and roast 45 minutes to 1 hour, stirring every 20 minutes until they are golden brown and crispy.

IMG-0176.jpg

Ranch Powder for Popcorn

Anne’s good friend, Kristin, requested a recipe for a vegan version of ranch seasoning for popcorn. Although we weren’t raised with ranch, we love the inspiration and are totally into eating this all the time. This topping could be used as a garnish on many things, like french fries for example! We haven’t gotten that far yet since we love popcorn so much. We would love to hear from you in the comments your favorite things to garnish with this delicious powder!

processed_20200630_162746.jpg
processed_20200629_173524.jpg

Serves: 2.75oz (80g) ranch powder mix which is enough for about 3 large servings of popcorn

Time: 15 minutes

Ingredients

1/2 cup powdered coconut milk

1/2 tsp citric acid

3 tbsp nutritional yeast

2 tbsp dried parsley

1 tbsp dried chives

2 tsp garlic powder

2 tsp onion powder

1 tsp kosher salt

1/4 tsp black pepper

pinch cayenne


Put the coconut milk in a bowl and fluff to break up any clumps. The more smooth you get it before adding the other ingredients, the more it will combine the flavors. Add the rest of the ingredients and mix until well distributed. I usually pop about 3 oz of popcorn and top with 4 tbsp of olive oil and 4 tbsp of the topping.

This topping can be kept in a jar in your pantry until you have eaten it all.

Chickpea Crepe with Tofu Scramble and harissa veggies

Do Better Consulting re-posted a tweet from MerQueenJude’s instagram… and we love it. Here’s the tweet:

2020-07-12 (2).png

It’s okay to be fat. Fat is simply a size and people come in different sizes. People often ask us what we blog about, and for us it’s simple: we share recipes of the food that we like to eat. This blog is about our creativity and joy in the kitchen. Because we often share recipes full of vegetables and because we use ingredients that are often expensive, people label our food as ‘healthy’ or morally superior. These ideas are a manifestation of diet culture which ties superiority and ‘health‘ to thinness. If you haven’t seen the Poodle Science video we highly recommend watching it.

Now that we’re clear that our food is not ‘better’, ‘the right thing to eat’, or somehow going to make you the perfect tool of capitalism or object of beauty, let us share with you a delicious chickpea crepe recipe!

Note that you can cook all the crepes at once, but when we aren’t planning to eat them all at once we will often only cook a couple of crepes for that night and then cook off more crepes during the week so that we can eat this for multiple meals. If you decide to do that, it will shorten the cooking time on the recipe below by at least 30 minutes.

processed_20200531_130735.jpg

Serves: 6-8

Time: 2 hrs

For the Chickpea Crepe

3 cups chickpea flour

2 1/2 tsp sea salt

3 1/2 cups water

3/8 cup or 6 tbsp olive oil

2 tsp turmeric

2 tsp coriander

2 tsp cumin

For the Carrot Top Pesto

small handful of carrot tops

2 cloves garlic

1/4 cup almonds or nut milk pulp from making milk

1/4 cup olive oil

1 1/2 tsp apple cider vinegar

1 tsp salt

For the Tofu Scramble

carrot top pesto

1 block tofu

1 tbsp corn starch

2 tbsp cooking oil

1/2 tsp turmeric

1/2 tsp garlic powder

1 tsp bouillon

1/4 cup of hot water

For the Roasted Harissa Carrots

4 medium carrots

olive oil

1/2 tsp salt

3 tbsp spicy harissa

1 tbsp agave

1 tbsp lemon juice

For the Roasted Cumin Cauliflower

2 small heads of cauliflower, romanesco, or a combination

2 tbsp olive oil

1 tsp salt

1 tsp cumin

1/4 tsp cayenne


Preheat the oven to 375 F. Mix the chickpea flour, salt, water, olive oil, and spices. Whisk until smooth and let sit for 30 minutes.

Cut the cauliflower into florets and the carrots into sticks. Toss the cauliflower with the olive oil and spices. Spread on a baking sheet and put in the preheated oven. Cook these until they are golden brown in places and soft when you stick a fork in them, which takes about 40 minutes. Stir every 15 minutes. Toss the carrots with olive oil and salt, and spread on a separate baking sheet. Roast in the preheated oven about one hour, stirring every 15 minutes. Stir together the remaining ingredients for the harissa carrots and set aside. Stir this mixture into the carrots when there are 15 minutes remaining. It will reduce and stick to the carrots.

To prepare the pesto, add the carrot tops, garlic, almonds or pulp, olive oil, vinegar, and salt to a food processor or blender. Blend, stopping to scrape down the sides regularly, until the ingredients combine in a chunky pesto. In a blender you may require some additional water to allow this to easily blend.

In a large frying pan, heat a small amount of oil. Once the oil is hot, add about 1/3 cup of chickpea batter to the hot pan. Tilt the pan to spread out the batter, and cook until golden brown and crispy on one side. Be patient, when the bottom is golden brown and crispy, the edges of the top will start to show color. Flip the crepe over and cook until speckled with golden brown on the second side. Cooking crepes to have a crisp but flexible texture takes some practice. Some tips are make sure your oil is hot before you add the batter. Don’t add too much batter. Allow the first side to cook until an even color is achieved before flipping. Remember, the first pancake rule applies to crepes as well. Your first crepe might come out under cooked and crumbly. Don’t be discouraged, keep cooking, be patient, and future crepes will be better.

We often cook as many crepes as we want to eat when we first make this dish. We then refrigerate the batter and fry fresh crepes for leftovers. When cooking batter that has been refrigerated, make sure to stir thoroughly before frying and, if it is too thick, you can add a little water to thin it out.

If you have two frying pans, you can make the tofu scramble at the same time as the chickpea crepes. Add oil to the frying pan and heat to medium low. Drain the tofu and crumble it into the hot pan. Add the corn starch and stir to coat. Fry, turning every 5 minutes, until parts are starting to brown, about 10 minutes. Add the turmeric, garlic powder, and salt. Cook about 5 more minutes stirring regularly until the tofu is coated. While it is cooking, dissolve the bouillon in hot water. Add the bouillon liquid to the tofu, and cook until there is no longer any liquid, but before the tofu gets dry again. Stir the pesto into the tofu scramble.

To serve, top chickpea crepes with the tofu mixture, roasted cauliflower, and harissa carrots. Enjoy!

Sweet N Salty Pitaya Bowl

This week our hearts are heavy and our bodies are exhausted as we continue the process of unlearning. We didn’t mention the 4th of July (Independence Day here in the U.S.) last week because we didn’t remember that it was coming up. Camille has many fond memories of celebrating this day with food, fireworks, and family. Never once did she stop think what this holiday is actually celebrating. She was taught that we were celebrating a great feat of independence, but today we are wondering independence for whom? While the core values claimed by the Declaration of Independence ‘life, liberty, and the pursuit of happiness’ seem worthy of pursuit, the fact is that it was only White cis-gendered heterosexual Christian colonists who were meant to receive these benefits. On July 4th, 1776 when the colonies adopted the Declaration of Independence chattel slavery was both legal and integral to the economy of the colonies. As the settlers claimed independence from the British Empire, we did so on stolen lands while committing genocide of indigenous people. This year we are seeing amazing protests sweep the world asking that our institutions stop killing Black people because of the color of their skin. While in 2020 chattel slavery isn’t supposed to exist anymore the prison industrial complex partners with police brutality to a similar affect. Feeling lost at how to reply to well-intentioned folks wishing her “happy 4th of July”, Camille used Rachel Cargle’s wise words “happy for who?”.

We are sitting with the questions of how to hold all of this knowledge. How do we hold the fond memories, the love of the values that should be core to our existence as a country, and also the death and brutality that this nation is built on. And, as we face this knowledge, how do we move forward? What do we do now that we know this? If you’re also having these thoughts reach out to us through email or text. If you’re also wondering how to hold the complexity of the life we are living, we are too. Let’s do this together.

This week we are celebrating with gratitude the full moon, the long July nights, and having fresh berries in season! In honor of these berries we’ve decided to share Camille’s favorite pitaya bowl recipe. We recognize that this bowl will be pretty expensive if you don’t already have a number of these ingredients on hand, and we don’t recommend trying to make it without a Vitamix with a tamping attachment. Feel free to play around with your own base and toppings and let us know what you love best!

We cook at home for a number of reasons including the pandemic, food allergies, money, and our love of cooking. Also, sometimes it makes more sense to eat out. For example, some recipes require so many ingredients that buying all of them to make one dish is very expensive and creates a lot of waste. For us, pitaya bowls often fall in the ‘makes more sense to eat out’ category. However, if you do want to make pitaya bowls from scratch at home, have some money to spend on ingredients, and have a Vitamix blender with tamping attachment then we highly recommend this pitatya recipe. It is sweet, fruity, salty, hearty, and delicious!

IMG_3673.jpeg

Time: 15 minutes

Serves: 1

Ingredients

for the pitaya base:

6 oz almond milk

6 oz frozen banana (if you have 24 hours you can chop your own banana and freeze the night before)

6 oz frozen mango

1 pack of frozen pitaya

1 tbsp chia seeds (optional)

1 tsp maca root powder (optional)

for the topping:

1/2 cup granola (gluten-free option)

2 tsp coconut oil, melted (optional)

1/4 tsp spirulina powder (optional)

1/2 banana, sliced

2 strawberries, sliced

12 blueberries (roughly)

1 tbsp chopped salted almonds, lightly toasted

2 tbsp peanut butter (we love Once Again for the flavor)

1 tbsp coconut flakes

2 tbsp coconut whip cream

1 tsp bee pollen (optional)

honey drizzle (as much/little as you like, if you don’t have coconut whip you might want extra honey)


IMG_3671.jpeg

If you want to experience the spirluna coconut ‘shell’ then start by melting the coconut oil and stir in the spirulina powder. If you aren’t using this you can start by slicing your almonds, and toasting them lightly in a dry pan.

Put all the pitaya base ingredients in Vitamix blender and blend on high using tamper to make sure everything gets fully incorporated. Be careful not to over-blend. Aim for a sorbet-like texture.

To assemble, layer the granola then the pitaya base. Next drizzle the warm coconut oil/spirulina mixture over the pitaya base (optional). As it cools it will form a coconut oil shell. On top of this, put sliced banana, sliced strawberry and blueberries around the bowl. Add the peanut butter in a clump and the coconut whip cream in a clump. Sprinkle the toasted almonds on top of the peanut butter and then sprinkle the whole bowl with coconut flakes. Top the whip cream with the bee pollen and then drizzle the entire bowl with local honey. Enjoy!

IMG_3669.jpeg

Curried Chickpea Salad

We’re grieving the loss of summer potlucks, picnics, and days at the beach with friends. Normally we would bring this chickpea salad, a bag of local cherries, and some chips to the river and just relax all day. With COVID, we’ve been traveling less but we still enjoy eating this delicious salad. I like to toast bread, cover it with mayo and then add this salad for a chickpea salad sandwich!

IMG-0069.JPG

Serves: 4 as side

Time: 20 minutes + chickpea cooking time

Ingredients

3/4 cup halved red grapes

2 cans chickpeas (1 1/3 cup dry*)

for the sauce:

1/2 med onion (1 cup) chopped

2 tbsp cooking oil

1 1/2 tsp curry powder

1/4 cup vegan mayo (soy-free option)

1/2 tsp salt

juice of 1/2 lemon (2 tbsp lemon juice)


IMG-0070.JPG

Slice grapes in half and chop the onion. Saute the onion in oil until it’s starting to be translucent, about 10 minutes.

While the onion is cooking, mash the chickpeas in a medium bowl. When mashing, the texture is important. You are looking to crush the chickpeas into a meaty texture but you do not want to over-mash as you could end up with hummus! Toss the chickpeas with the lemon juice and salt and set aside.

Once the onions are translucent, add the curry powder, stir for an additional minute and then remove from heat. In the pan you cooked the onions in, add the mayo, stirring to combine. Pour sauce into mashed chickpeas and stir to coat. Fold in the grapes and enjoy!

*Cooking Chickpeas from dry:

In the Instant Pot:

To cook the chickpeas, in an Instant Pot, add 1 1/3 cup of dried chickpeas to the pot.  Cover the beans with water (in the small Instant Pot this is about 6 cups of water), season with 1 tbsp kosher salt, 1 tsp turmeric, 1/2 tsp ground ginger, and 1/8 tsp cayenne.  Set the Instant Pot to pressure cook for 35 minutes letting depressurize naturally. Drain and rinse before adding to the dish.

On the stove:

If you don’t have an Instant Pot, you can easily cook chickpeas from scratch with a little planning. First you will need to soak the chickpeas which can be done one of two ways. 1. you can soak them overnight making sure they have enough water and space to double in size or 2. you can put them in a pot and bring to boil, then turn off the water and let soak for one hour. Again, make sure you have enough water and space that they can double in size.

Once you have soaked your beans, rinse them and then put in a pot with salty water. These will be cooking for about 2 hours so you don’t want as much salt as you would use for pasta, but you do want to add enough that you can taste the salt. The best way to get good at this is to practice. Each time you salt the water, taste it and when the beans are done taste them to see if they are well salted. A well salted bean should taste flavorful but not salty. If it tastes like you are eating salt, you added too much. If the bean lacks flavor then you didn’t have enough salt.

For this recipe, also add 1 tsp turmeric, 1/2 tsp ground ginger, and 1/8 tsp cayenne to the chickpeas as they cook. Cook the chickpeas until they are soft but not falling apart (this will take 1.5-2 hours).  We recommend checking the beans at about an hour and then every 20 minutes until they are soft but not disintegration. Make sure your pot has enough water as I have definitely cooked all the water off before and burnt the beans! This may seem like a lot of work, however once you get the hang of it the work is almost all passive and the reward is high: chickpeas cooked from scratch taste much better and are much cheaper!

Lettuce Wraps

We love how the crunchy, sweet lettuce pairs with this soft and savory tofu in these wraps. The combination of textures and flavors is as satisfying as the dish is pleasing. Camille’s favorite lettuce varietal is black seeded simpson lettuce and that is what we recommend, however these taste delicious with any lettuce varietal.

fullsizeoutput_e12.jpg

Serves: 2

Time: 1 hr

Ingredients

2 tbsp sesame oil

1 package of firm tofu

1 tbsp corn starch

2 cloves garlic, minced

1 very small onion, diced

1 cup minced mushrooms

1 cup finely cut cabbage

1 cup grated carrot

2 green onions, sliced

1 head lettuce

salt and pepper

for the sauce:

1/4 cup tamari (gluten-free soy sauce)

2 tbsp rice vinegar

1 inch ginger, peeled and minced

1/2 tsp maple syrup

1 tbsp almond butter


Whisk the sauce ingredients in a medium bowl until the almond butter is broken up. Mince garlic and ginger, and dice onions and stir into the sauce until coated. Set aside.

Heat a pan to medium high heat with sesame oil. Once hot, crumble the tofu into the hot oil. Sprinkle with corn starch and stir to coat. Let cook about 7 minutes, until the bottom of the tofu has started to brown. While tofu is cooking, cut the cabbage and mushrooms and grate the carrots. Add the mushrooms and cabbage and cook with the tofu, stirring regularly until the cabbage softens about 7 minutes. Then stir in garlic, onions, ginger and sauce mixture. Cook until onions are translucent, about 10 minutes. Stir in carrots and green onions. Season with salt and pepper to taste.

Wash the lettuce and pull apart into individual leaves. Scoop tofu mixture into lettuce leaves and enjoy!

IMG_2417.JPG

Green Goddex Fried Tofu

Introductions are something we struggle with. Often we just want to share a recipe with y’all, but we realize that it’s socially normal to also say things about the recipe or the world in the intro. Additionally we love using our platform to speak up and share what we’re learning and hearing as we do anti-oppression work. This week our big yes is a short intro, so here it is:

This is one of our favorite game snacks. We imagine it would be good to eat while watching a sports ball game, we eat it when having board game or D&D nights. Paired with our Pea-tatoes from last week it makes a delicious dinner.

processed_20200316_191009.jpg

Serves: 4 as a side

Time: 1 1/2 hrs (1 hour active time)

Ingredients

for the marinade:

2/3 cup tamari (gluten-free soy sauce)

1/2 cup water

1 tbsp maple syrup

1 tbsp balsamic

1 tsp ground ginger

1 tsp garlic powder

pinch of cayenne

for the tofu:

2 blocks of tofu

1/2 cup cornstarch

1 tsp salt

for the sauce:

3/4 cup soaked cashews

1 clove garlic

1 tsp salt

2 tbsp lime juice

1/2 tsp apple cider vinegar

1/2 cup packed basil leaves

2 cups loosely packed cilantro with stems

1/2 cup water


processed_20200316_191030.jpg

Cut your blocks of tofu in half so that you have four, one inch thick rectangles. Press tofu between two kitchen towels, placing a cast iron pan, or something heavy on them to remove some of the liquid. This process can be done with a tofu press. While the tofu is draining, combine all the marinade ingredients and whisk until smooth. Slice the tofu into cubes or thick sticks toss in the marinade mixture. Allow tofu to sit in mixture for 30 minute, making sure to gently turn the tofu after 15 minutes so that everything receives marination.

Combine the cornstarch and a generous pinch of salt in a shallow bowl. Drain the marinade (you can save this in a jar and use if for a different dish). Toss the tofu a couple of pieces at a time in the cornstarch mixture until coated on all sides. Heat 2 tbsp of neutral oil in a frying pan. Once hot, fry the tofu in batches on med-high making sure it gets golden brown on all sides. Be careful not to crowd the tofu as that will make it all stick together. We use tongs to turn each piece separately.

To make the sauce, drain the cashews from the water they were soaking in and add them and the remaining sauce ingredients to your blender and blend until smooth. Serve the tofu in a bowl with sauce on the side. Dip and enjoy!

Garlicky mashed pea-tatoes

Sometimes we feel all the things. Joy and grief can co-exist. We want to start with the joy we feel that the global uprisings in response to the murder of George Floyd, Breonna Taylor, and countless others are creating change! For those of you on the front lines protesting, for those of you sending money to support the uprisings, to the countless hours of un-paid Black labor that went into organizing this moment, and for all the labor that continues we thank you. Thank you for standing up to systemic racism and oppression, thank you for your work. Let’s celebrate together that the Minneapolis City Council is supporting de-funding police! Our voices can be heard. There is a long way to go and we need all of us in this work.

We also hold the grief of the immense amount of Black death and suffering that has, is, and will continue to happen until we can take down systemic racism. This is a lot to hold for us. If you are new to this work, and you are just seeing the injustice and inequity remember to be soft with yourself. We need you here today, tomorrow, and in 50 years. This moment didn’t come from nowhere, and the fight will continue. We trust that you are and will keep doing your part.

One thing we do to care for ourselves is eat lots of comforting foods. Comfort food looks different for everyone. For me, comfort food is usually something with a good amount of fat and salt preferably potato based. Also, any food that brings me back to sweet memories from my past is so comforting. It’s also a good reminder that food is never just one thing. White supremacy and diet culture often reduces food to it’s nutritional value. Food is so much more than nutritional value and it’s time that we re-contextualized the way that we think about it. Today, for me, that means remembering that comfort food can be relational. This recipe isn’t just about getting calories into my body (which is important and I’m thankful to be able to do). It’s also about remembering a deep friendship 30 years in the making and continuing.

This recipe is something Anne started making before she turned 10. At an early age we were already experimenting with different food combinations and enjoying inventing in the kitchen. We used to make ‘soup’ by throwing lots of random ingredients (whatever we could reach) into a pot of water and then telling our parents we had cooked for them. They were good sports, always saying how much they loved the food we made (even though we’re pretty sure they were only pretending to eat it). At one point, Anne started mixing peas into their potatoes and dubbed them pea-tatoes. For years, neither of us would eat mashed potatoes without peas (I’m sure our parents loved this new rule).

I’m making this for dinner tonight and I’m remembering how lucky I am to have such a deep friendship with this beautiful human who creates amazing food. I’ll be connecting to how the calories fuel my physical body and how the memories connect me to sweetness. This will be part of my survival kit. #covidcooking.

processed_20200504_113416.jpg

Pictured above: Anne + Camille cooking together at a young age.

processed_20200316_191009.jpg

Serves: 6 as a side

Time: 45 minutes (20 minutes active)

Ingredients

6 medium potatoes (I like the red ones)

1 head garlic 

A drizzle of olive oil

2 tbsp salt

3/4 cup cashews + water to soak them in

1/2 cup water

1/4 cup olive oil

1 cup frozen peas


Preheat the oven to 375 F. Cover the cashews with water and put them in the fridge until you make the mashed potatoes. Roast the garlic. You can do this a number of ways and our two favorite are to use a garlic roaster or a small cast iron pan. If you are using a garlic roaster chop the tops off the garlic, drizzle a bit of oil into the garlic cloves, put this into the garlic roaster and roast in the oven for about 45 minutes. To use a small cast iron pan, peel the garlic and place cloves in the cast iron pan with a small amount of olive oil. Roast this in the oven for about 20 minutes, stirring every 10 minutes. Either way, the garlic should look golden brown and be very soft. With the cast iron method, it is easier to burn the garlic so make sure to check on it.

Quarter and boil the potatoes in very salty water until tender. The water should taste about as salty as sea water so that the potatoes soak in the water and are perfectly salted when done. Don’t worry if these feels like a lot of salt; you will be draining the water. Cook potatoes until almost tender, about 6 minutes, then add the peas to the boiling water, cook for another 4 minutes. Drain the peas and potatoes when the potatoes are fork tender.

Drain the soaked cashews and add them to a blender (we like the Vitamix) with 1/2 cup water until smooth. You can test for smoothness by rubbing some between two fingers. If it feels at all gritty, keep blending. Mash the cooked peas and potatoes with the roasted garlic, cashew cream, 1/4 cup olive oil, and nutritional yeast. We do not recommend mashing with a hand mixer as this can make your potatoes gluey.